A place to share our camping experiences, gear reviews and DIY projects that let us easily transform from daily life into camping adventure with minimal cost. Actually, it was not too easy and we still spent a lot of money. But the most important thing for us is to regularly transform our live into a camping adventure and explore many beautiful places.One of our favourite camping scenes.
Places
Our favorite (including not so favorite) camping spots.
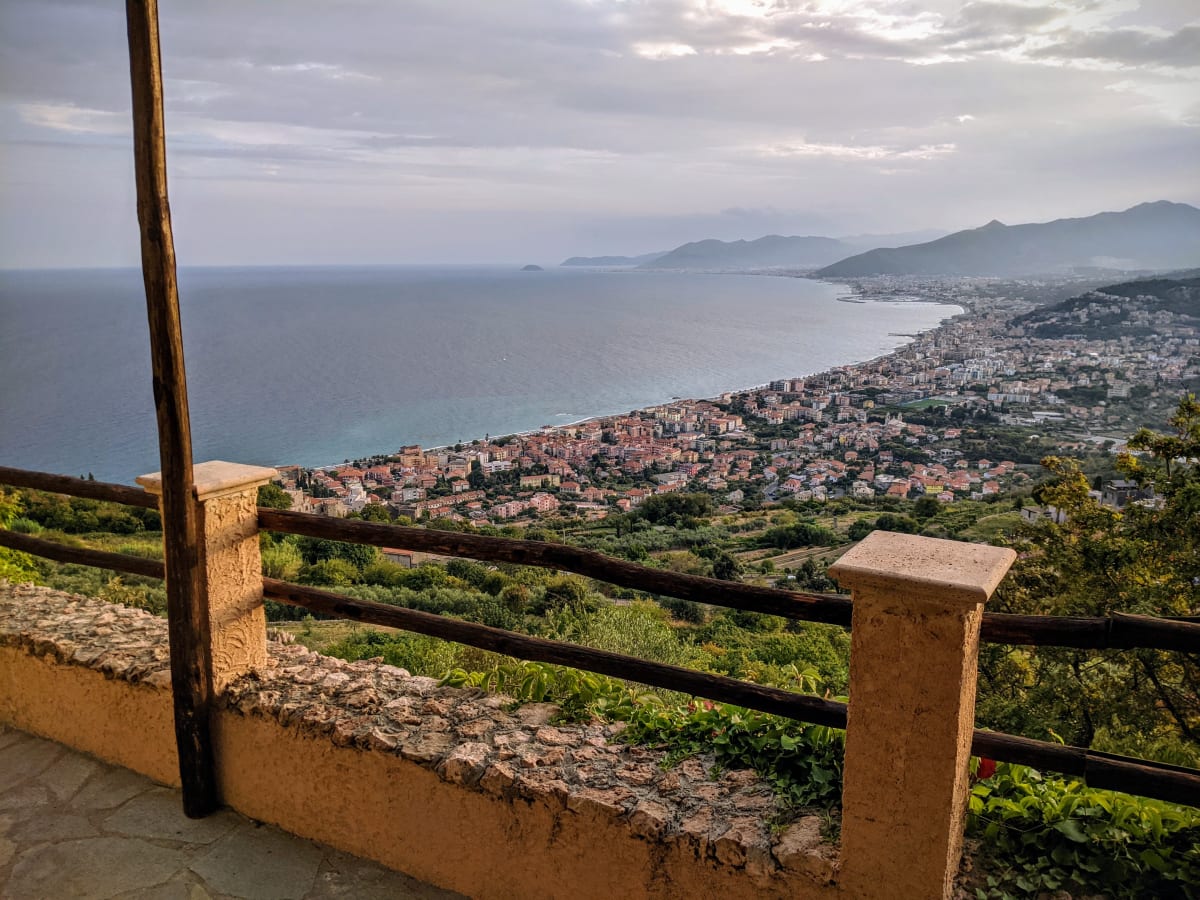
Finale Ligure
Susi · 2021-09-16
A night in Liguria, high above Finale Ligure, and a pizzeria with an incredible view.
From France onwards to Italy – as a stopover I had booked a place in Finale Ligure, though a bit
outside of town up in the mountains. Luckily Fred took over the mountain road – steep, curvy, that
is nothing for my nerves. I had read that the parking was a short walk from the accommodation, but
the photos on booking.com had instantly convinced me. Once we arrived at the top, we walked off in
the wrong direction with all our bags. We ended up in a small, picturesque village. We thought we
had found the key safe of our accommodation and were puzzled that the code did not seem to work. Then
the courtyard slowly filled with people dressed up for a celebration, and we had wandered right into
a wedding venue. At the latest when the bride and groom appeared, it became clear that something was
not quite right. After Fred took over the navigation, we finally found the place. It was a simple
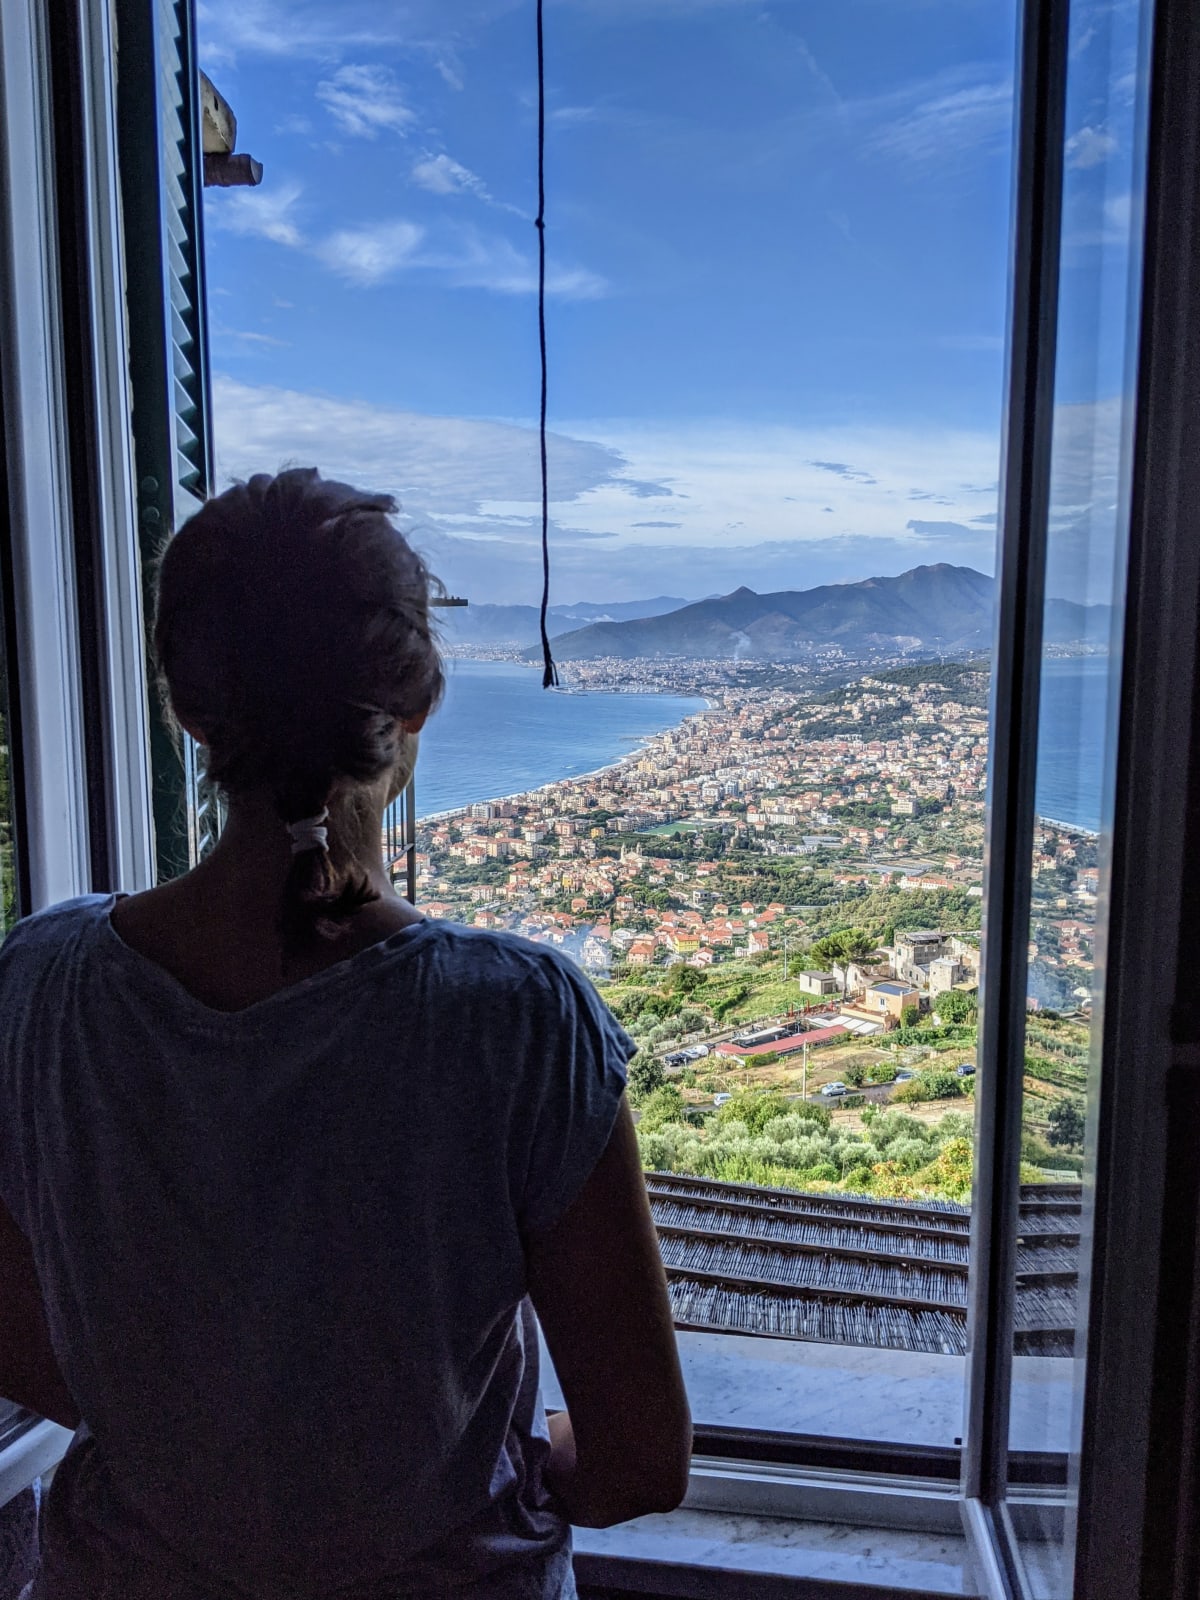
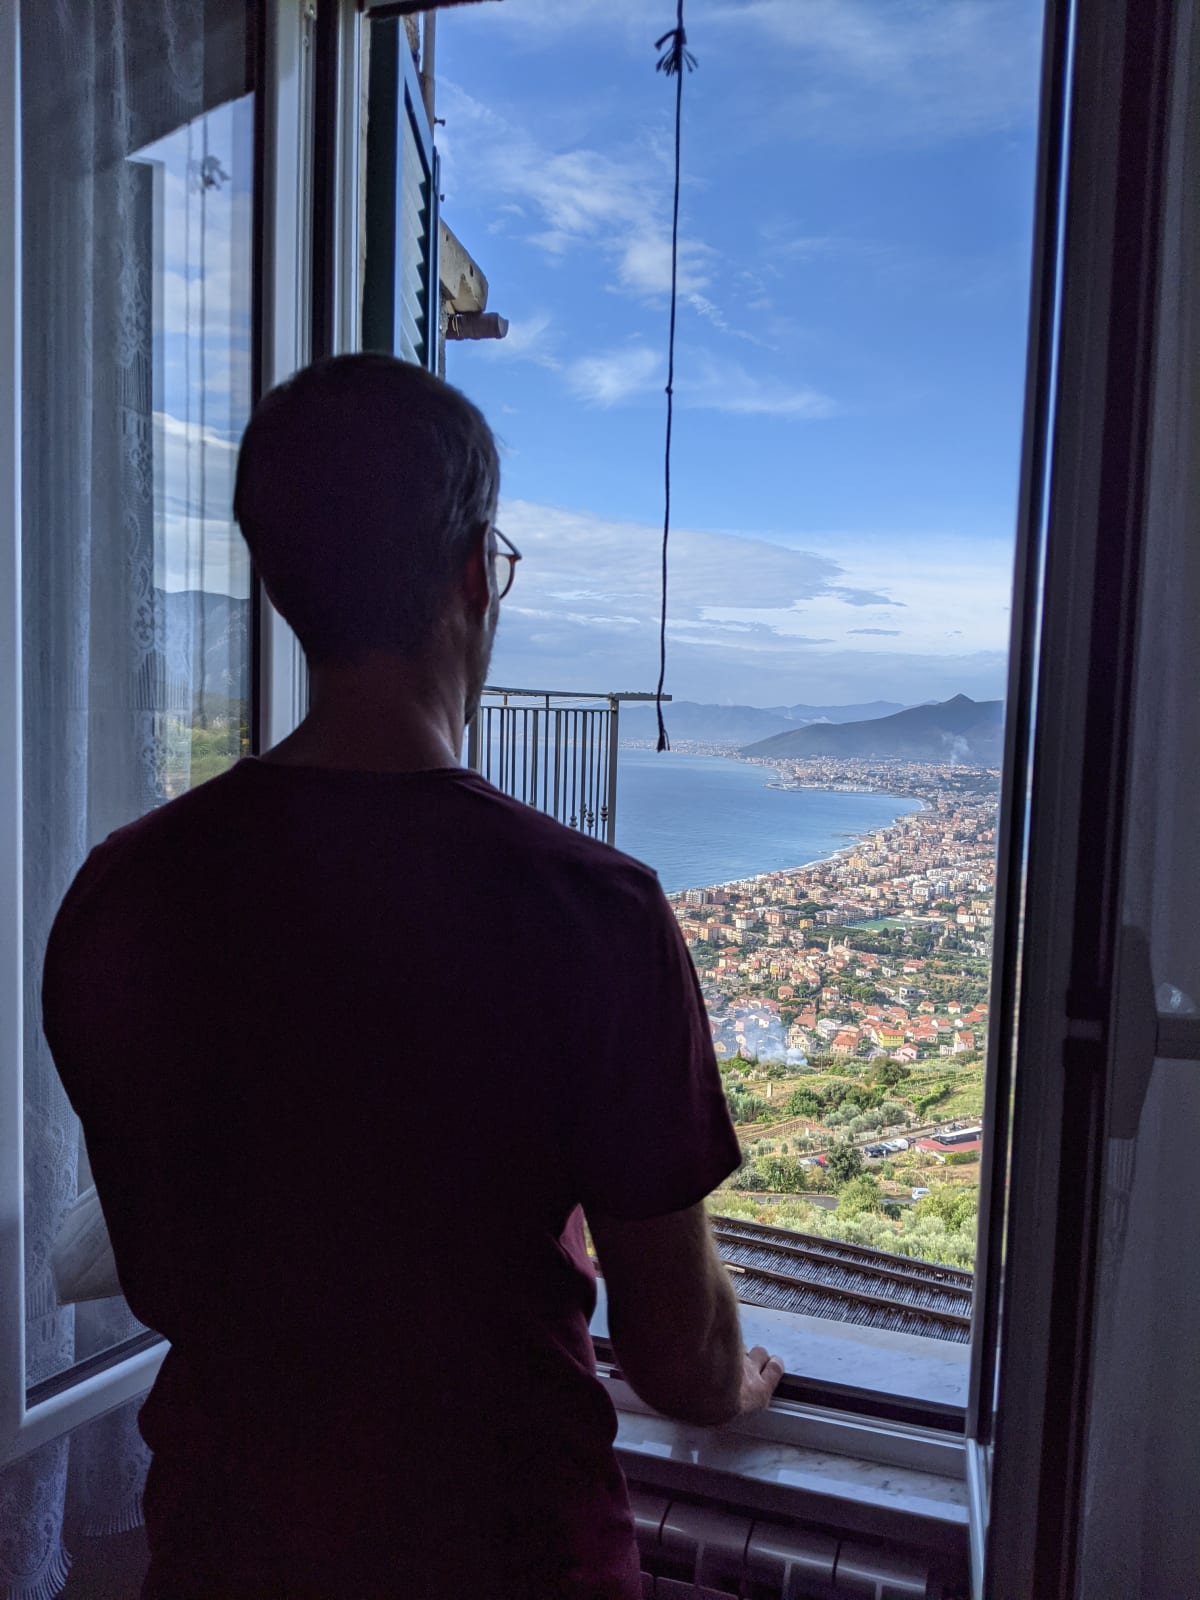
room with a bathroom, but the view from the window delivered exactly what the photos had promised.
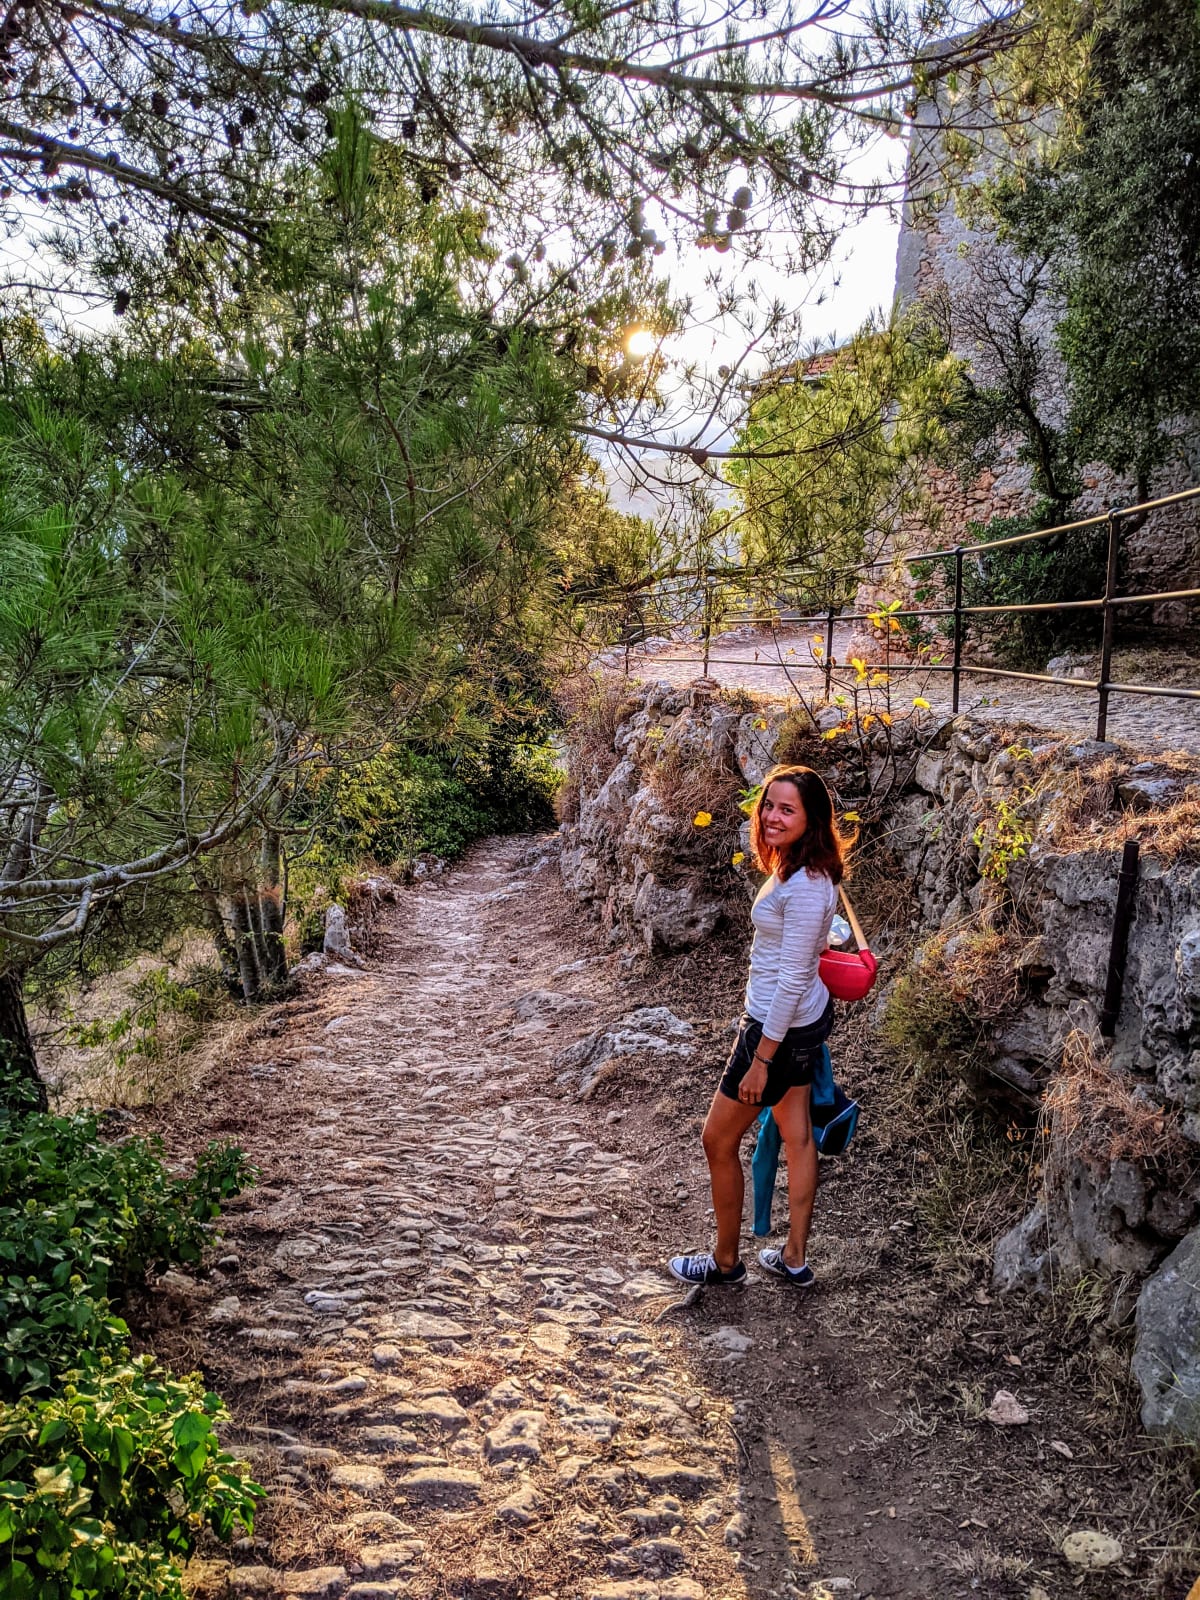
In the late afternoon we set off to explore the surroundings a bit. Down to the next little town
there was a trail through terraced plantations on the hillside – a half-hour walk, the path lined
with huge aloe vera plants. After a short stroll we turned back and went looking for a restaurant.
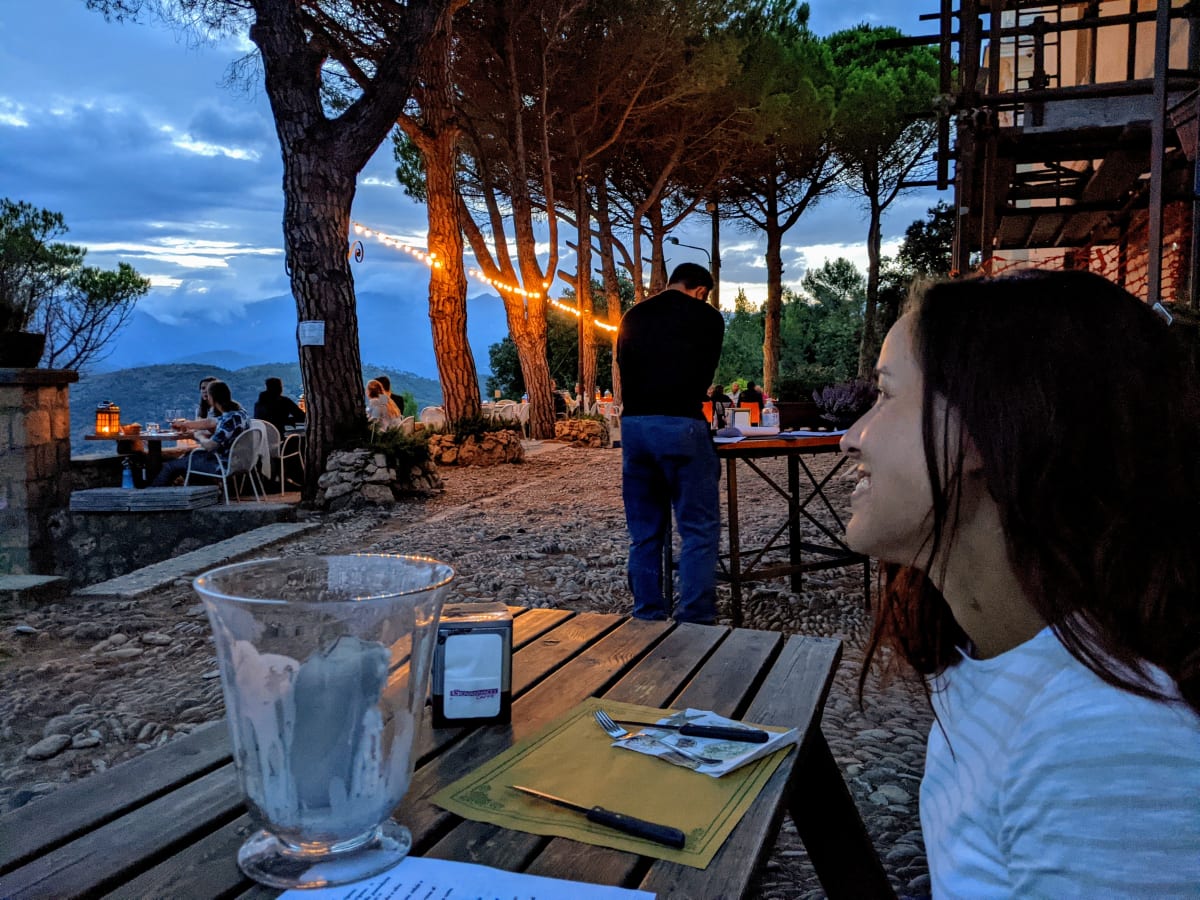
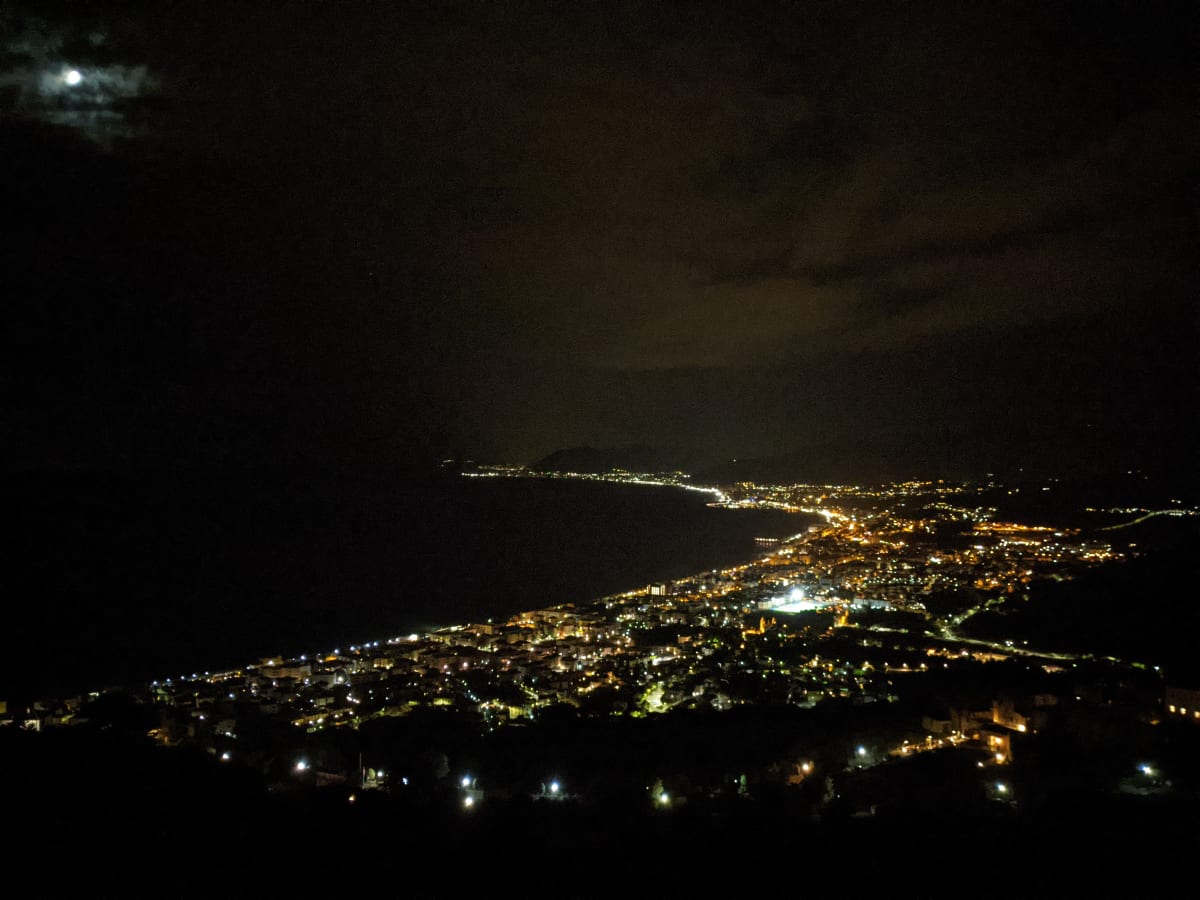
A bit further up from our accommodation we found the restaurant of our dreams: atmospheric lighting
and a breathtaking view over a sea of city lights along the coast below. The only seats left were on
the backup "here you only get pizza" bench. Exactly our style. The pizza and the wine were delicious.
A really lovely evening.
The next morning, once back down at the coast, we jumped into the sea one last time, then headed
home. We made one final stop at Lake Garda (but the hotel was rather disappointing, so there is no
text about that).
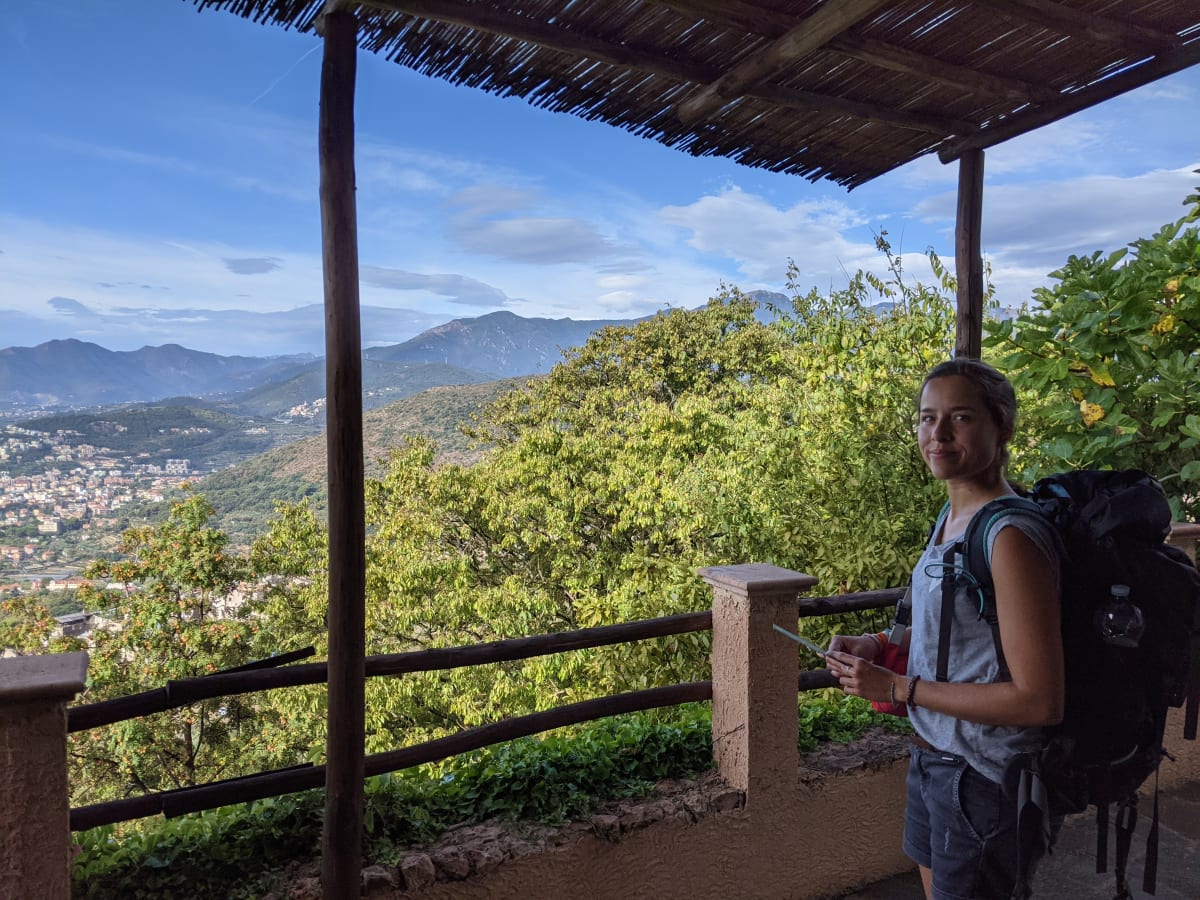
View from the accommodation over Finale Ligure and the coast.The trail down through the plantations to the town.Pizza on the backup bench – the best seat of the evening.Finale Ligure at night.Susi enjoying the view from the room.Fred enjoying the view from the room.Susi ready to go – saying goodbye to the mountain view.
La Presqu'île de Giens, Hyères
Susi · 2021-09-12
A peninsula in the Mediterranean, an unexpected reunion, and finally some kitesurfing again.
We actually only drove to the Presqu'île de Giens because the peninsula looked so cool on the map –
and because Fred knew the conditions for kitesurfing were good there. We arrived in the evening at a
tiny campsite that we did not really like. So the next day we moved and ended up at Camping
Presque-Ile-de-Giens. And that was a hit: the pitches were arranged in terraces on a small slope,
with lots of shady and fragrant trees. The big pitches for motorhomes were already all taken, but for
our little Caddy there was still plenty of choice. We grabbed a double pitch – one plateau for the
car, one for hanging out. Pine trees everywhere, the scent of resin and dry grass, and the chirping
of crickets. It was just incredibly pleasant.
Then something crazy happened: We were sitting at our spot when two adults with two children came
walking down the slope – right past us. They were university friends of Fred. Even though the campsite
was quite large, we had randomly ended up at the same spot at the same time. So we arranged to meet at
the beach: Fred and his friend went kitesurfing, and I spent a lovely time with his partner and the
kids in the beach shelter. In the evening we visited them in their bungalow and got to stay for dinner.
Delicious pasta with loooads of garlic from the weekly market around the corner.
We really liked the campsite, only the logistics were a bit adventurous. When you sleep in the car and
everything is converted, you cannot just quickly drive off with the kite gear. So Fred cycled to the
spot with the bike plus kite equipment. The peninsula itself is quite narrow: lots of roads, few
pavements, and even for cycling you basically have to ride on the road. There was not much beach
directly on the peninsula, more cliffs. But on the strip of land connecting the peninsula to the
mainland there were long stretched-out beaches.
We also visited a weekly market on the peninsula, but that was not really our thing. Overall it felt a
bit too crowded for our taste outside of the campsite. And after the weeks on the Atlantic we did
notice that we prefer the ocean there over the Mediterranean. Still, they were really lovely days and
the chance encounter is something we will always remember.
Susi at our pitch under the pine trees.Fred at our pitch.The kite spot on the strip of land between the peninsula and the mainland.
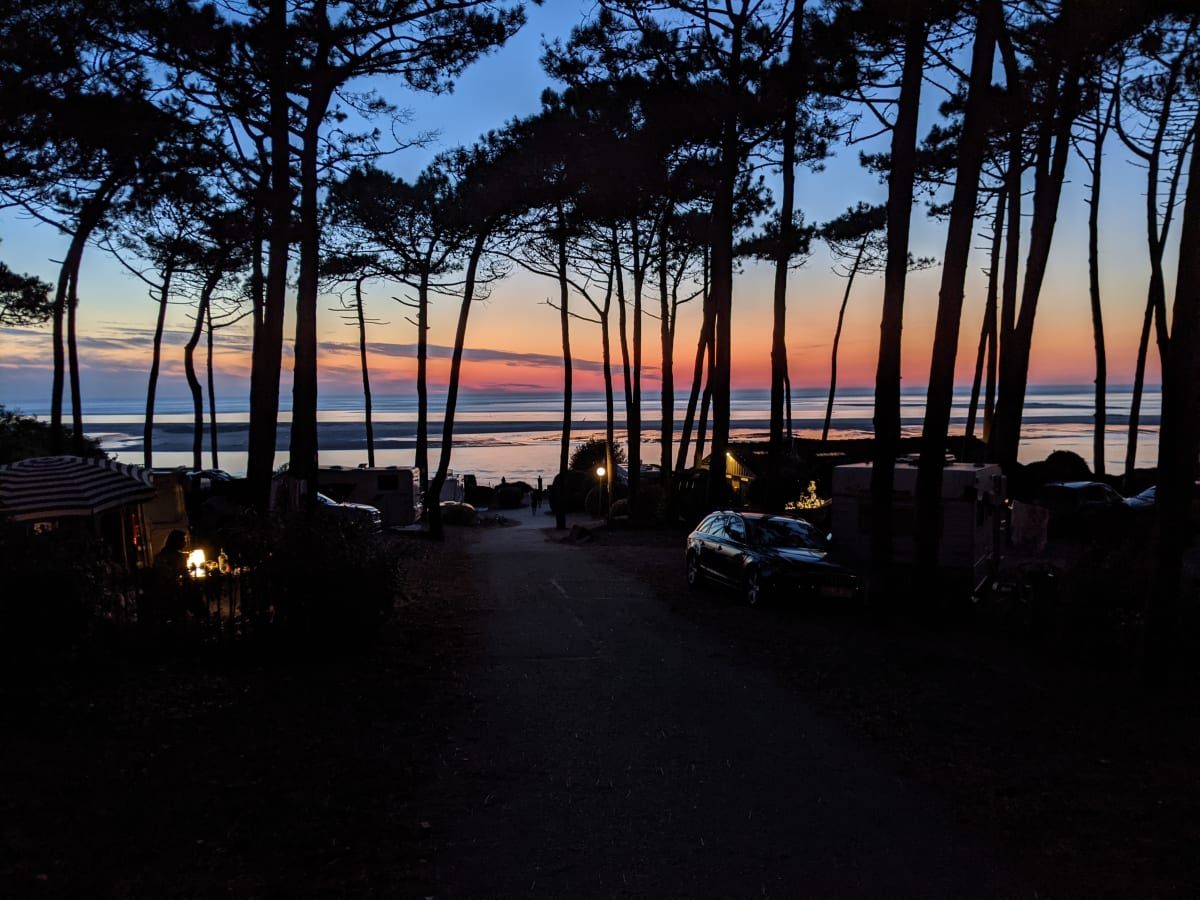
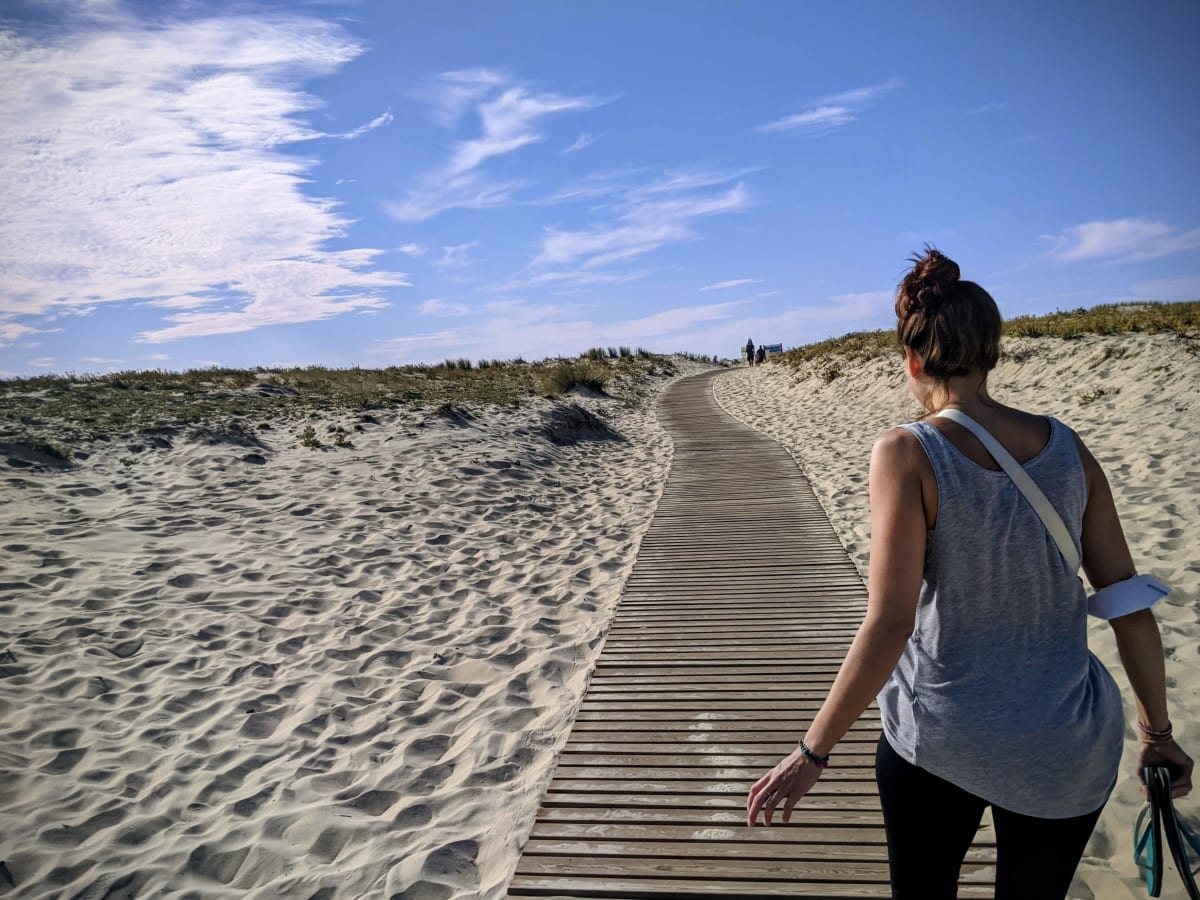
Dune du Pilat
Susi · 2021-09-08
A lucky recommendation, a pitch under pine trees with a direct sea view, and the largest sand dune in Europe right at the doorstep.
We like to travel completely free – without committing to anything beforehand, and usually Fred only
starts looking for the next campsite the day before we leave. So far this has worked out really well
for us (and we have always found a spot).
That is how we spontaneously decided to head to Camping Panorama de la Dune du Pilat. Our pitch
neighbour at Cap de L'Homy had raved about it. And she had not promised too much. It started with
the great service. After we arrived, Fred was driven around the site by a nice guy in a golf cart
so he could get a first impression of the available pitches.
He came back with three options, and we decided quickly: A pitch right at the edge, on the slope
facing the sea, shady under old pine trees. It was not really a proper pitch anymore, more like the
forgotten corner spot – too small for bigger cars, which is why it was still free. But for us it was
the coolest campsite spot we have ever had.
That the pitch was quite steep, we only noticed when setting up. We did not have levelling wedges back
then – we did not even know you need something like that. So we gathered every stone we could find.
We stacked and fiddled and somehow drove the wheels on top. It was pretty wild, but it worked. And
then we just sat there in our chairs, about 200 metres above the sea, and simply looked. When the
thermals were right, paragliders glided silently past us and circled right in front of our noses.
Very atmospheric and calming at the same time.
The campsite itself was lively, and yet we had our peace and quiet. There were nice new sanitary
facilities, not too far away, a supermarket within walking distance and a restaurant – which we
ended up not going to. Getting pizza and eating at our pitch felt cosier 😊. All over the site there
were hidden, lovely pitches under the big pine trees. It was pleasantly cool and smelled wonderful.
Everything was just right here.
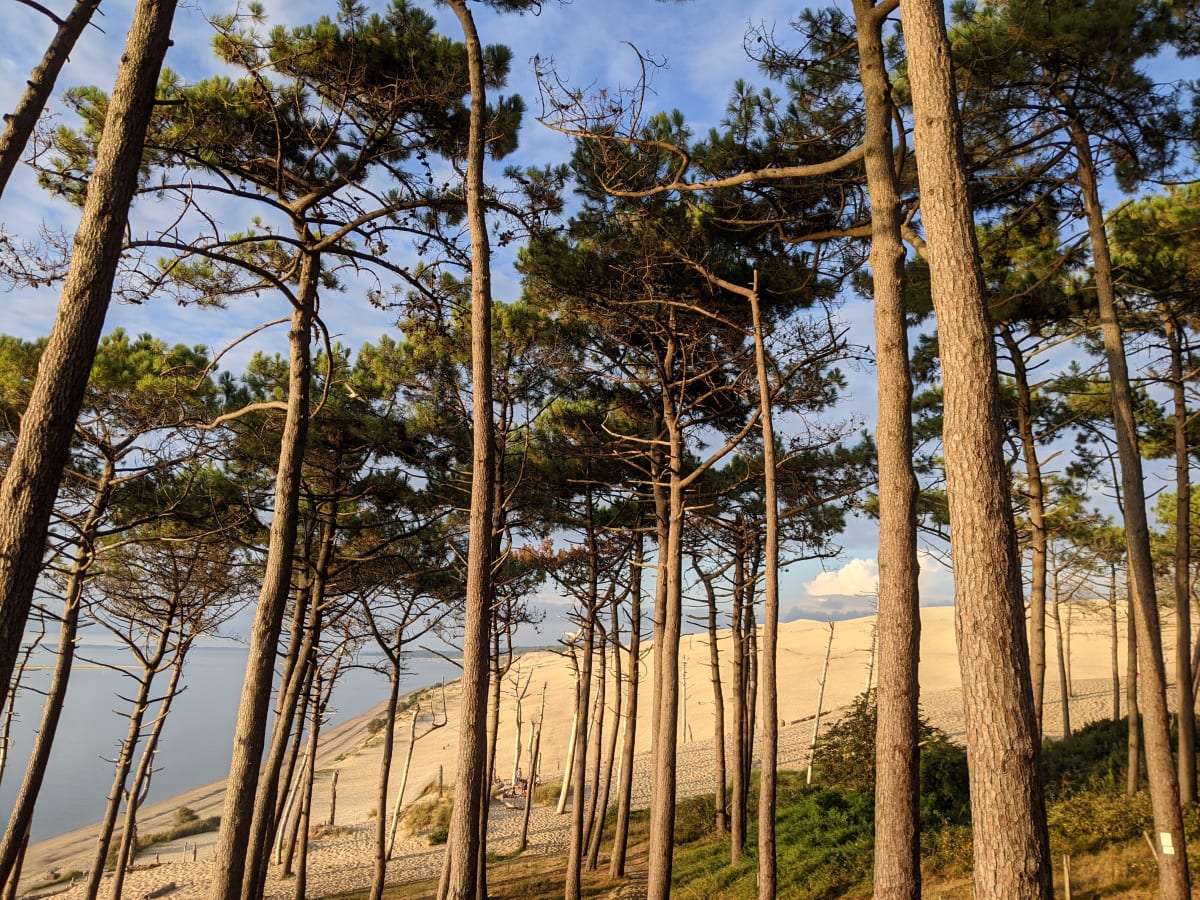
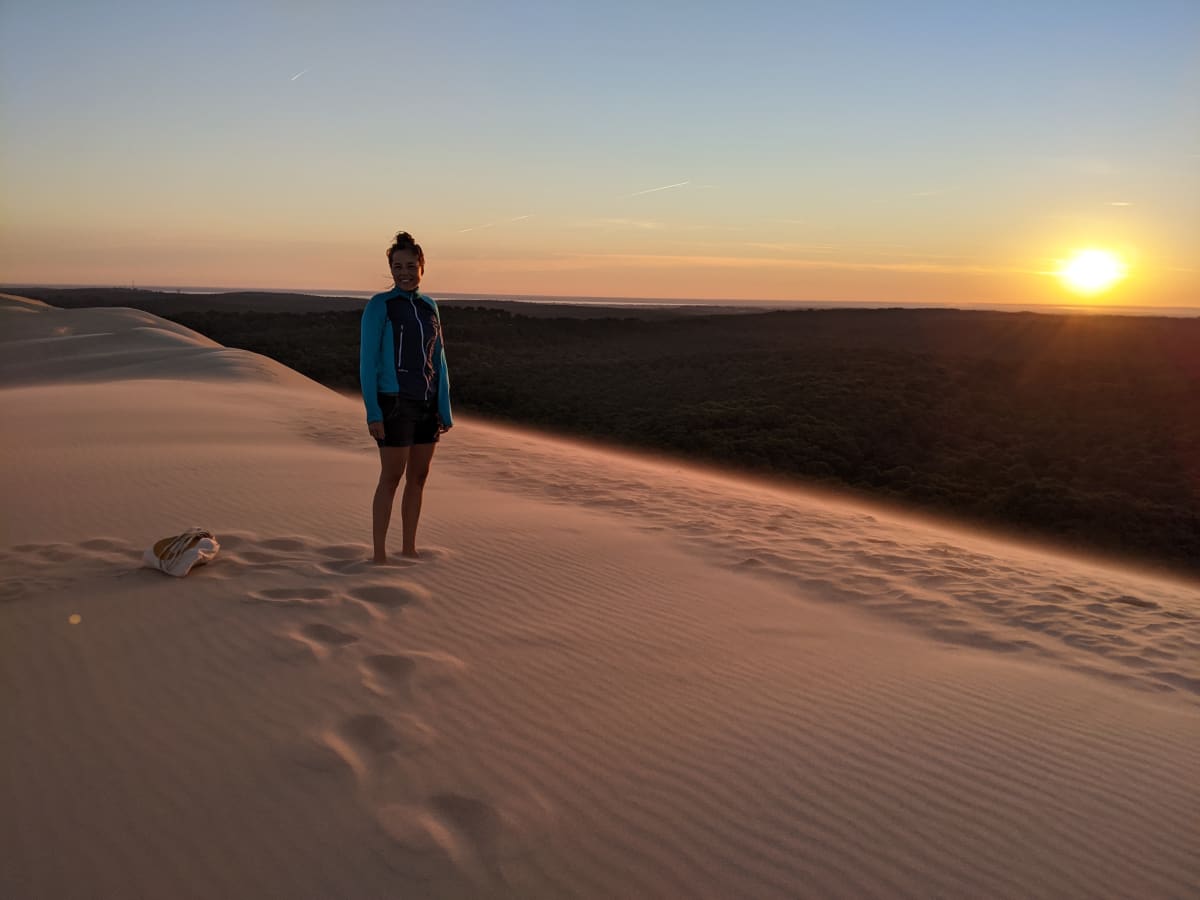
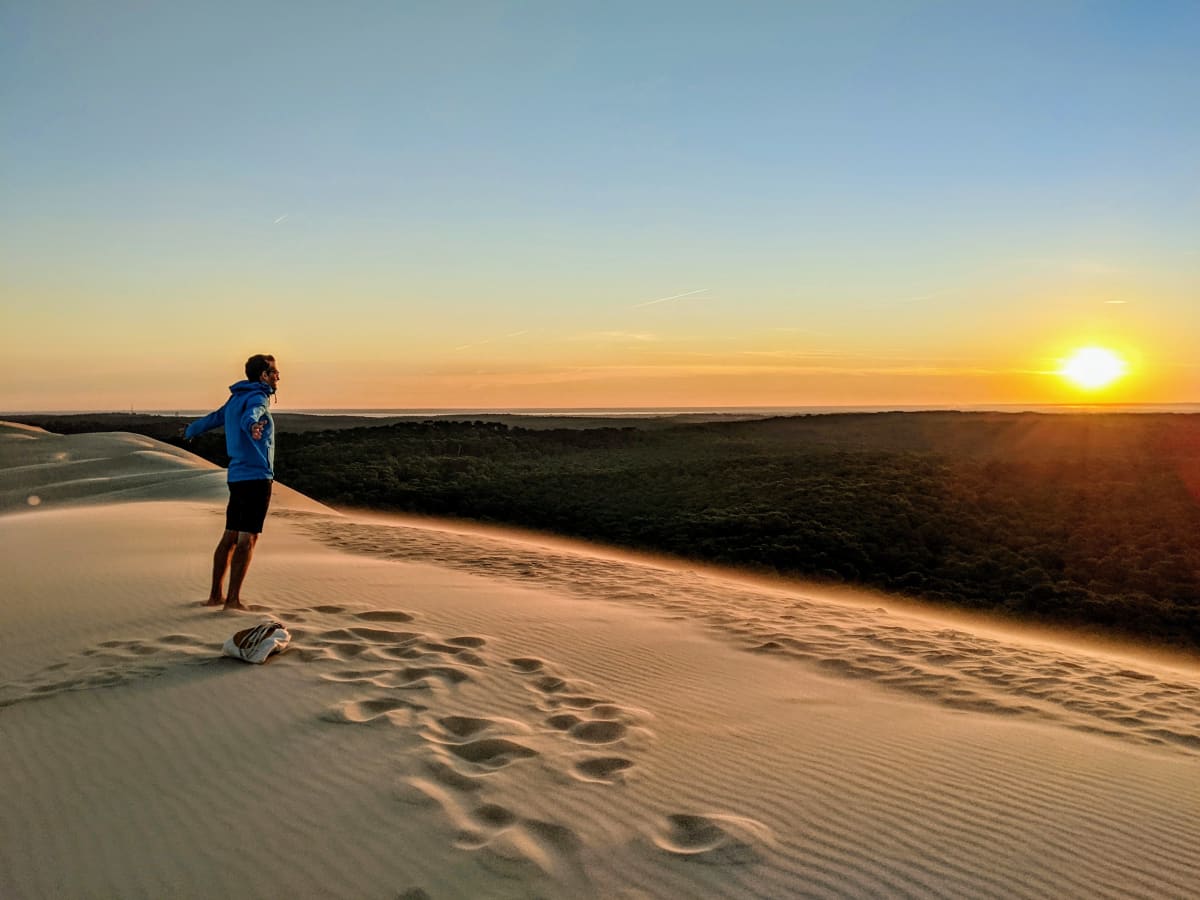
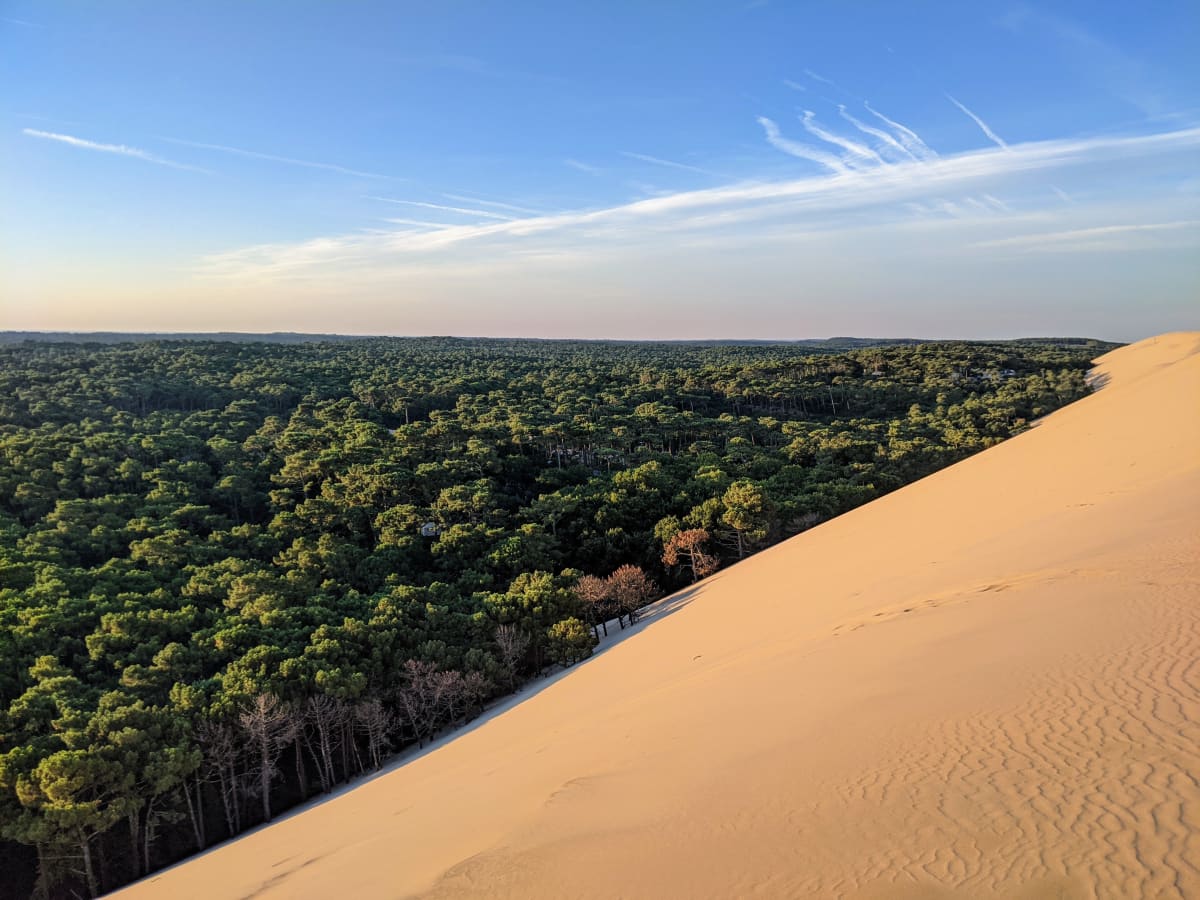
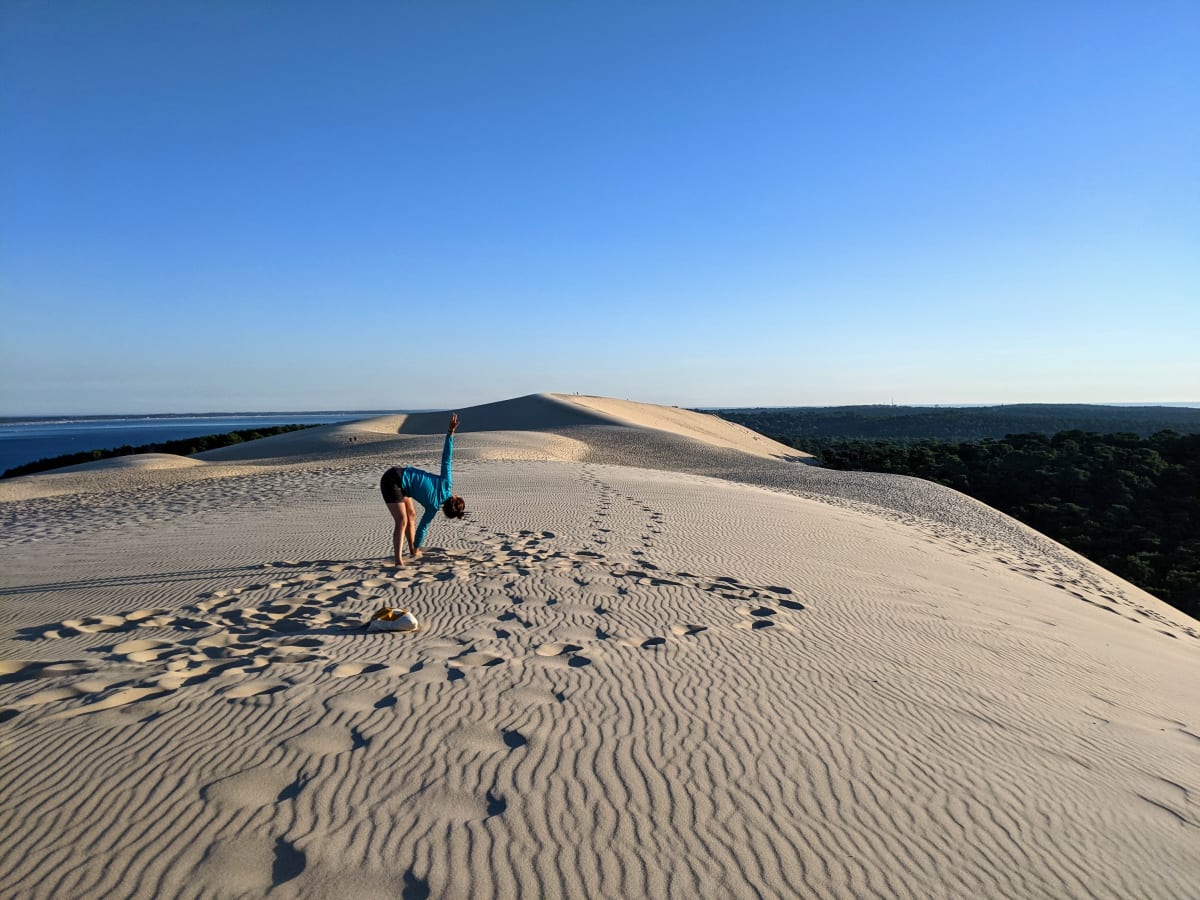
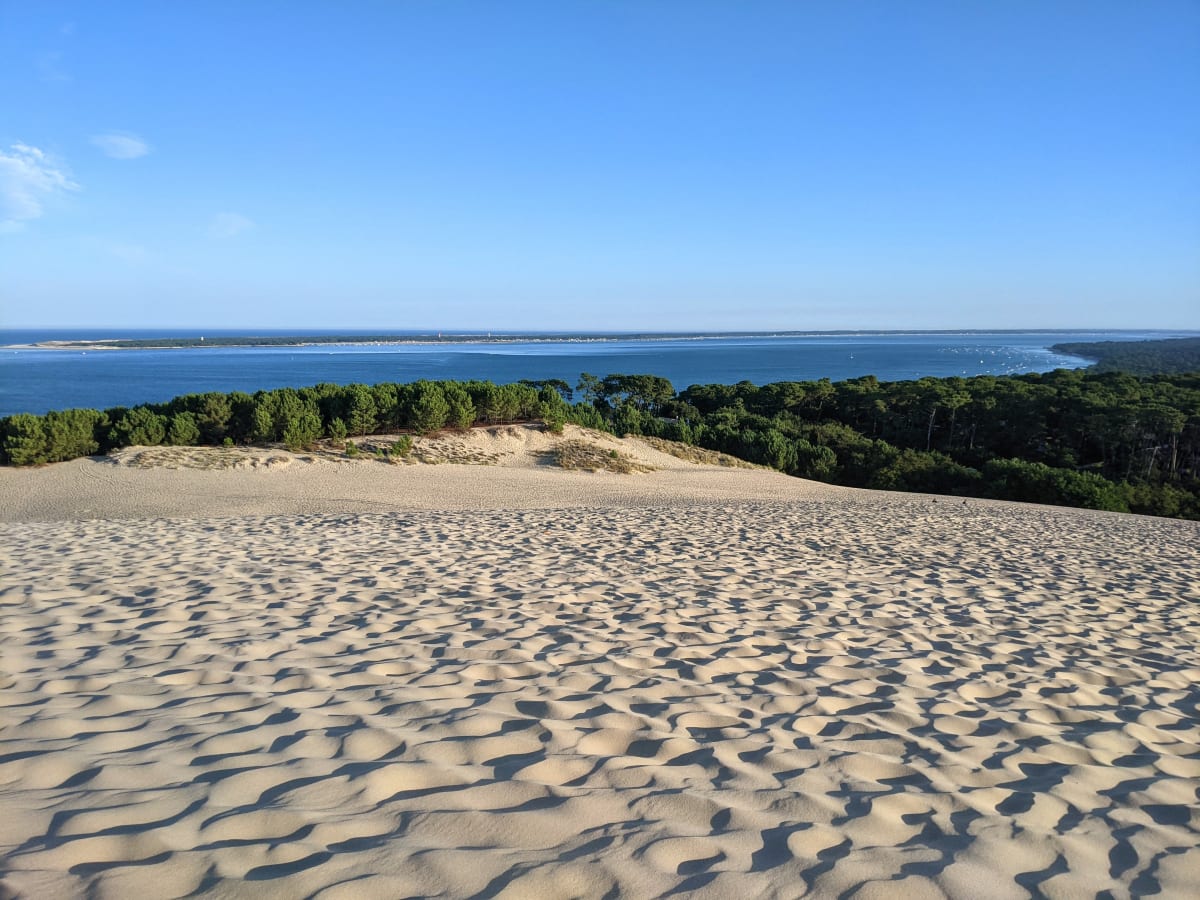
Also: the largest sand dune in Europe is right next to the campsite. One day we got up at four in
the morning to watch the sunrise from the dune. Getting up was not exactly easy and then it was also
colder than expected at first. But when we finally arrived at the top, it was simply unforgettable:
barefoot in the sand, the sea on one side, the pine forest on the other. And in between this quiet
vastness. We had never experienced anything like it before.
To get to the sea you go down a steep staircase – which is quite exhausting, but in return we had
the amazing view from our pitch. The beach below is sheltered by a sandbar, so there were hardly any
waves. The beach is narrow, but there was plenty of space. Once we cycled around the area with our
bikes. We can recommend the cycle paths too; it is just a bit hilly and on that hot day we worked up
quite a sweat.
We really wanted to come back the following year (2022). But then we heard that a terrible wildfire
raged and destroyed a large part of the old pine trees around the campsite. The site has since
reopened, but we do not know what it looks like today. The atmosphere of those old trees was beyond
words. We prefer to keep this place in good memory just as it was.
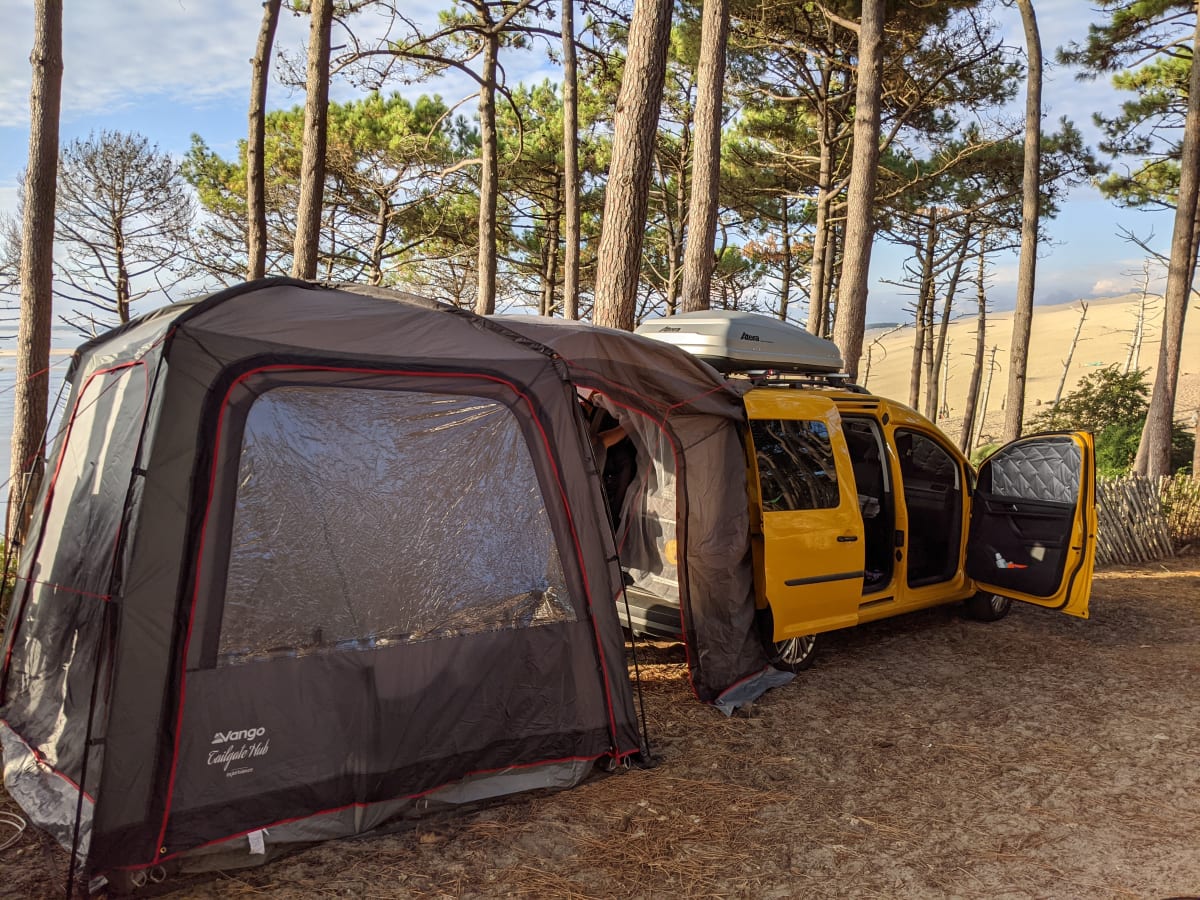
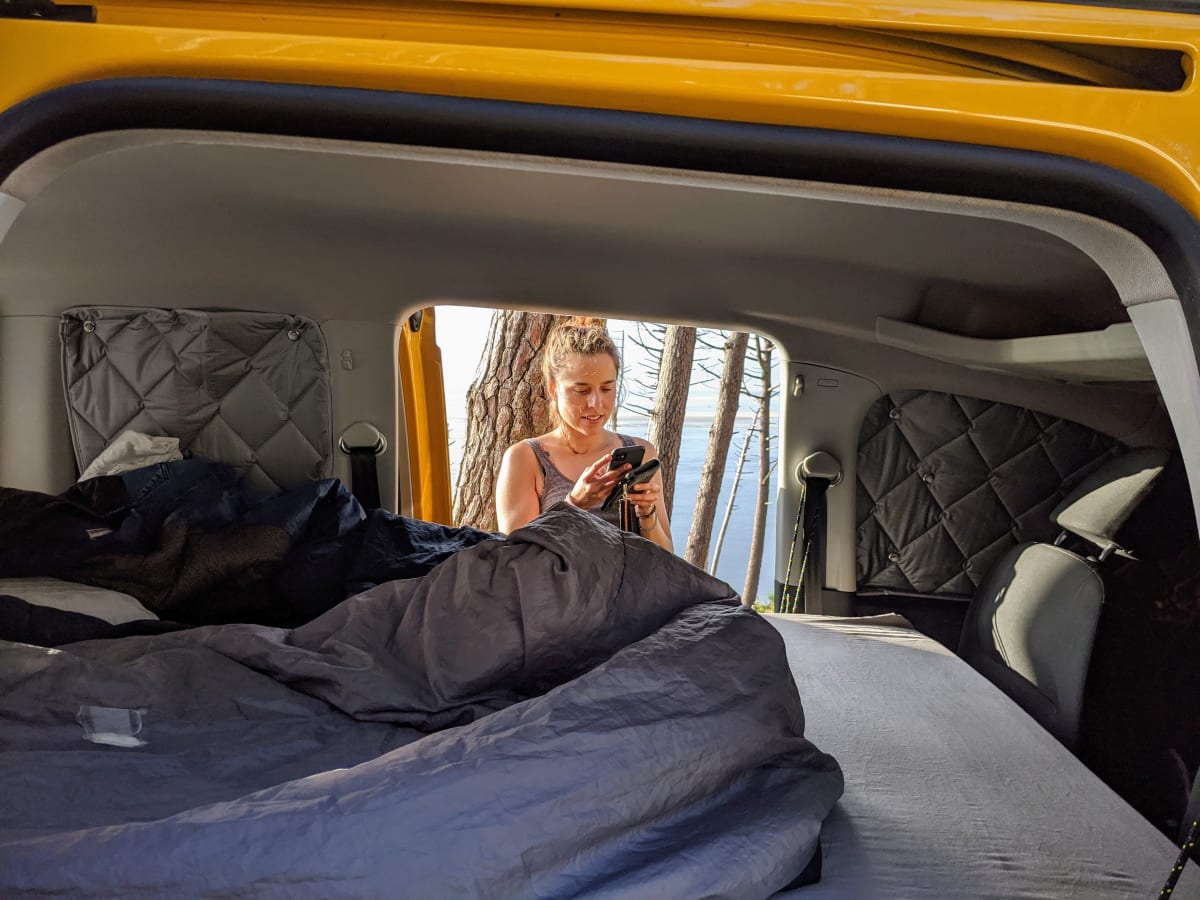
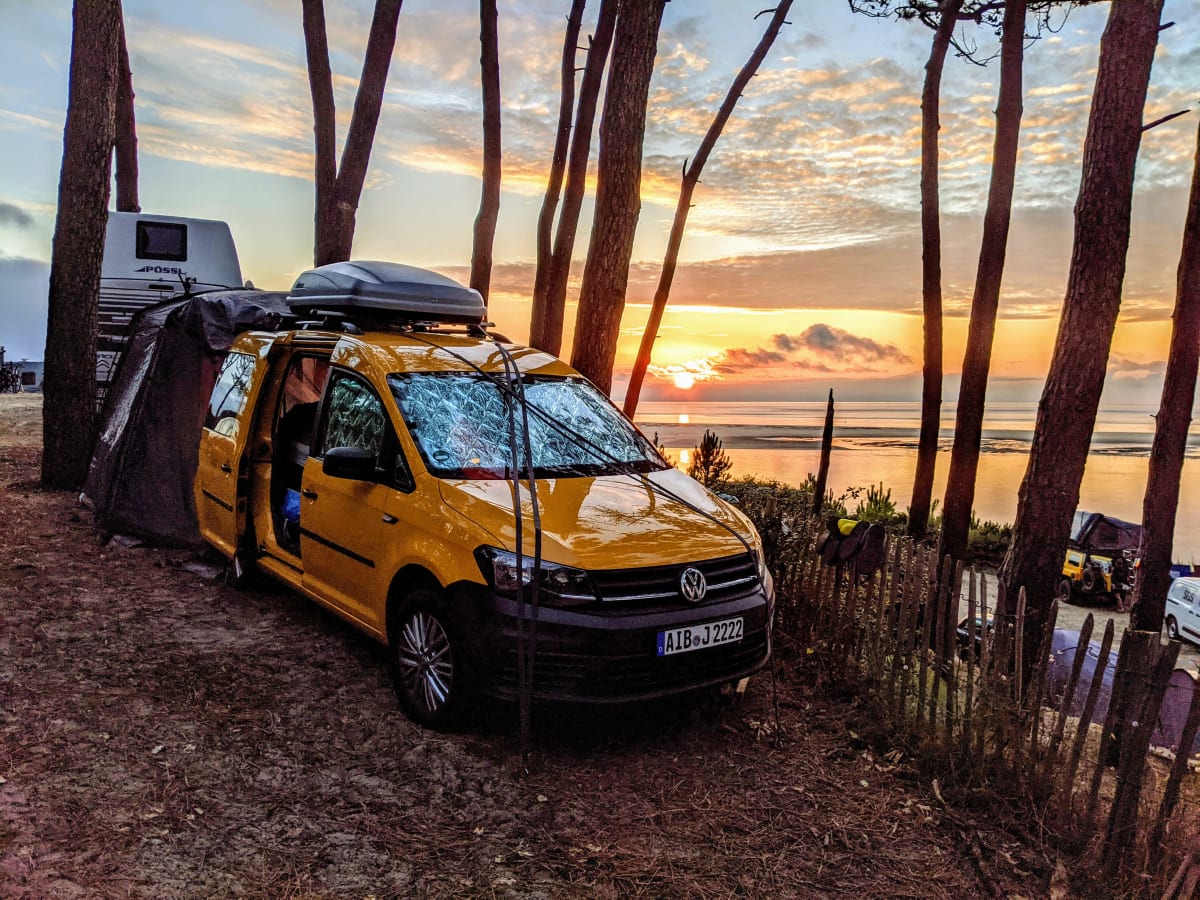
Our pitch at the edge with a sea view.Paraglider in the thermals right in front of our spot.Steep staircase down to the sea.Our Caddy with the Vango tailgate awning.Sea view straight from the sleeping area.Under the old pine trees.Sunset with sea view from the pitch.The pitch after sunset.Susi greeting the rising sun.Fred greeting the rising sun.View from the dune down into the pine forest.Fred doing (laughing) yoga on the dune.Susi doing yoga on the dune.The calm sea, sheltered by a sandbar.The campsite in the evening.
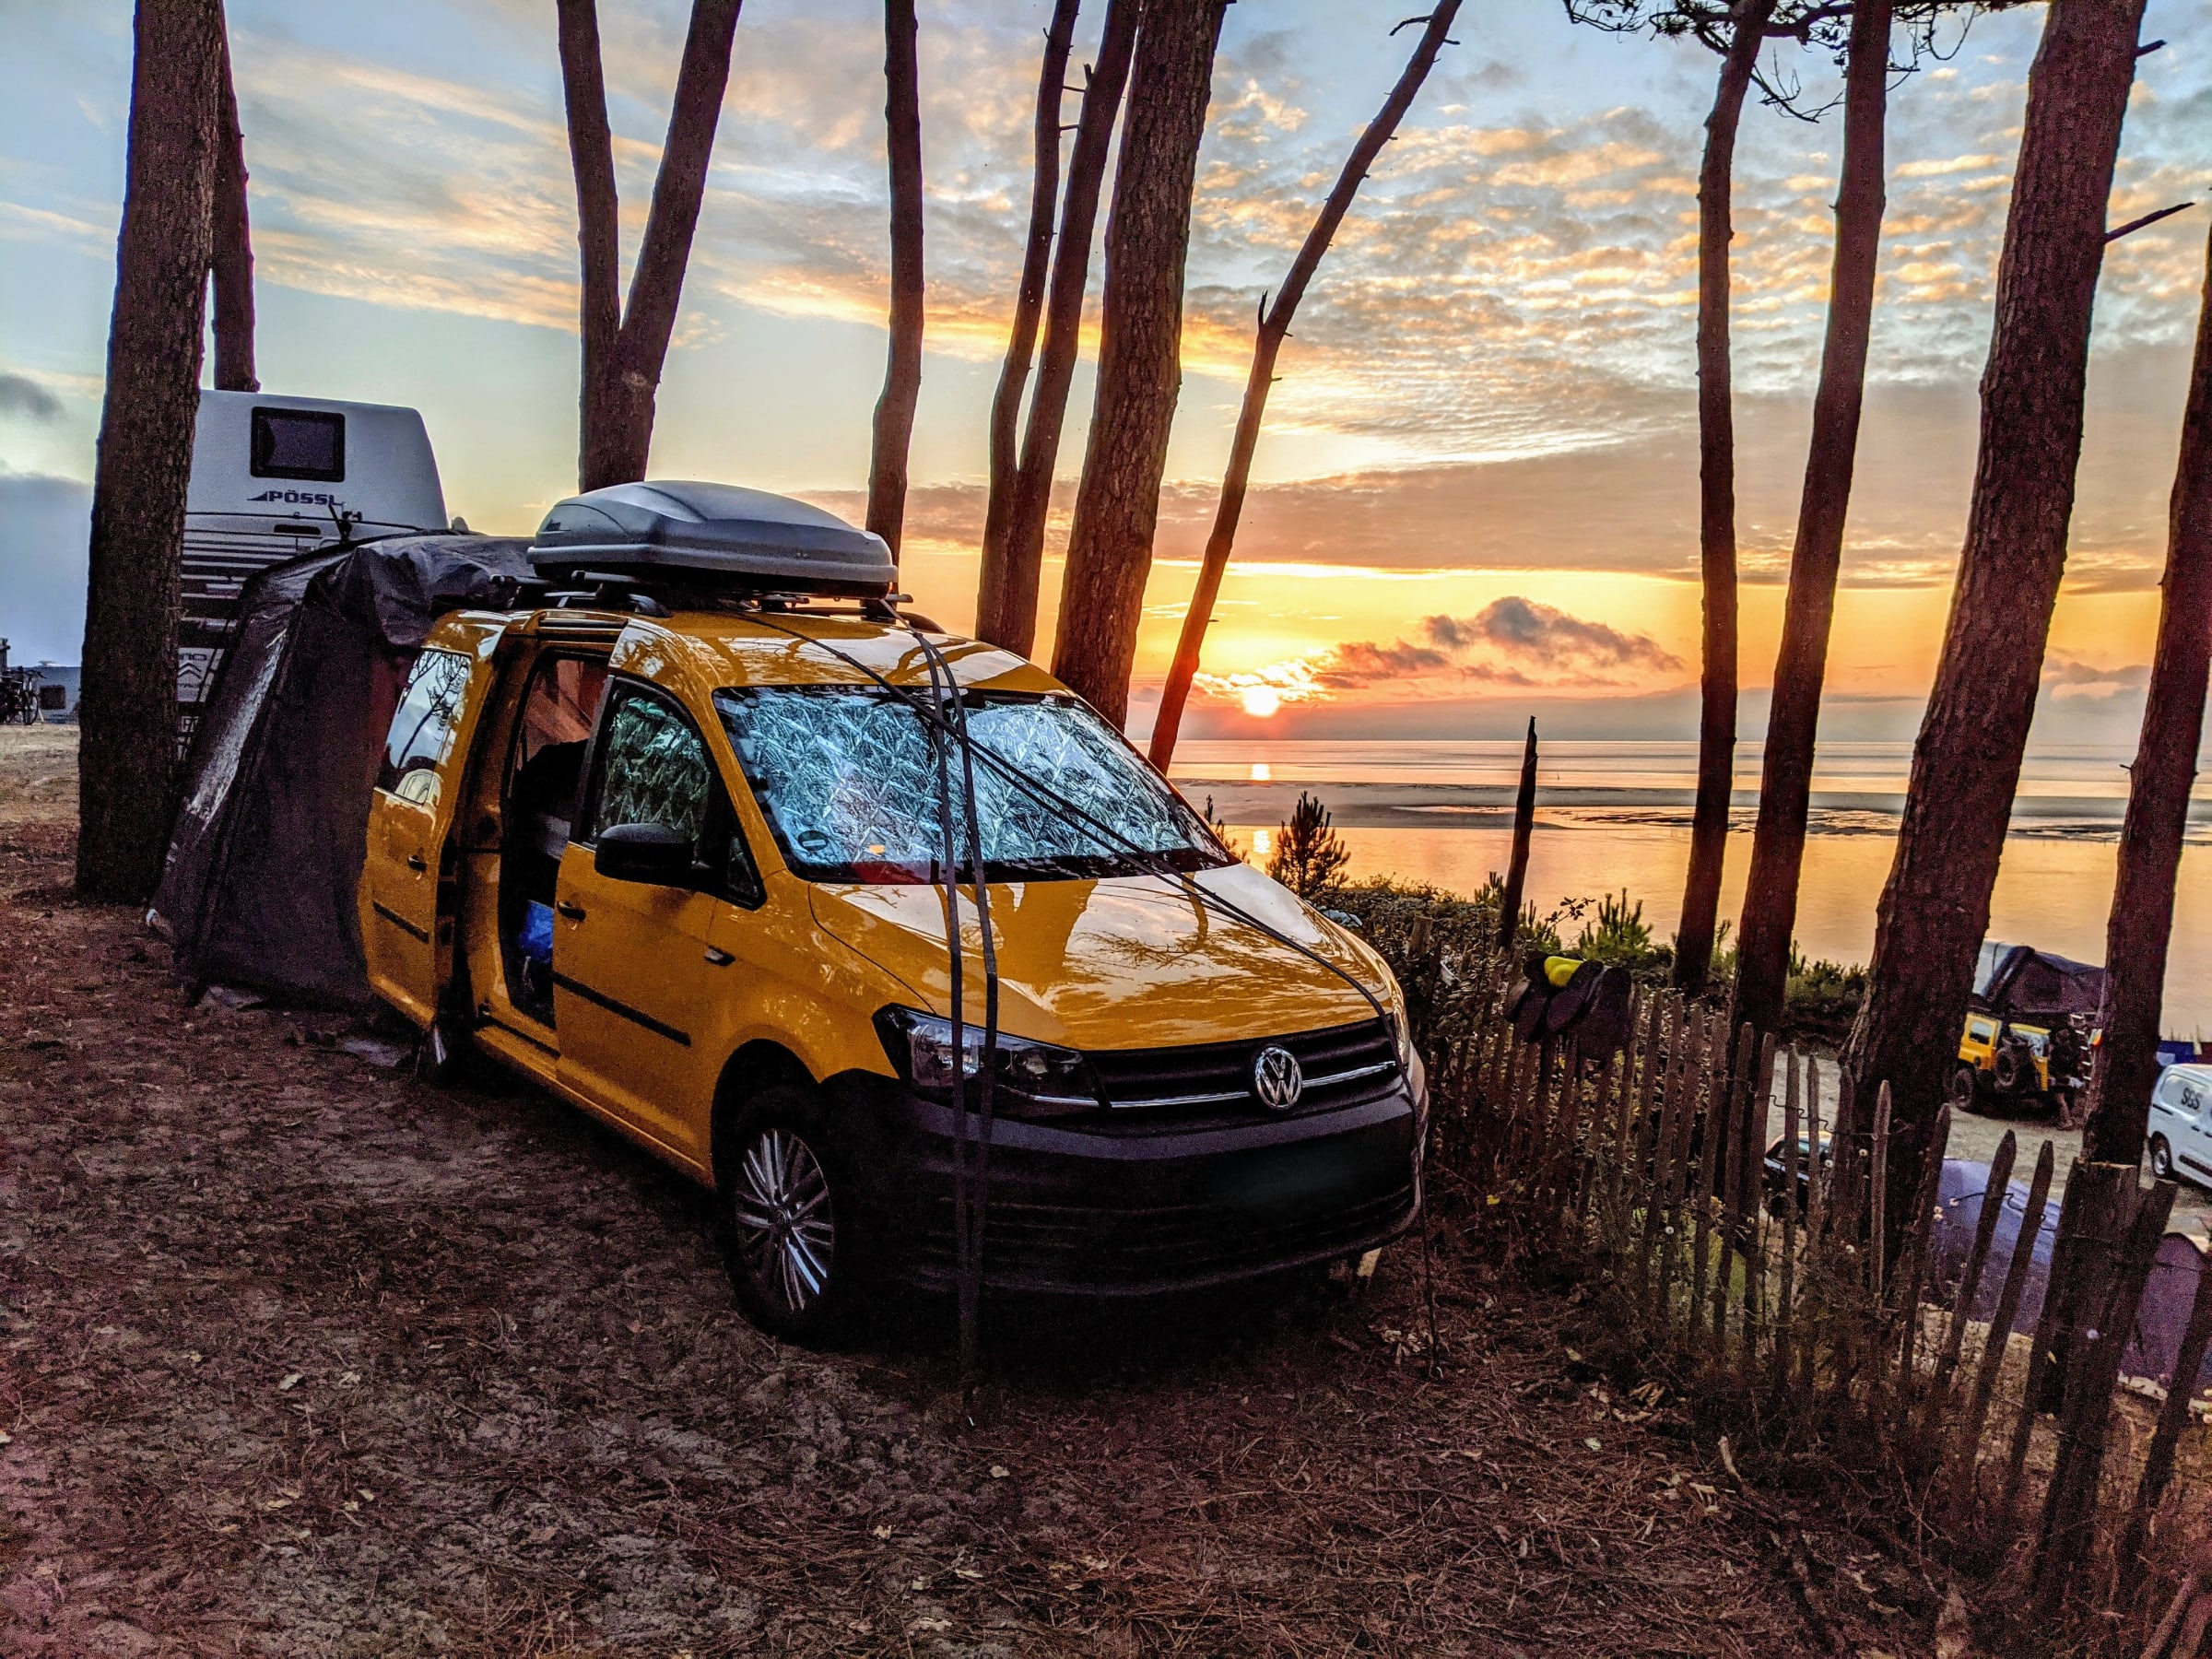
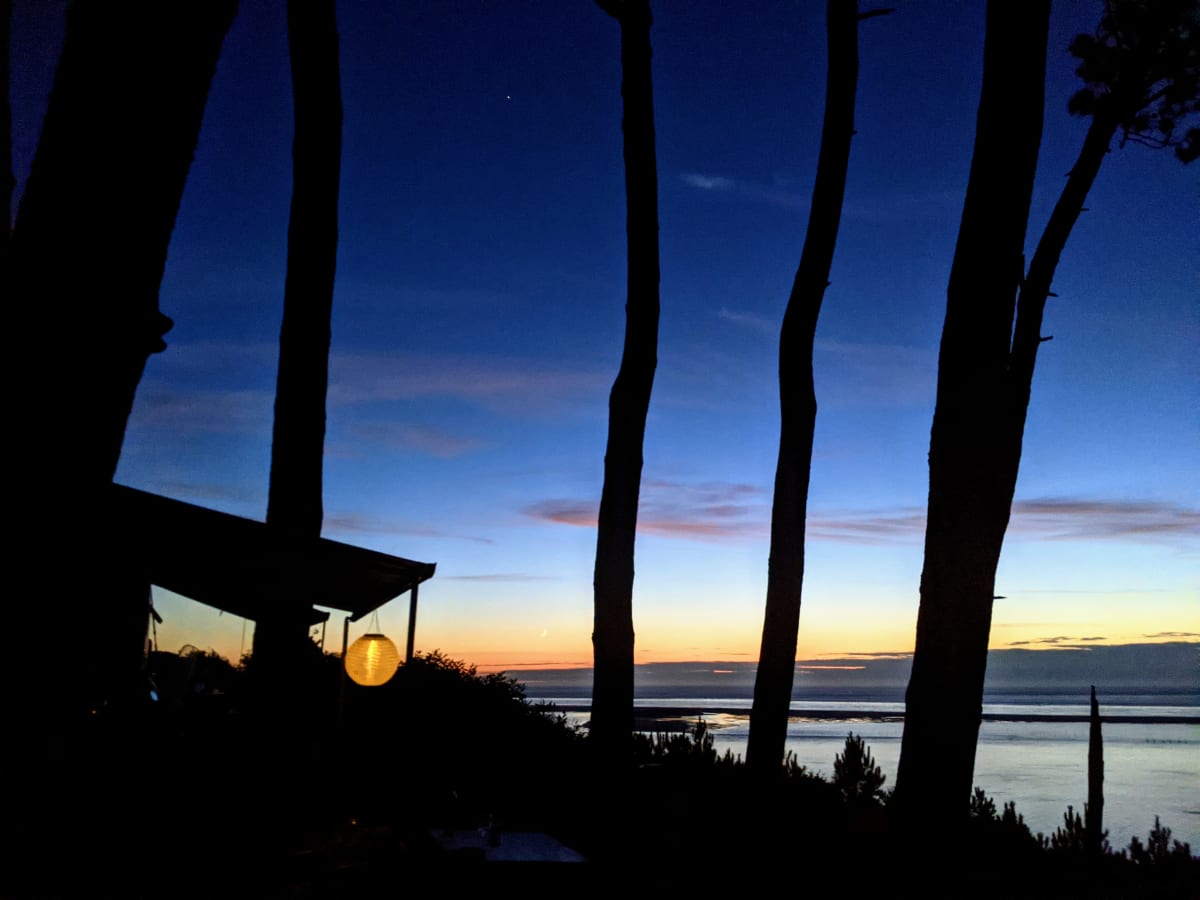
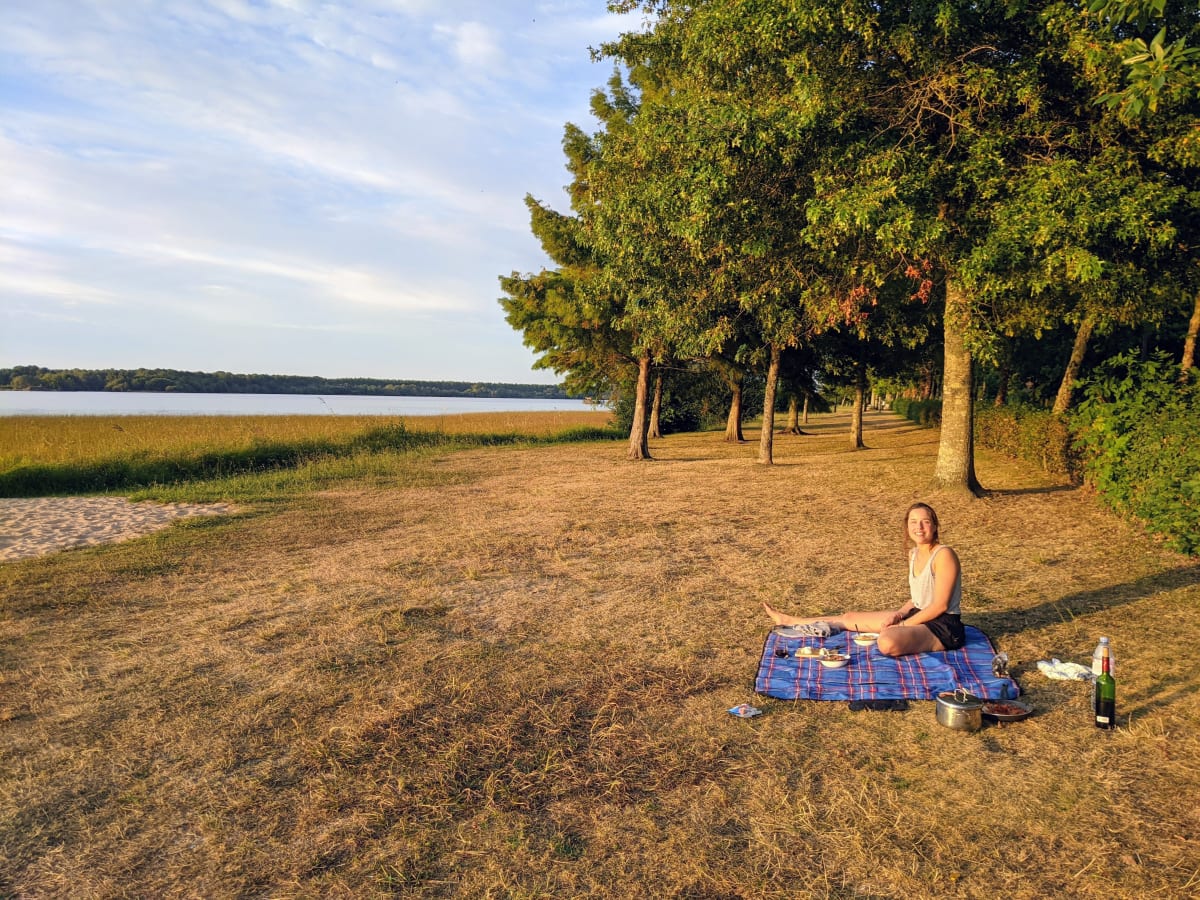
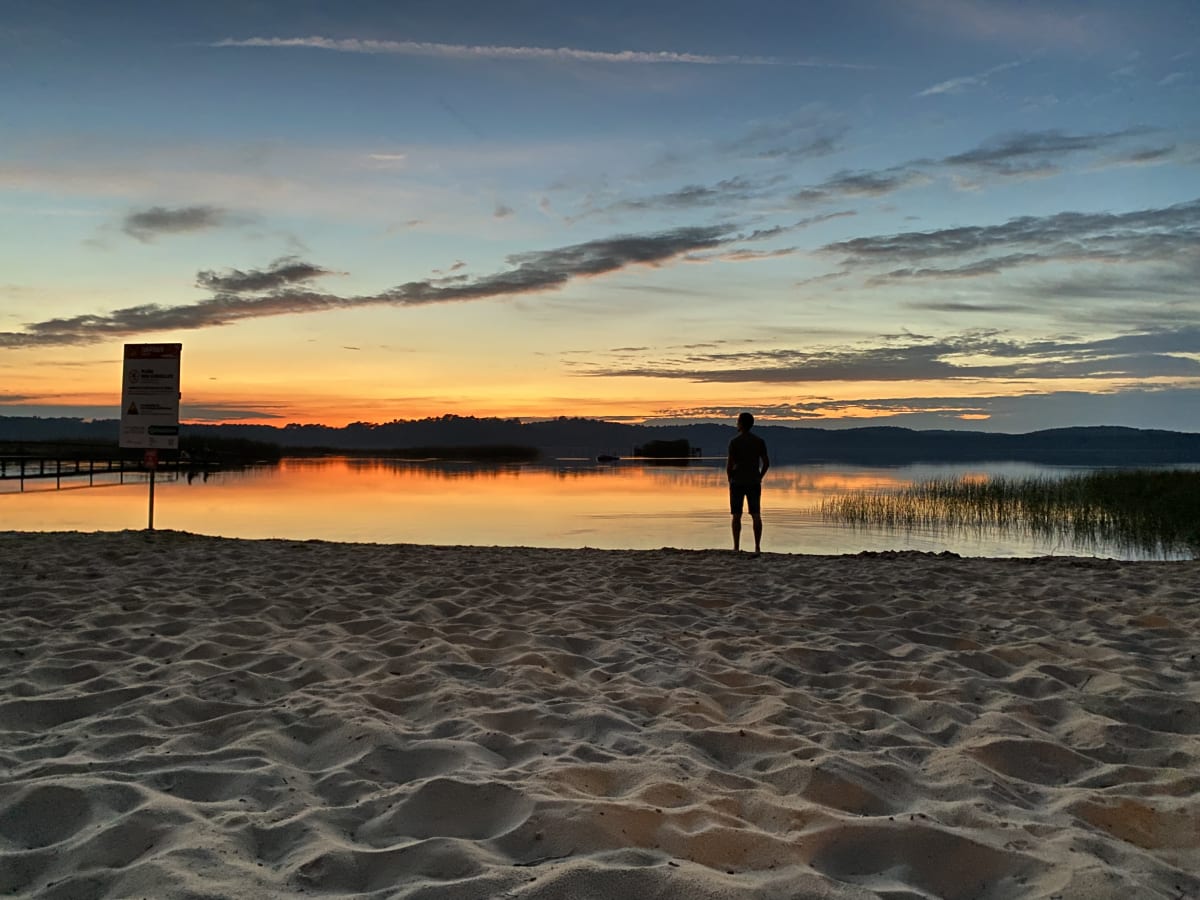
Étang d'Aureilhan
Fred · 2021-09-02
Finding Tranquility at a Lake, minimalistic lake dinner and a perfect sunset.
After a couple of days staying at cap de l'homy, we decided to do a short trip to a nearby lake and try some wild camping. To be honest, we did not enjoy the camping in Cap de L'Homy that much so we needed to break out for one night. Susi found this "secret" car parking spot via Park4Nite that was close to the lake. Just amazing. And very quiet—despite the proximity to a mega-large touristic camp site. So there we were, having a quick bath in the lake, then cooking dinner with our Ququq box while enjoying the view. And, finally, yummy dinner with a minimalistic setup of blanket, red wine, pasta and sunset.
Susi is ready for our minimalistic dinner at the lake.Fred cooking minimalistic with our tailgate kitchen.Wow, what a sunset.
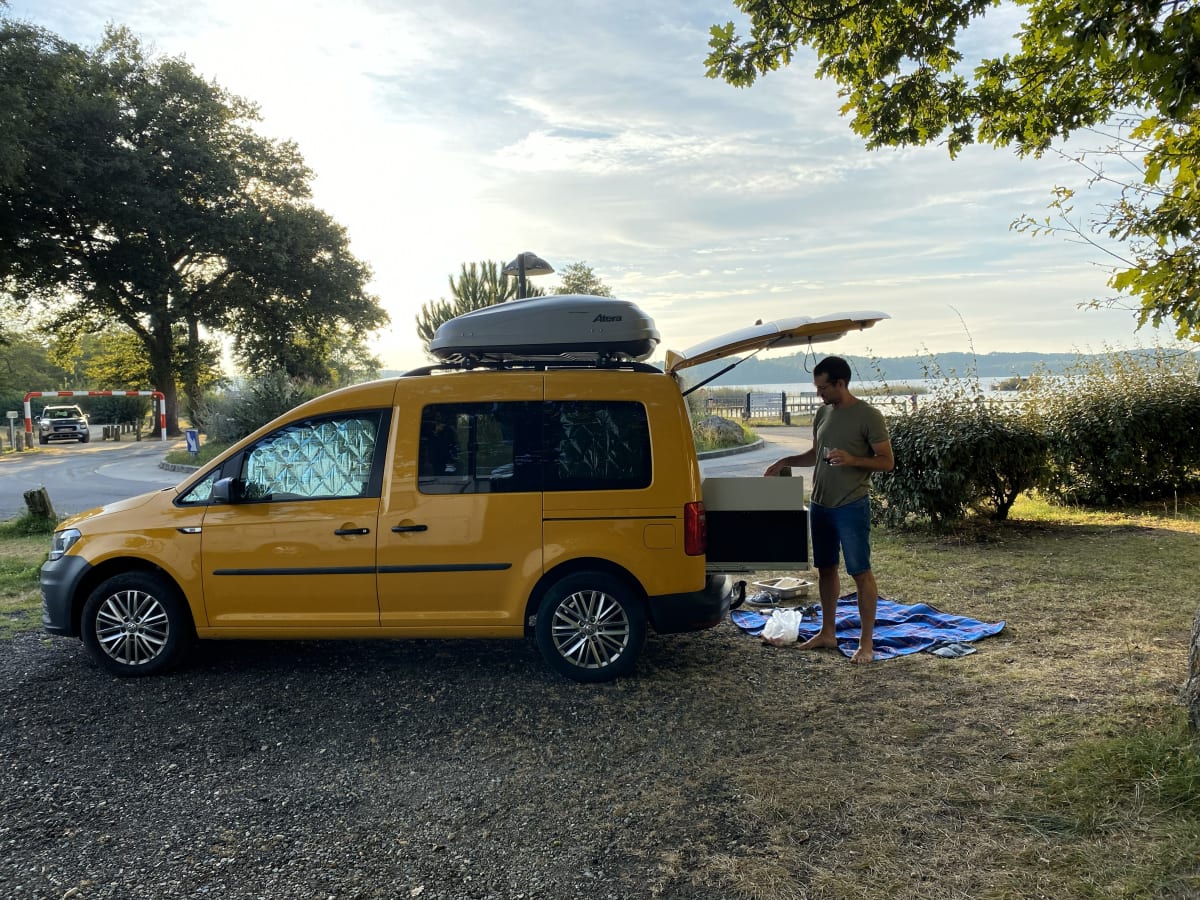
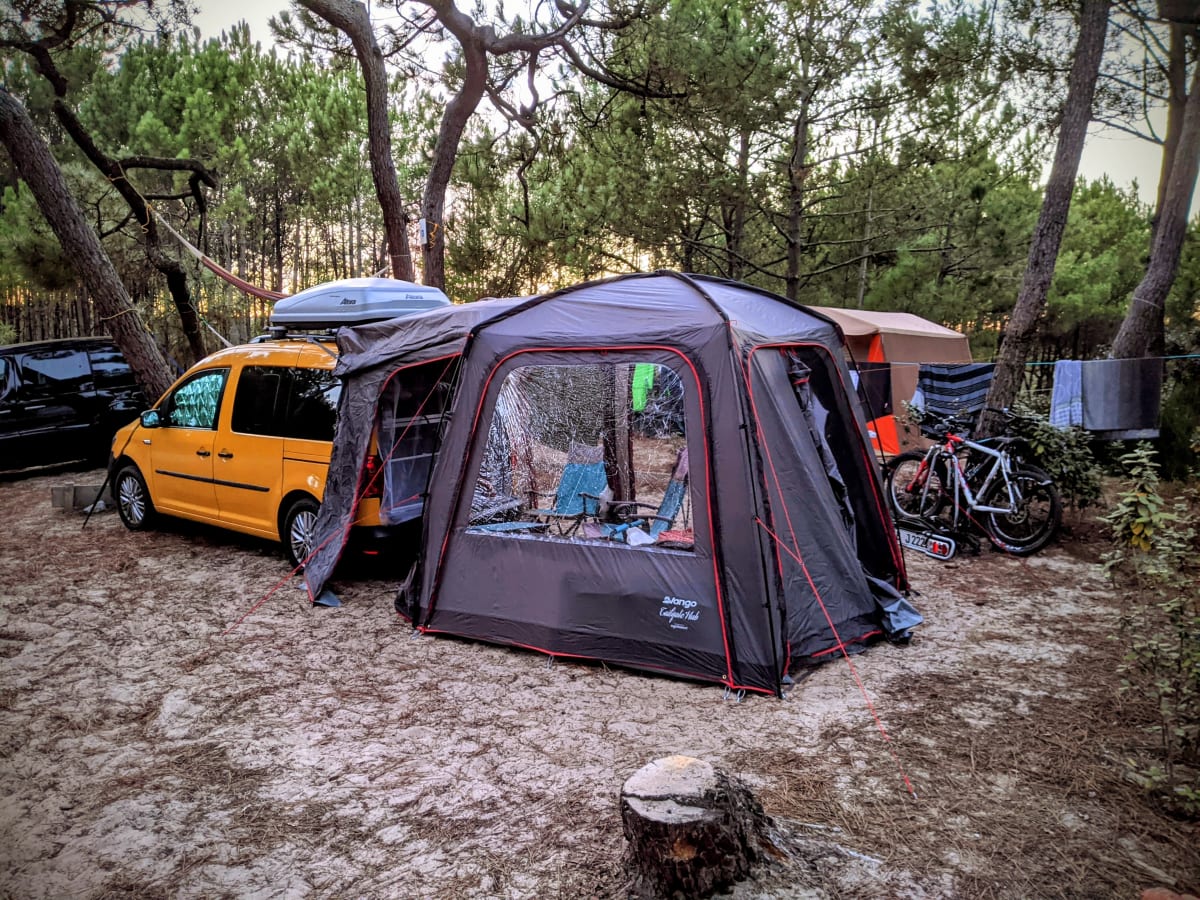
Cap de l'Homy
Fred · 2021-08-30
Chasing Tranquility in the Surf, crowded beach campsite and noisy Vango tailgate tent.
On our trip to France, we set up our first camp at Camping Municipal de Cap de l'Homy, a long-time favorite of our dear friends Linda and Fabian. This was also the first—and one of the last—times we tested our brand-new Vango tailgate tent. After the holidays, we decided to let it go, as it didn't fit our small VW Caddy as well as we'd hoped. No matter how much we adjusted or squeezed, we couldn't eliminate the persistent flapping noises during windy nights. (We go into more detail about the issues in our Vango Tailgate review.) We also brought along our roof box—a decision we quickly regretted. The added height meant we had to stop and turn away from most of the height-restricted parking sites near the beaches. Next time: no roof box (we thought). Let's keep it minimal (we won't). As it turned out, Cap de l'Homy did not become our favorite spot. It was quite crowded and noisy, and so we missed the tranquility we were hoping for.
Susi on the walkway to the beach.Our pitch at the Cap de l'Homy campsite.Ready to go in the wetsuit at the beach.
Attersee
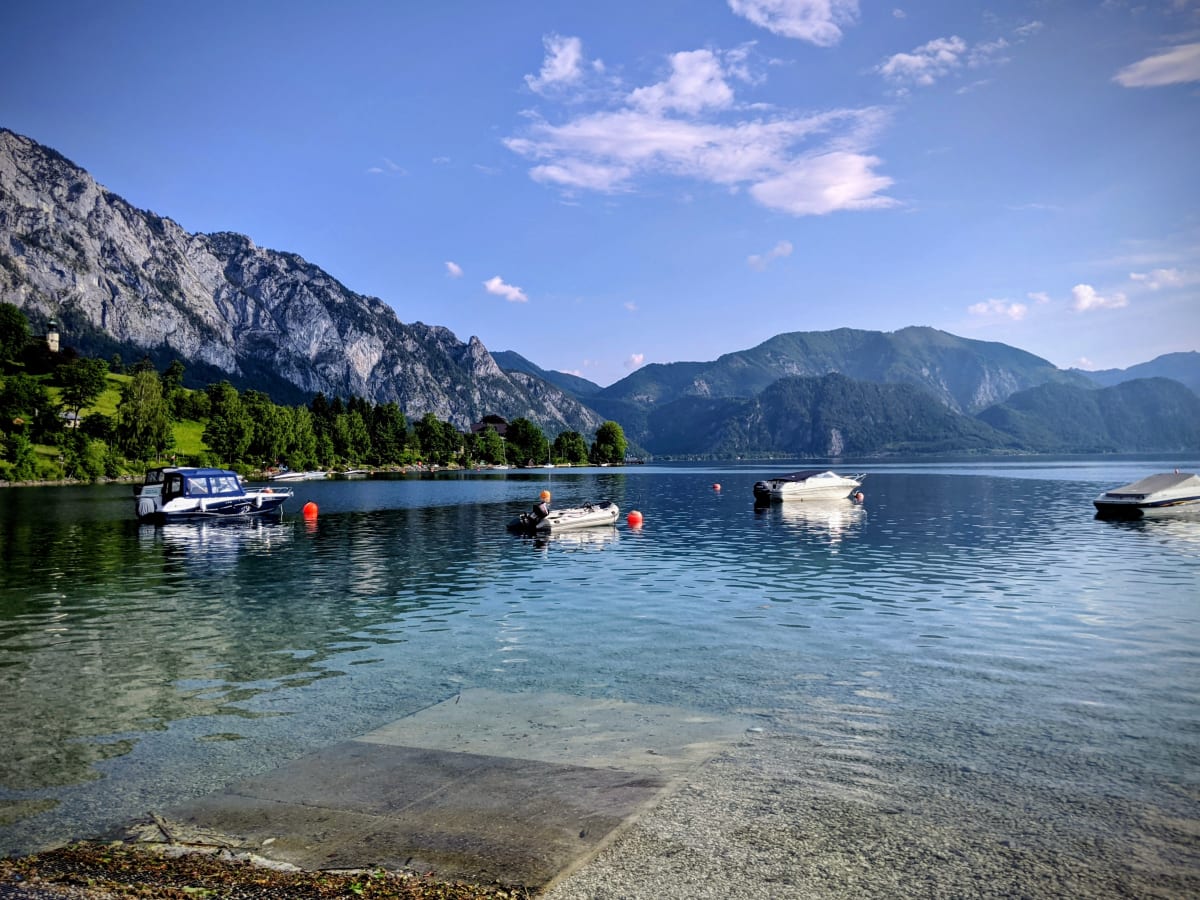
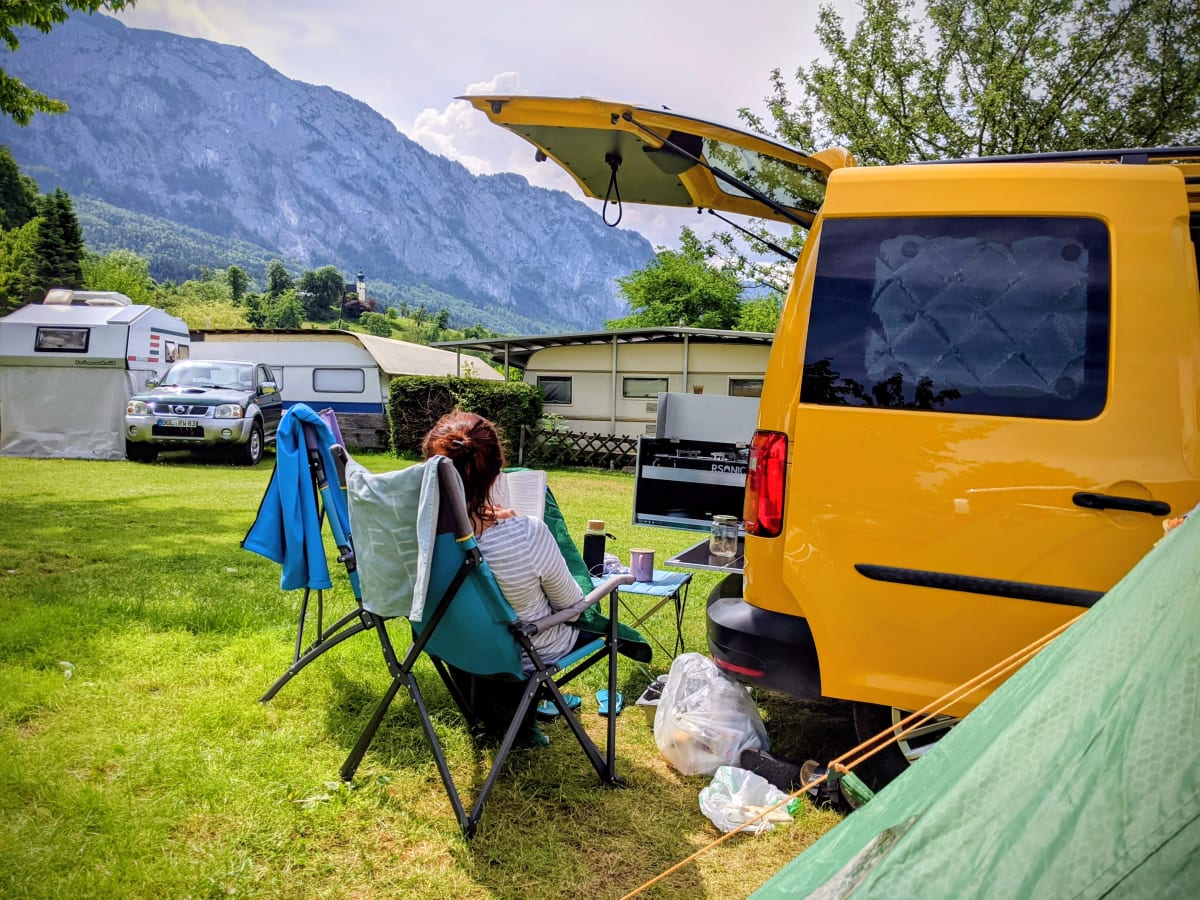
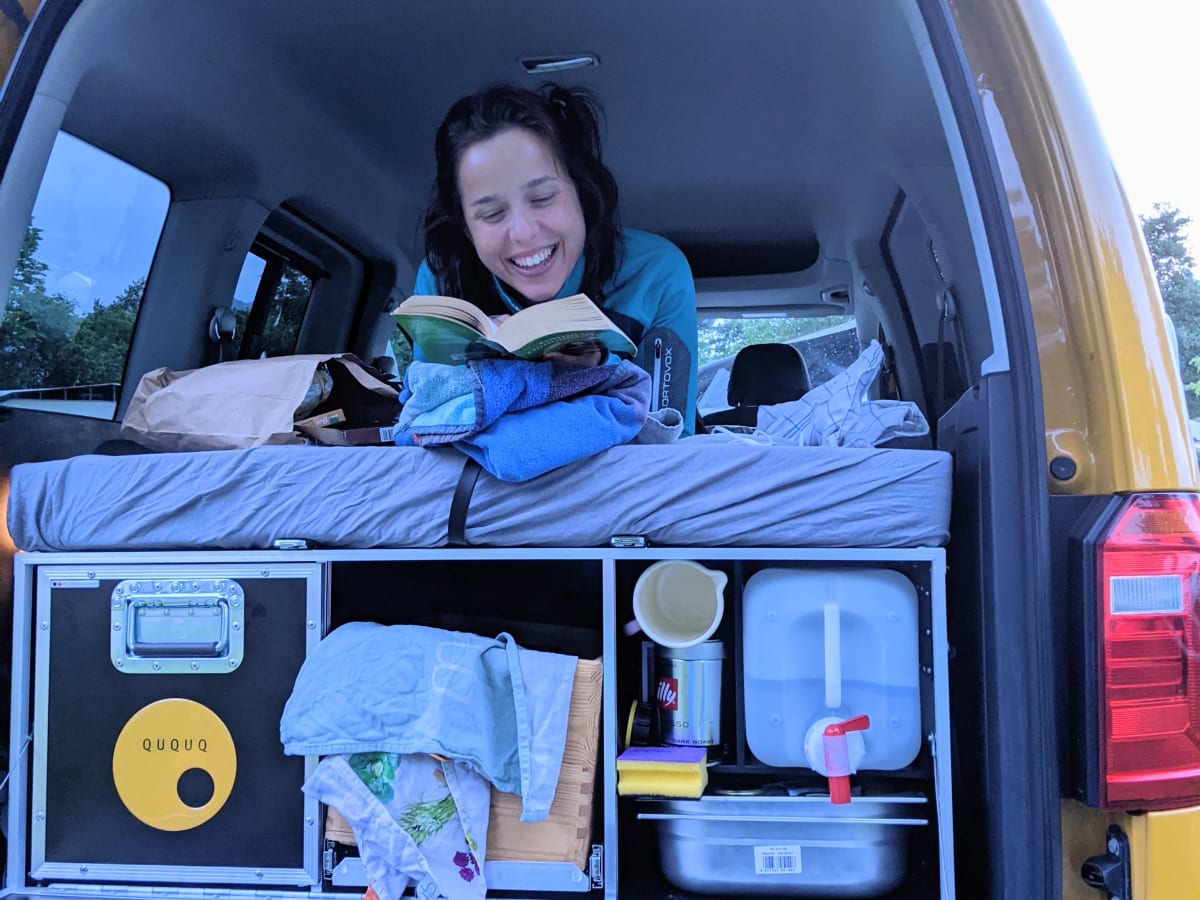
Fred · 2021-06-10
A quiet weekend at the lake, Caddy Minicamper and mountain views.
We spent a few peaceful days at Lake Attersee in Austria, our first trip with our little yellow Caddy minimalistic camper. We'd just fitted it out with the basics—a simple trunk box from Ququq that holds a small kitchen and provides a place to sleep. No luxuries, just what we needed. The lake was calm and clear, deep enough to swim in close from the shore, with the mountains reflected on its surface. We loved how easy it was to step out of the van and straight into the water, or to sit quietly by the shore and enjoy the view. The campsite was small and modest, nothing fancy, but that suited us just fine. The only inconvenience was having to walk along the main road to leave, since there wasn't a path by the lake. It wasn't a grand adventure, just a small and quiet one. We left feeling lighter, already looking forward to the next time.
View from the campsite over Lake Attersee and the surrounding mountains.Susi and our Caddy at our pitch.Susi in our little Caddy minicamper.
Reviews
Short product reviews about our favorite camping gear.
Qeedo Motor Tarp Universal
Fred · 2025-08-23
★★★★☆ · Schick, hochwertig verarbeitet und schön kompakt verpackt – aber der Aufbau dauert und die Teleskopstangen sind die klare Schwachstelle.
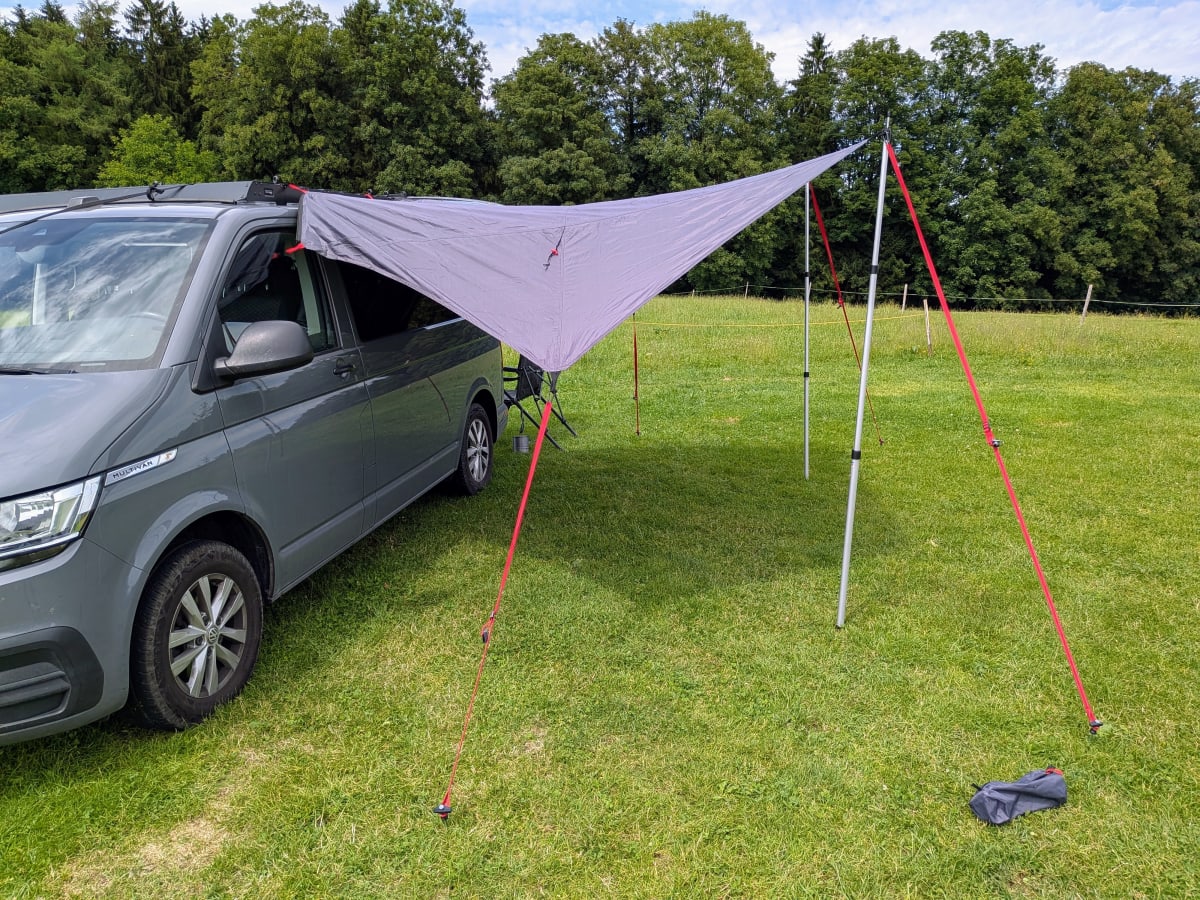
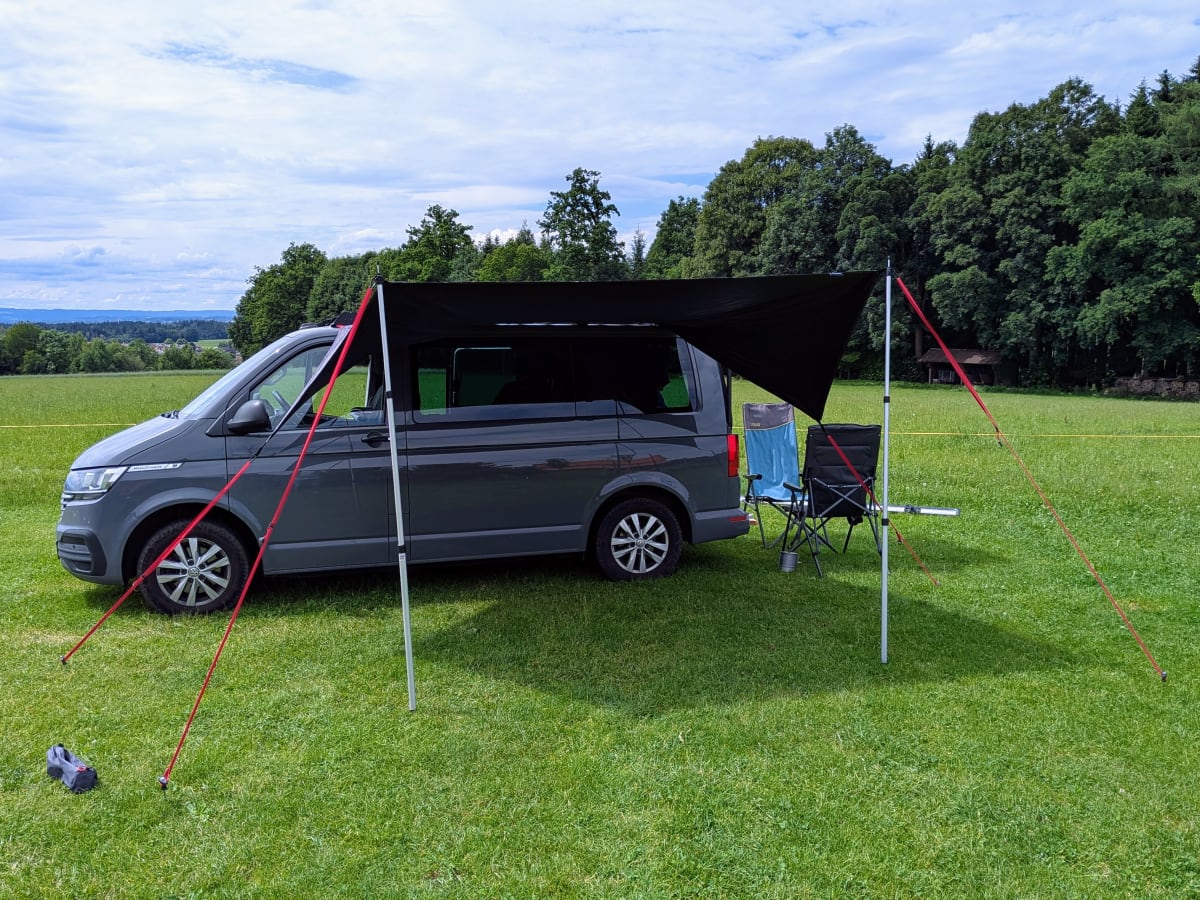
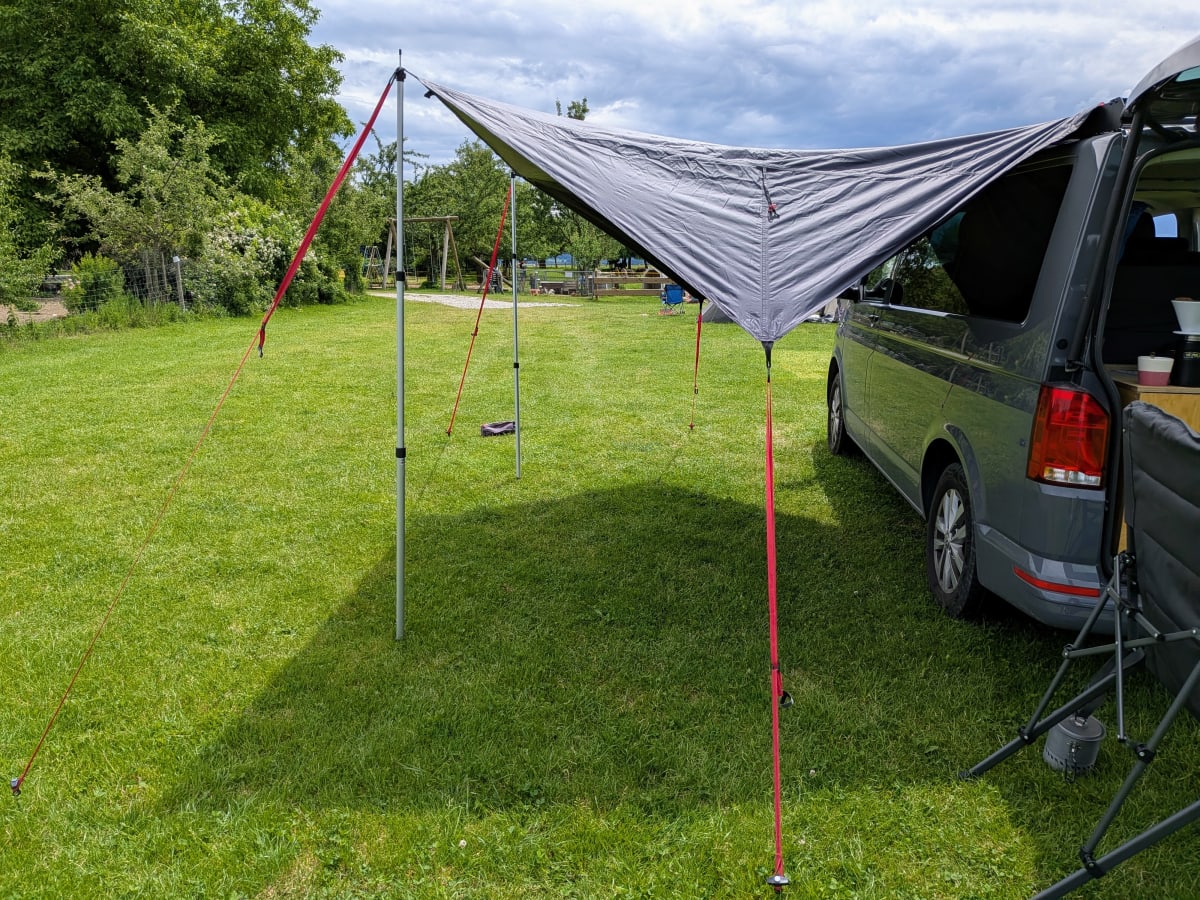
Nach einem billigen Tarp und einem sperrigen Pavillon sollte das Qeedo Motor Tarp die elegante Sonnen- und Regenschutzlösung für unseren T6 Multivan werden. Optik, Verarbeitung und Packmaß haben uns überzeugt – nur der Aufbau hat uns am Ende doch zu viel Zeit gekostet.
Bevor wir beim Qeedo Motor Tarp gelandet sind, haben wir in Sachen Sonnen- und Regenschutz einiges durchprobiert. Angefangen hat es mit einem ganz günstigen Tarp und zwei Stangen, das wir hinten am Caddy befestigt haben. Später kamen zwei weitere Stangen dazu, damit wir auf vier kamen – aber genau das war das Problem: Mit vier Stangen brauchte man zum Aufbau mindestens zwei Personen, ständig haben sich die Stangen verstellt, wir haben unzählige Heringe zum Verspannen gebraucht, und bei nur ein bisschen Wind hat alles geflattert. Danach hatten wir eine Weile einen faltbaren Pavillon dabei – super stabil, aber groß, schwer und auch nicht im Handumdrehen aufgebaut. Als wir dann vom Caddy auf unseren T6 Multivan umgestiegen sind, wollten wir etwas, das wirklich zum Bus passt. Das Motor Tarp sah genau danach aus: schick, für den Bus gemacht, mit verschiedenen Befestigungsmöglichkeiten – und mit rund 150 Euro hält sich die Investition in Grenzen. Also haben wir es ausprobiert.
Das Qeedo Motor Tarp montiert an unserem Multivan.
Die wichtigsten Eckdaten in Kürze:
Technische Daten
Gewicht
ca. 3 kg
Packmaß
101 × 13 × 13 cm
Beschattete Fläche
250 × 250 cm
Wassersäule
4000 mm
UV-Schutz
UV80 (Dark-Coating)
Stangen
2× Alu-Teleskop, 95–230 cm
Alle weiteren technischen Infos findet ihr direkt beim Hersteller:
Noch eine Anmerkung für alle, die ganz genau hinschauen: Wir haben das Tarp auf einem längeren Urlaub ausgiebig genutzt und getestet. Der hier gezeigte Aufbau ist aber nur provisorisch für die Bilder gemacht worden, da wir bisher keine anschaulichen Bilder hatten. Da wir hier bereits unser neues Roof-Rack drauf hatten, ließen sich die mitgelieferten Saugnäpfe nicht befestigen. Daher ist der Aufbau nicht ganz optimal und nur zur Veranschaulichung gedacht.
Aufbau und Befestigung
Beim ersten Aufbau waren wir erstmal angetan – wie von anderen Qeedo-Produkten, die wir schon haben, ist auch hier alles sauber gemacht: das Tarp selbst, die Leinen, die Verarbeitung. Bleibt die Frage, wie man es ans Fahrzeug bekommt. Vorgesehen sind die angenähten 5- und 7-mm-Keder zum Einfädeln in eine Kederschiene – die haben wir am Bus aber nicht und wollten sie auch nicht extra nachrüsten. Also haben wir über die Leinen abgespannt: drei Leinen laufen mittig über das Fahrzeug und werden auf der anderen Seite mit Heringen verspannt, dazu kommen an den Enden zwei Saugnäpfe aufs Dach. Auf der fahrzeugabgewandten Seite stehen zwei Stangen auf dem Boden, jeweils mit zwei Leinen abgespannt. Das vordere und hintere Ende lässt sich zusätzlich mit zwei Dreiecken zum Boden abspannen – oder einrollen, wenn man lieber eine glatte, plane Fläche möchte. So bekommt man das Tarp tatsächlich ordentlich gespannt.
Ist es erstmal aufgebaut, steht es ordentlich. Okay, eine Stange ist noch etwas schief, das lässt sich korrigieren.
Stabil, aber zeitaufwändig
In der Praxis funktioniert das gut, und windstabil ist das Tarp durchaus. Was uns aber zunehmend gestört hat, ist der Zeitaufwand: Bis alles sitzt, ist man eine ganze Weile beschäftigt – hier nochmal die Leinenlänge nachziehen, da die Stangenhöhe korrigieren, und dann von vorne. Schnell ist eine halbe Stunde rum. Vor allem die Stangen sind ein echter Schwachpunkt. Sie lassen sich zweifach ausziehen, man hat also gleich zwei Drehpunkte zum Verstellen, und sie wirken insgesamt etwas billig – wie Standardstangen, die es an jeder Ecke gibt. Die Feststellung per Festdrehen ist anfällig, teilweise sind uns die Stangen während des Aufbaus wieder zusammengerutscht. Hier würden wir uns eine feste Stange oder wenigstens einen einrastenden Verstellmechanismus wünschen.
Das Tarp bietet ausreichend Schutz vor Sonne und Regen und ist durchaus gemütlich.
Verarbeitung und Packmaß
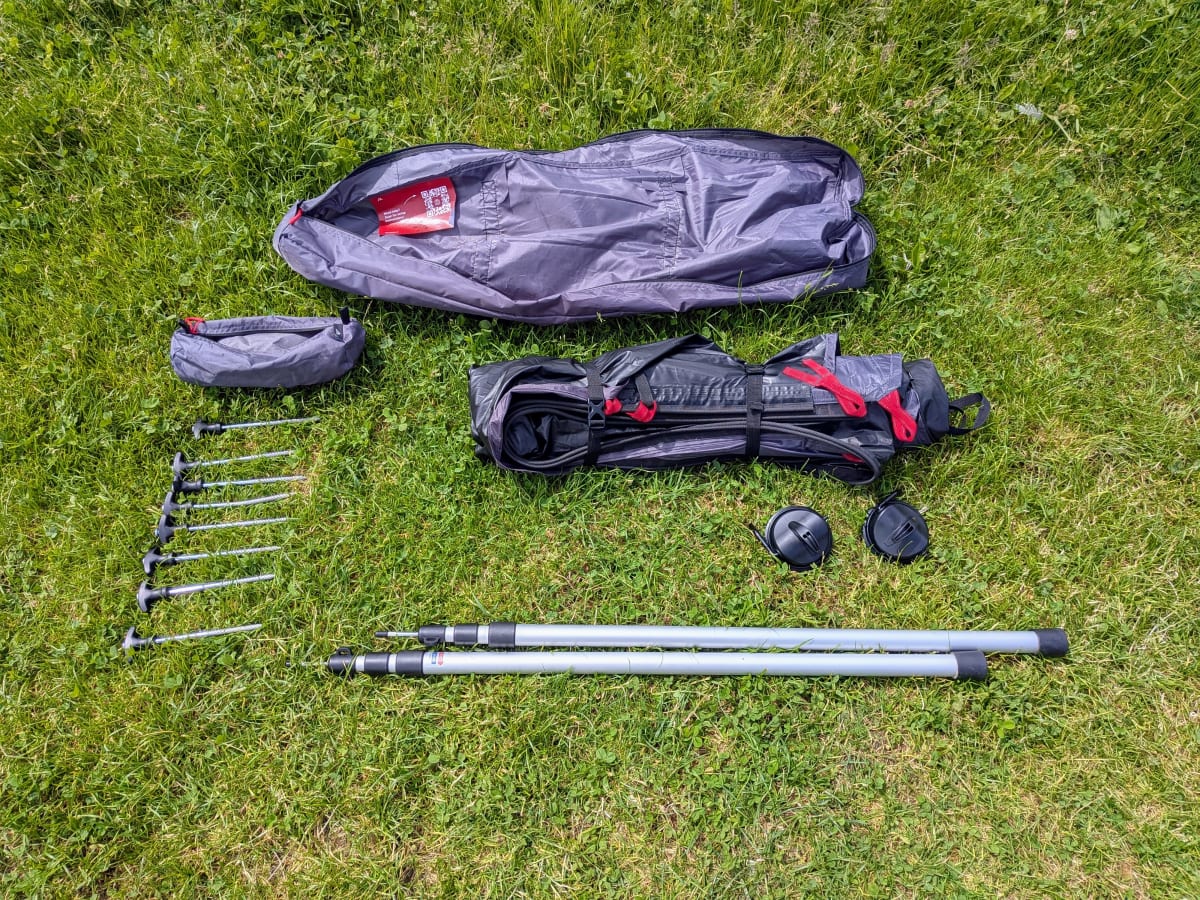
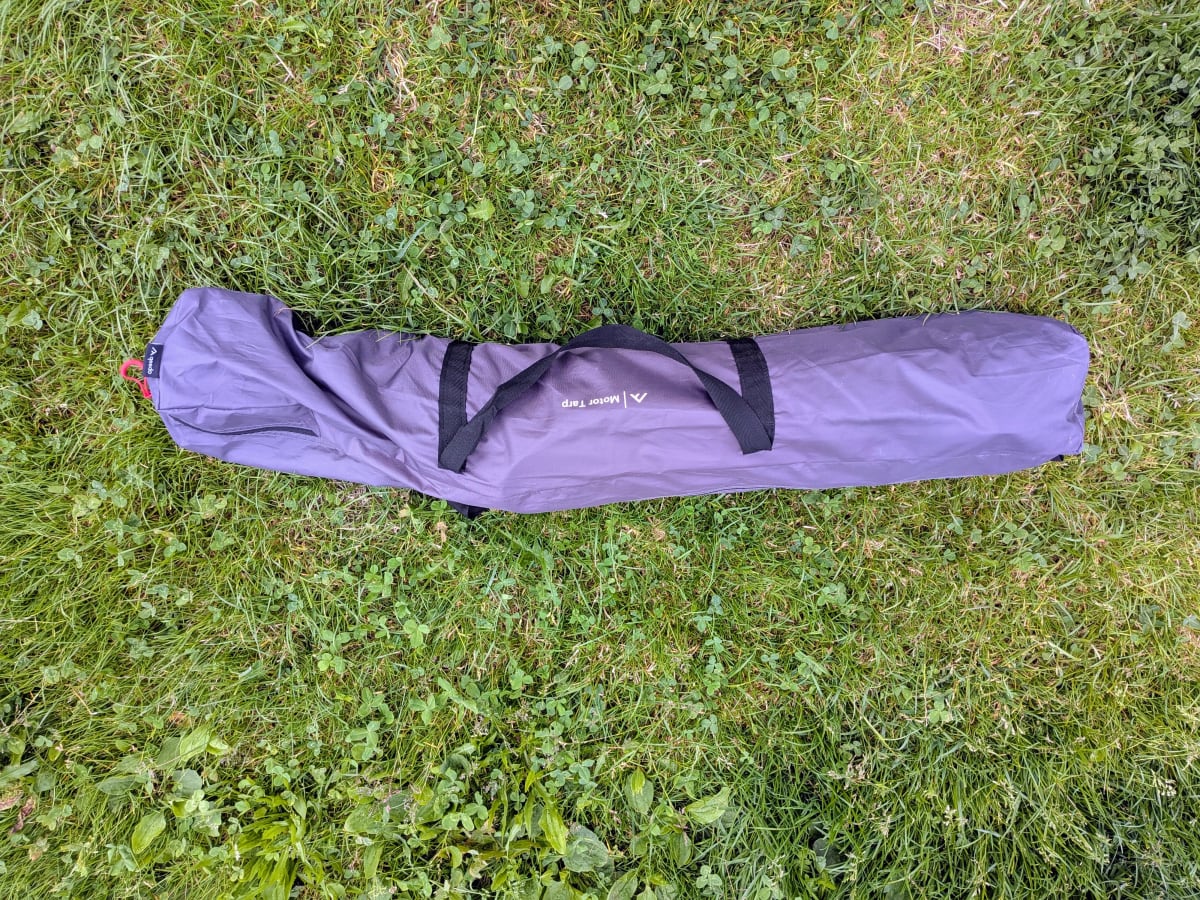
Abgesehen von den Stangen stimmt die Verarbeitungsqualität. Besonders die Heringe haben uns überzeugt: stabil, mit leichter Schraubenform zum guten Eindrehen und mit praktischen Griffen. In die mitgelieferte Tasche passt alles problemlos zurück, das Packmaß ist mit 101 × 13 × 13 cm schön klein und mit rund 3 Kilo ist das Ganze leicht zu verstauen. Im Vergleich zu einem ausgewachsenen Faltpavillon ist das quasi nichts – das ist klar ein Pluspunkt.
Das alles ist drin in der Tasche.Die Packtasche verpackt das ganze schön kompakt und es verbraucht tatsächlich kaum Platz.
Fazit
Von der Verarbeitung her ist das Motor Tarp in Ordnung, das Styling ist gewohnt cool, nur die Stangen überzeugen nicht. Wahrscheinlich ist es eines der besten Tarps für den Bus da draußen, aber am Ende haben wir es doch wieder verkauft. Der Aufbau dauert uns einfach zu lange, und gerade wenn man häufig auf- und wieder abbaut, nervt das ständige Hier-und-da-Nachjustieren. Dazu kommt, dass die Leinen über das Fahrzeug laufen und sich damit nicht immer alle Türen bequem öffnen lassen. So schön die Idee ist, alles flexibel in einer Tasche dabeizuhaben – für uns war es am Ende zu viel Gebastel. Für uns war es damit an der Zeit mal eine richtige Markise auszuprobieren.
So schön es ausschaut; es muss leider wieder gehen.
Renogy Foldable Solar Suitcase 100 W
Fred · 2024-06-23
★★★★★ · A solidly built, reliable solar suitcase that pairs beautifully with our battery box – just heavy and bulky, and the constant setting up and packing away got to be too much for us over time. There's nothing wrong with the product itself: full recommendation.
After a foldable 80-watt solar bag gave up the ghost early, we wanted something sturdier – and ended up with Renogy's foldable 100 W solar suitcase. Solidly built, reliable, and a great team with our battery box. We still didn't keep it in the end, though.
Our first piece of portable solar was a foldable 80-watt solar bag from Offgrid Tech – small, compact, and nicely soft, with no sharp edges, so we could even lay it on the car roof. As handy as that was, it never had much punch: we rarely saw the full 80 watts. And after just a year and a handful of outings, it suddenly quit – somewhere a cable or contact had failed, the kind of thing you can't fix without fully taking the bag apart. That made it clear to us: we needed something sturdier, a proper hard-shell solar suitcase. That's how we landed on Renogy.
The format isn't especially common, and when we bought the suitcase a few years ago it wasn't cheap either – around 200 euros, and only an offer made it affordable for us. These days suitcases like this have gone a bit out of fashion, and Renogy barely sells it anymore – but you can now find it for around 90 euros.
The key specs at a glance:
Specifications
Power
100 W (2× 50 W, monocrystalline)
Open-circuit voltage
24.3 V
Optimum voltage
20.3 V
Weight
9.3 kg
Folded size
63 × 51 × 7 cm
Connector
MC4
Unfolded, two 50-watt modules add up to 100 watts – a classic hard-shell solar panel.
Built tough
The very stability the solar bag lacked is exactly what the suitcase delivers. It's solid through and through: a classic hard-shell solar panel whose thick supplied cables lie out in the open, where nothing can snag or chafe anymore. Folded up, the suitcase closes on massive hinges, the cables sit protected inside and the modules face out – it feels genuinely robust. And so nothing gets knocked about, there's a sturdy case that protects the whole thing well in transit. Our impression is that it should last for many years.
The back, with its massive hinges, exposed thick cables, and the MC4 connector.The sturdy carry case that keeps the suitcase well protected in transit.
Heavy and bulky
The price for that solid build is weight and bulk. At 9.3 kilos the suitcase is a much bigger, heavier affair than the old solar bag, harder to transport and thirstier on storage space. Quickly propping it on the car roof or behind the windscreen is barely an option either – because of the hard edges it tends to end up on the ground for us, or at most carefully on the roof so nothing gets damaged.
The fold-out legs let us angle the suitcase toward the sun; the thick cable runs to the battery box.
Teamed up with the battery box
We ran the suitcase off our self-built battery box. Our version deliberately comes without a charge controller – which suits us fine, since the regulation lives in the battery box anyway. And the combination worked out great: the suitcase's output pairs nicely with the box's small battery. The handy part is that you can either set the battery box outside or leave it in the car and just run the cable out – that always worked reliably for us.
Verdict
We're thoroughly happy with the suitcase itself: robust, reliable, and a great team with our battery box. We still didn't keep it in the end – and that wasn't down to the product. The general catch with a suitcase like this is that at every spot you have to set it up, angle it, and bring it back to safety at night. That effort became too much for us over time, so we decided that from now on the solar panel simply belongs fixed to the roof. That's why we passed this suitcase on as well. For anyone after a flexible, sturdy solution, though, it's a full recommendation – even if it wasn't the lasting answer for us.
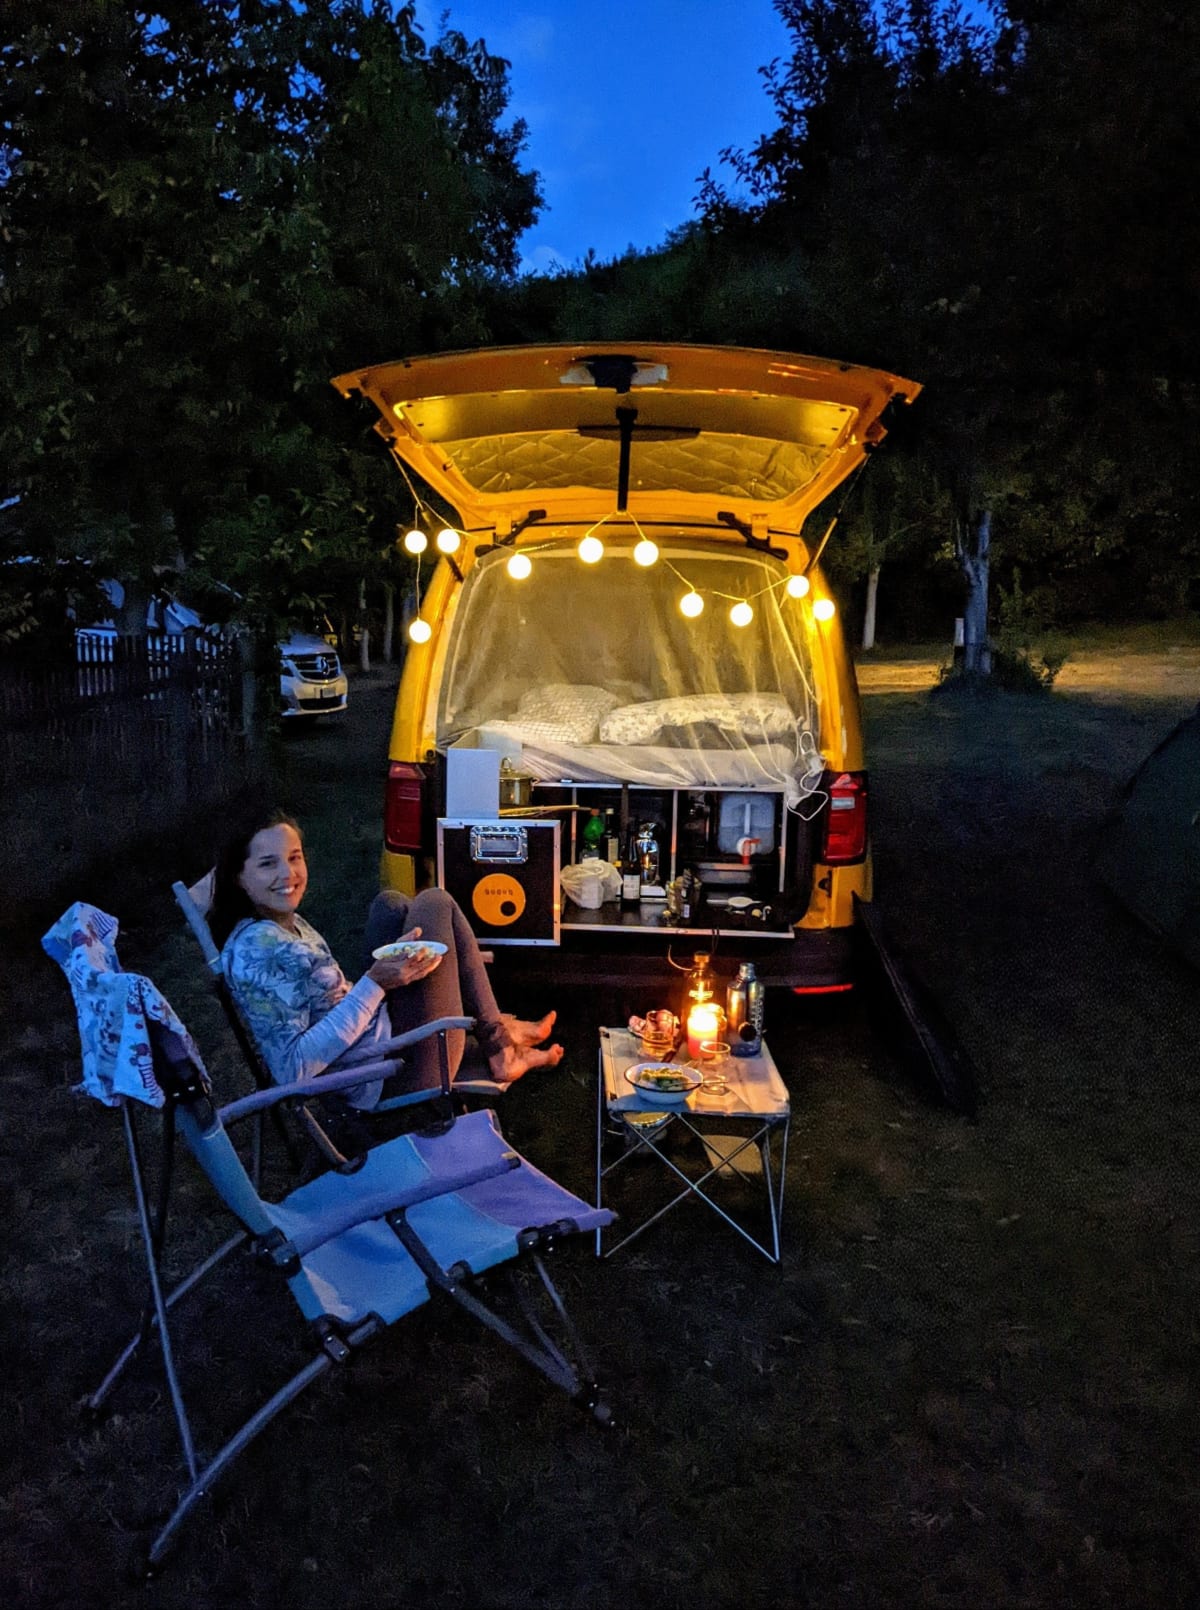
Ququq KombiBox for high roof vans
Susi & Fred · 2021-06-12
★★★★★ · A great solution for small vans — we'd buy it again.
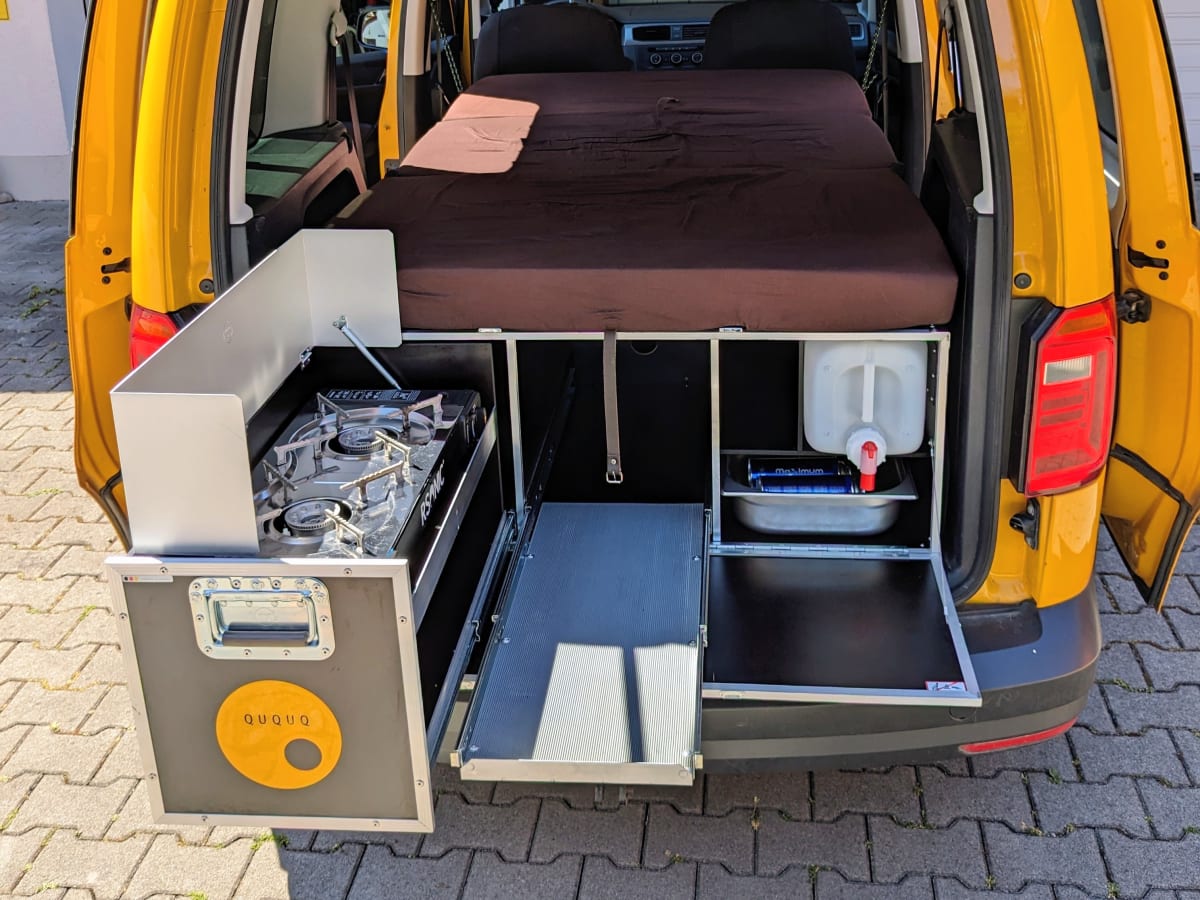
In this little review we want to share our experience with the Ququq KombiBox. After buying our yellow Caddy we needed a minimal camping solution – and chose the Ququq KombiBox as a simple rear kitchen with sleeping setup. To put it upfront: we love this little box.
The QUQUQ KombiBox is a compact camping solution designed for high roof vans. It takes just a few minutes to place it in the trunk and secure it with straps. The box combines everything you need for spontaneous trips: a 2-burner stove with windshield, a 10 cm cold foam mattress (195 x 110 cm), two 10-litre water canisters and stainless steel bowls. The bed folds out and hooks onto the seatbelt anchors, while the kitchen is ready to use the moment you open the lid. What makes it really practical is that you can remove the box anytime without permanently modifying your car. It fits many different vehicle models and is a flexible alternative to full van conversions. In the picture below you can see the box installed in our Caddy with all the included accessories. The middle pull-out tray is not included by default and has to be ordered separately.
The Ququq KombiBox installed and in sleep mode in our Caddy mini camper.
We mainly want to share our personal experience here, not list every feature in detail. For all the specs and technical information, check out the manufacturer's website:
What impressed us from the start is the build quality. The materials feel premium, nothing rattles, everything fits together tightly and feels solid. Two people can easily carry and lift the box into the trunk. Once inside, you secure it with ratchet straps – takes a bit of patience the first time, but becomes routine quickly.
The interior layout is well thought out and surprisingly spacious for its compact size. The drawers fit everything you need for cooking and eating. There is extra storage space under the stove for dishes, and we can highly recommend the optional middle pull-out tray – we used it for all sorts of food and kitchen supplies. The fold-down rear panel doubles as a worktop and shelf. It only holds about 15 kilos and you definitely should not sit on it, but for cooking and placing things it is perfect.
Cooking and storage
The included 2-burner stove is not a high-end piece of equipment – more in the 80-euro range – but it has enough power and worked reliably throughout our trips. You just have to know that the slim gas cartridges need to be replaced a bit more often. Standing outside in good weather, cooking a meal and then eating with a view of the landscape – that is simply an unbeatable feeling of freedom.
We did not store a cooler box in the back of the Ququq, by the way. The space on top is a bit too narrow for that, so we kept ours in the front footwell where it was easier to reach.
Sleeping
We had the version for the short Caddy. That means you have to push the rear seats forward and tilt them to sleep. This was sometimes a bit annoying, but in an everyday car like the Caddy there is really no other way. For the long Caddy there is a version where this is not necessary. The bed hooks onto the seatbelt anchors and is adjusted to the right height with ropes. Getting the rope length right takes some patience at first, and it can shift slightly over time – but overall it worked well. The mattress itself is surprisingly comfortable. Under the suspended bed we still had enough room for our clothes boxes, which we could pull out from either side.
On the road with the Ququq
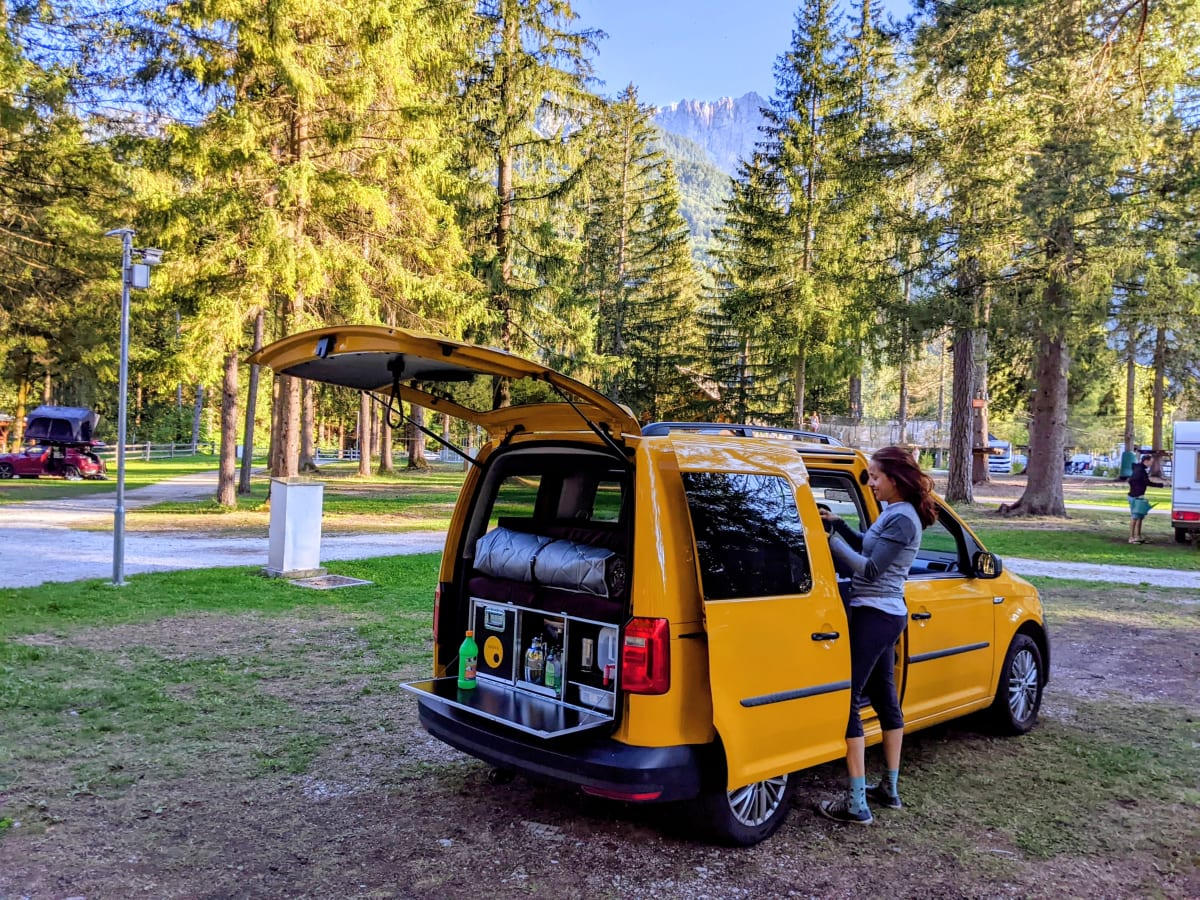
The box accompanied us on some beautiful trips. One of them took us to Camp Spik in Slovenia – a gorgeous spot at the foot of the Julian Alps.
In drive mode with the worktop folded out at Camp Spik in Slovenia.
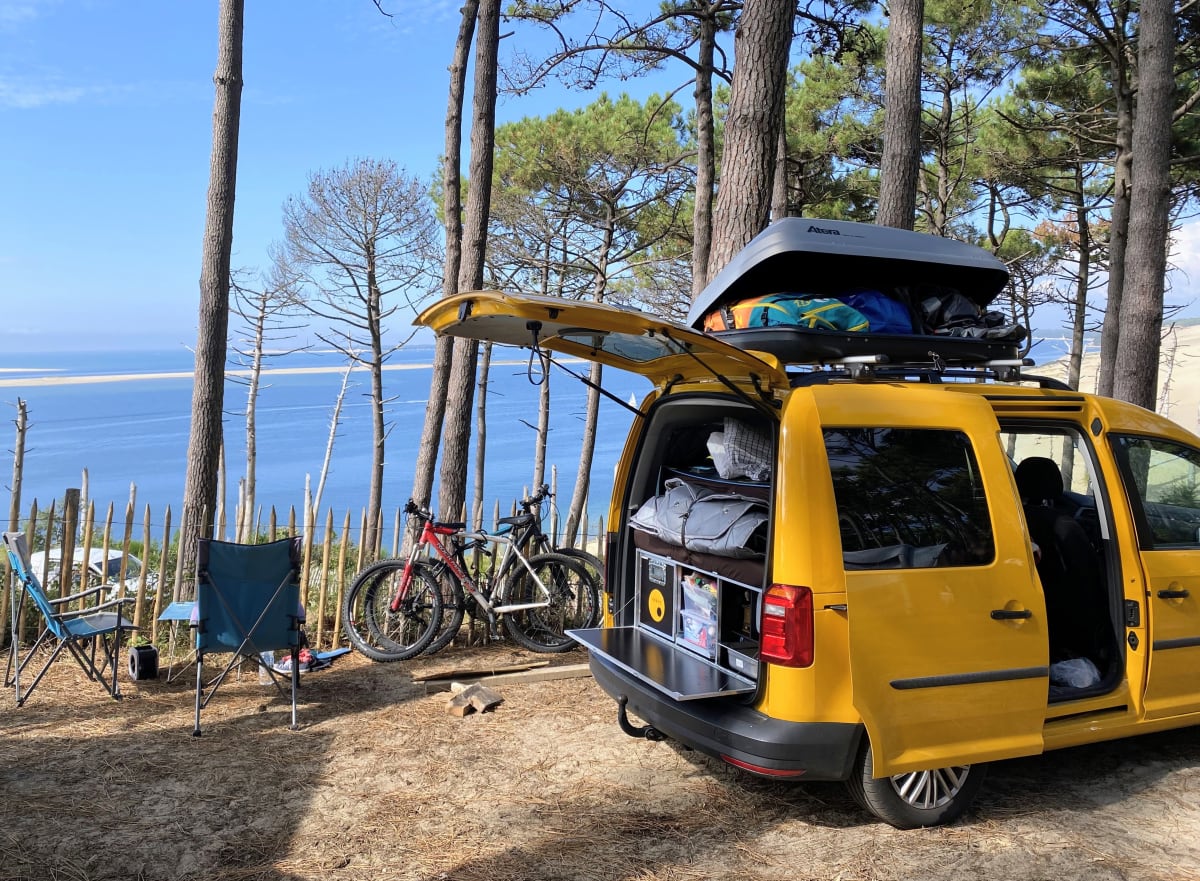
The absolute highlight was the Dune du Pyla campsite in France. We were parked on top of the dune, a good 100 metres above sea level, right at the edge with a full panoramic view of the ocean. We had our bikes and a roof box with us, and in the evenings we cooked dinner with a sea view. Sadly, this campsite no longer exists in this form – wildfires in 2022 destroyed the pine forests. The site has reopened, but without the beautiful trees it is just not the same.
At the beautiful Dune du Pyla campsite in France – our most spectacular spot so far.
In Croatia we spent a night on a small fruit orchard near the Plitvice Lakes. An older gentleman handed out homemade schnapps – a campsite of the charming kind.
Evening vibes on a small fruit orchard near the Plitvice Lakes in Croatia.
Verdict
We are thoroughly happy with the Ququq KombiBox. It is compact, well designed and built to a high standard. For anyone who does not want to permanently convert their daily car but still wants to hit the road spontaneously and camp self-sufficiently, it is an excellent solution. We would buy it again in a heartbeat.
Projects
DIY projects and tutorials useful for camping and outdoor adventures.
Battery box
Fred · 2022-07-03
€ 220 · 2d · A fun weekend project to get a reliable solar storage solution.
A self-built solar battery box, made entirely from standard off-the-shelf components. It reliably powers our cooler, charges our devices and has been running without issues for years. The big advantage over ready-made solutions: it's tailored to our needs and can easily be expanded or repaired.
We prefer camping simple, minimal and with as little hassle as possible. Our yellow Caddy was perfect for that: small, nimble and with a Ququq box in the trunk we had almost everything we needed. The one thing we were missing from the start was a way to power our compressor cooler without relying on a campsite power hookup.
My first approach was the obvious one: buy a ready-made battery pack, add a solar panel, plug everything together, done. So I got a battery with an Anderson connector for the solar panel and a 12-volt output for the cooler. On paper it all made sense. Then came the first test and the disappointment: as soon as the cooler went into standby and stopped drawing power, the battery simply shut itself off. The cooler stayed off and the battery would not turn back on by itself. As I found out, many off-the-shelf battery packs have this problem: when the output voltage drops, they go into sleep mode after a short time.
So I needed a different solution. I looked into how people build small solar setups at home, balcony power stations and similar projects. The principle is actually simple: a solar charge controller connects the solar panel to the battery, add a few fuses and connectors, and that is basically it. How hard can it be, I thought. And honestly, it was also a welcome hobby project to get into.
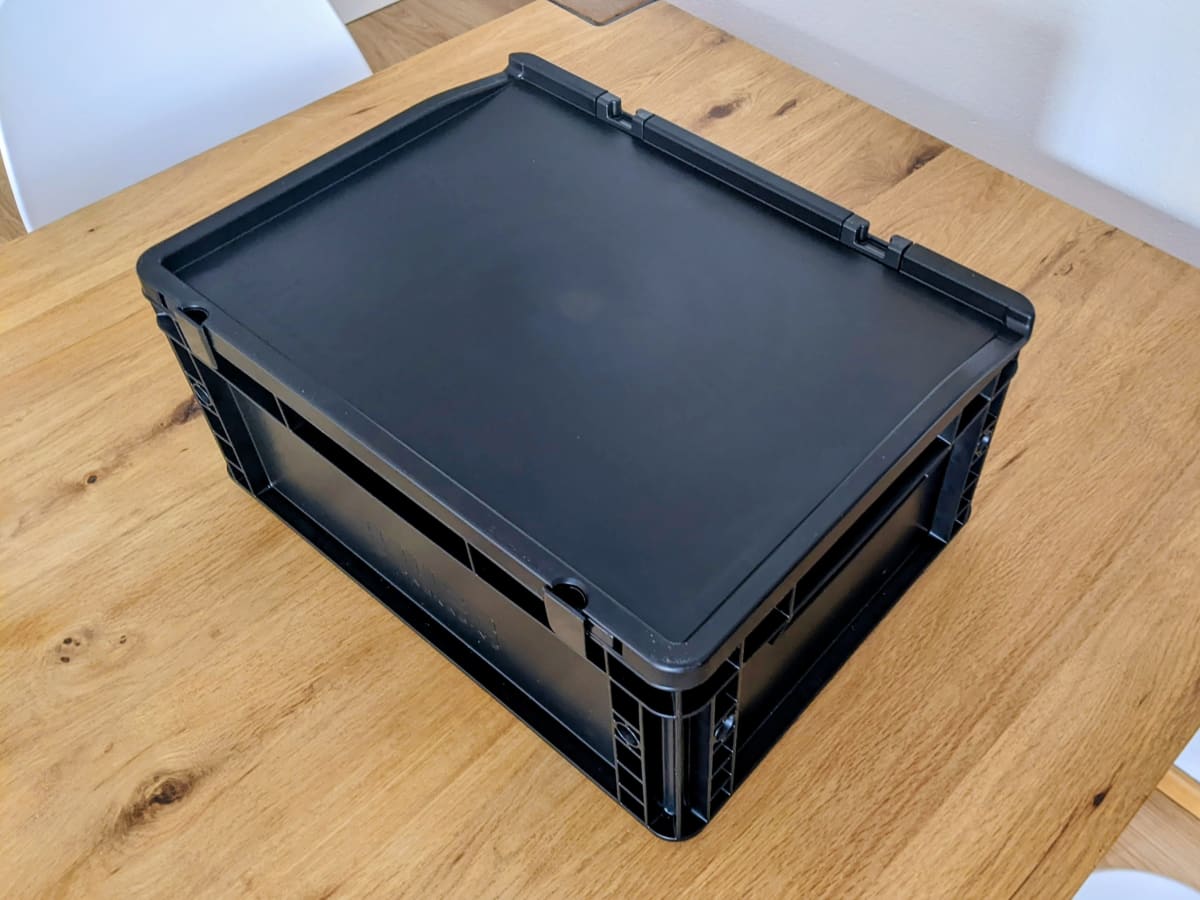
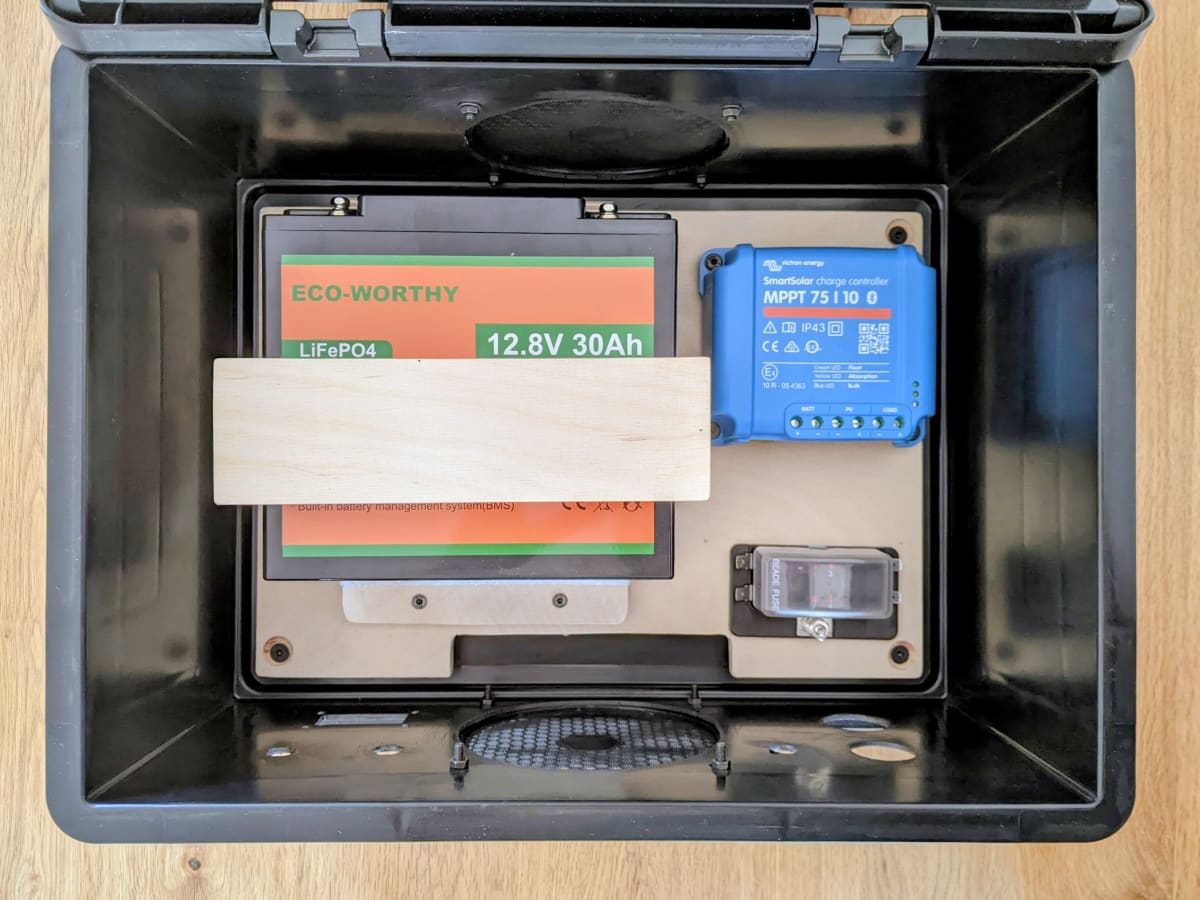
For the enclosure I chose a black Eurobox from Auer Packaging, measuring 40 x 30 x 18.5 cm. Small enough to not get in the way inside the Caddy, but big enough for all the components. The battery ended up being a 30 Ah lithium iron phosphate cell, an affordable but solid model that should be more than enough for our energy-efficient cooler.
Black Eurobox with lid, 40 x 30 x 18.5 cm.
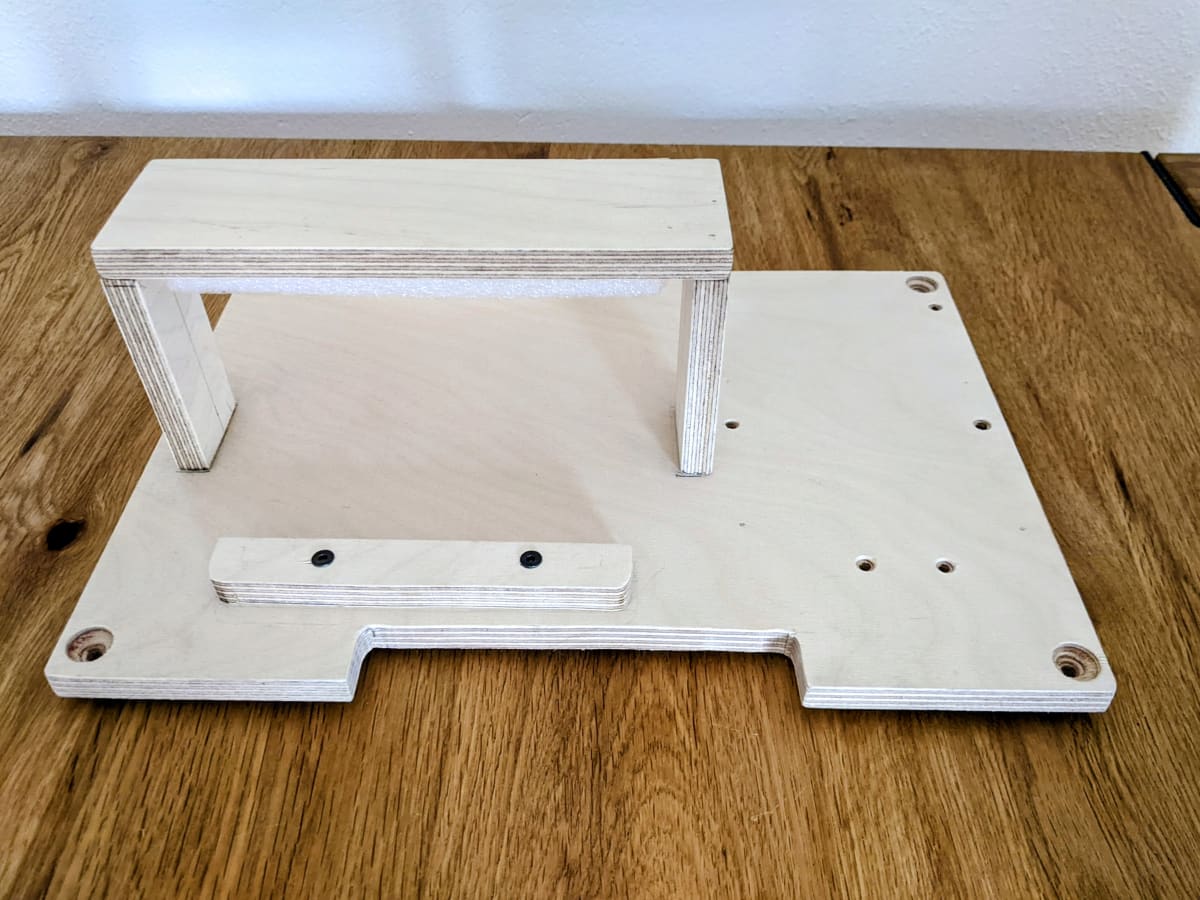
Inside the Eurobox I first needed a base plate to mount the components on. I used several layers of craft plywood for that. On top of it I built a small U-shaped bracket to hold the battery securely in place.
Plywood base plate with U-shaped bracket to hold the battery in place.
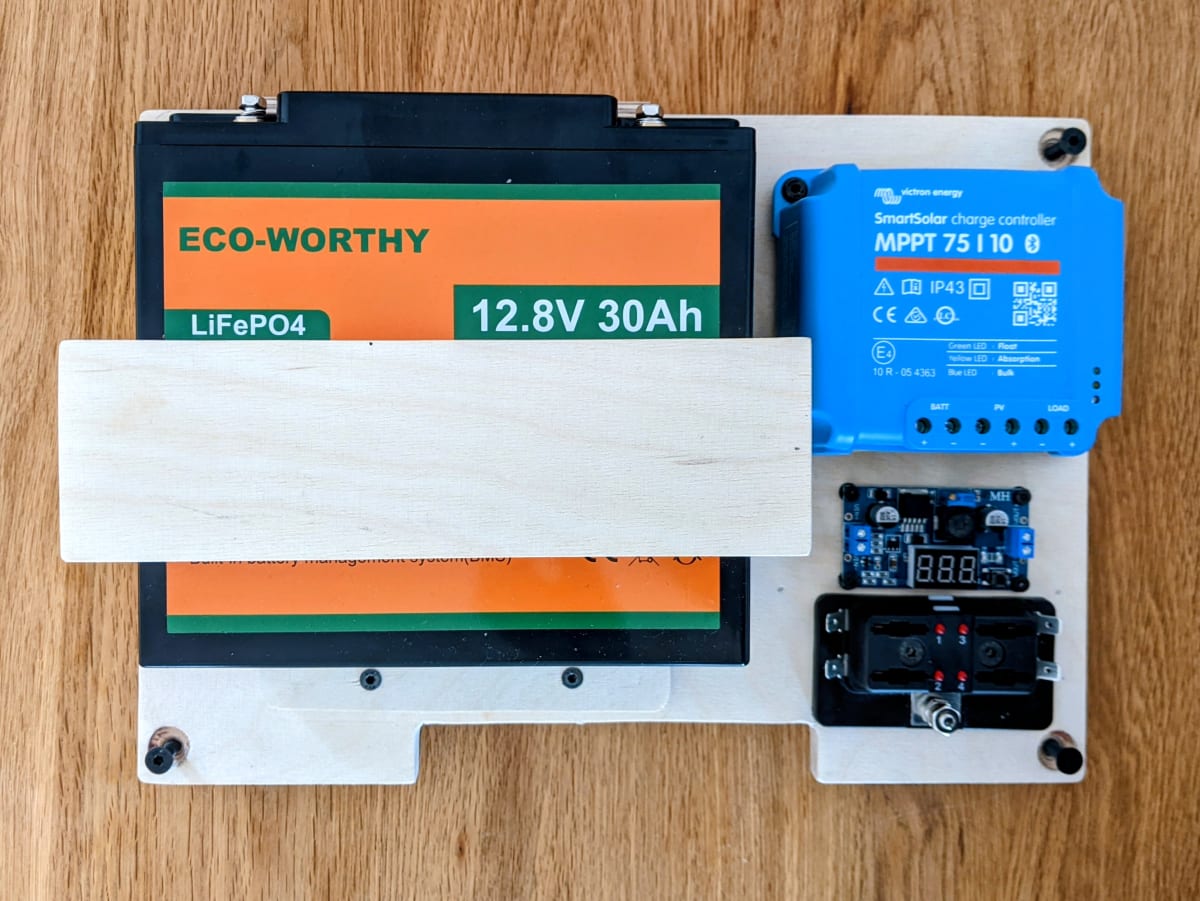
On the left side of the base plate sits the battery in its bracket. To the right I fitted the MPPT solar charge controller, a fuse holder, and a small buck converter. The buck converter supplies the correct voltage to a 120 mm fan – a small extra that was not strictly necessary, but makes sense on sunny summer days. The fan has a built-in temperature sensor and regulates itself.
Battery, solar charge controller, fuse holder and buck converter mounted on the base plate.
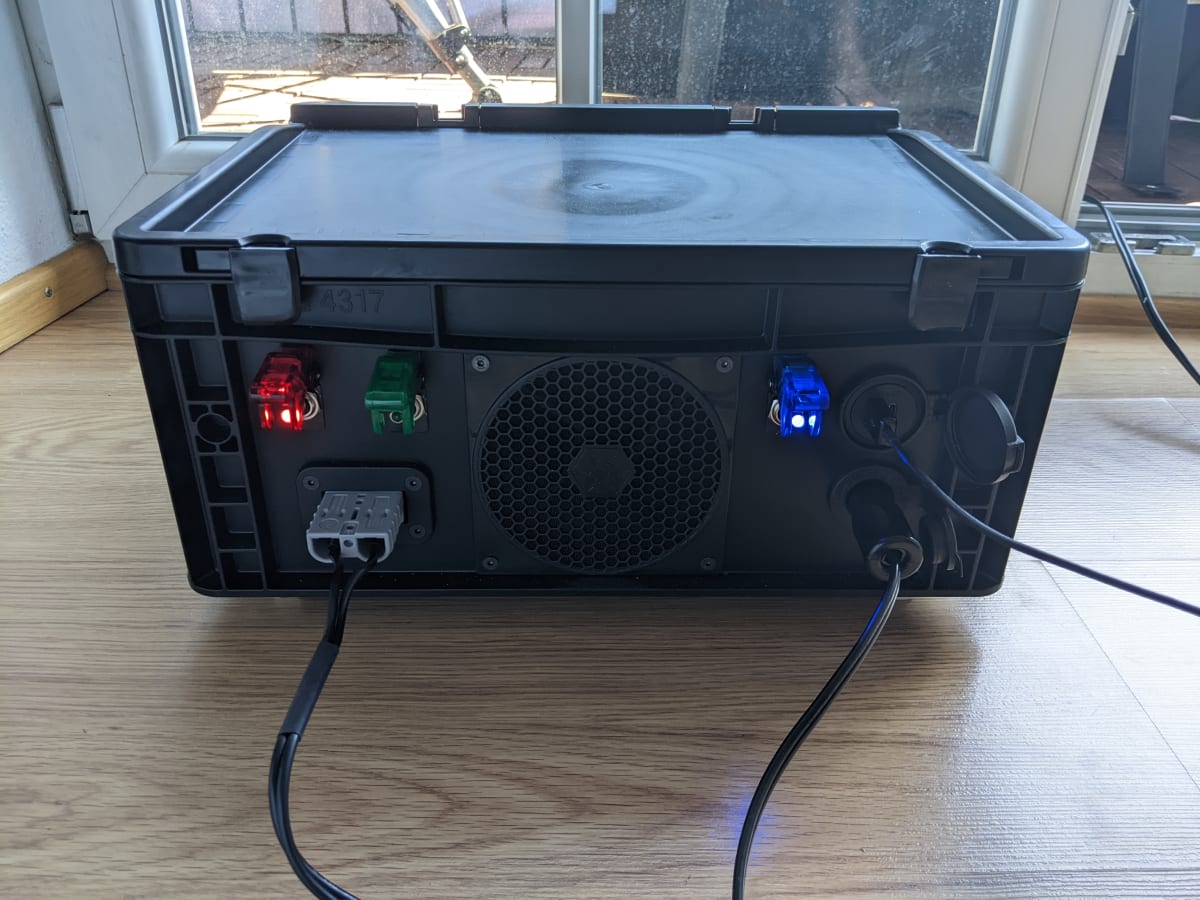
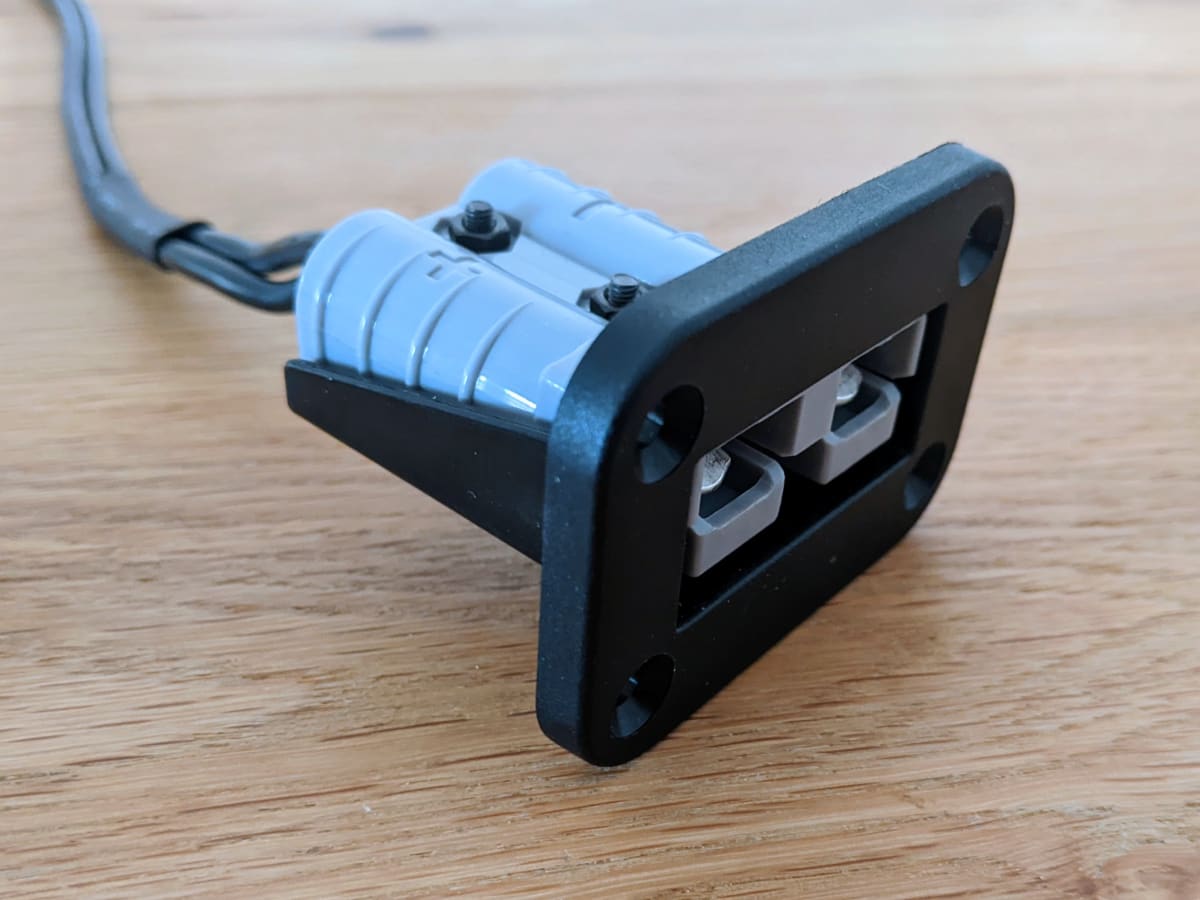
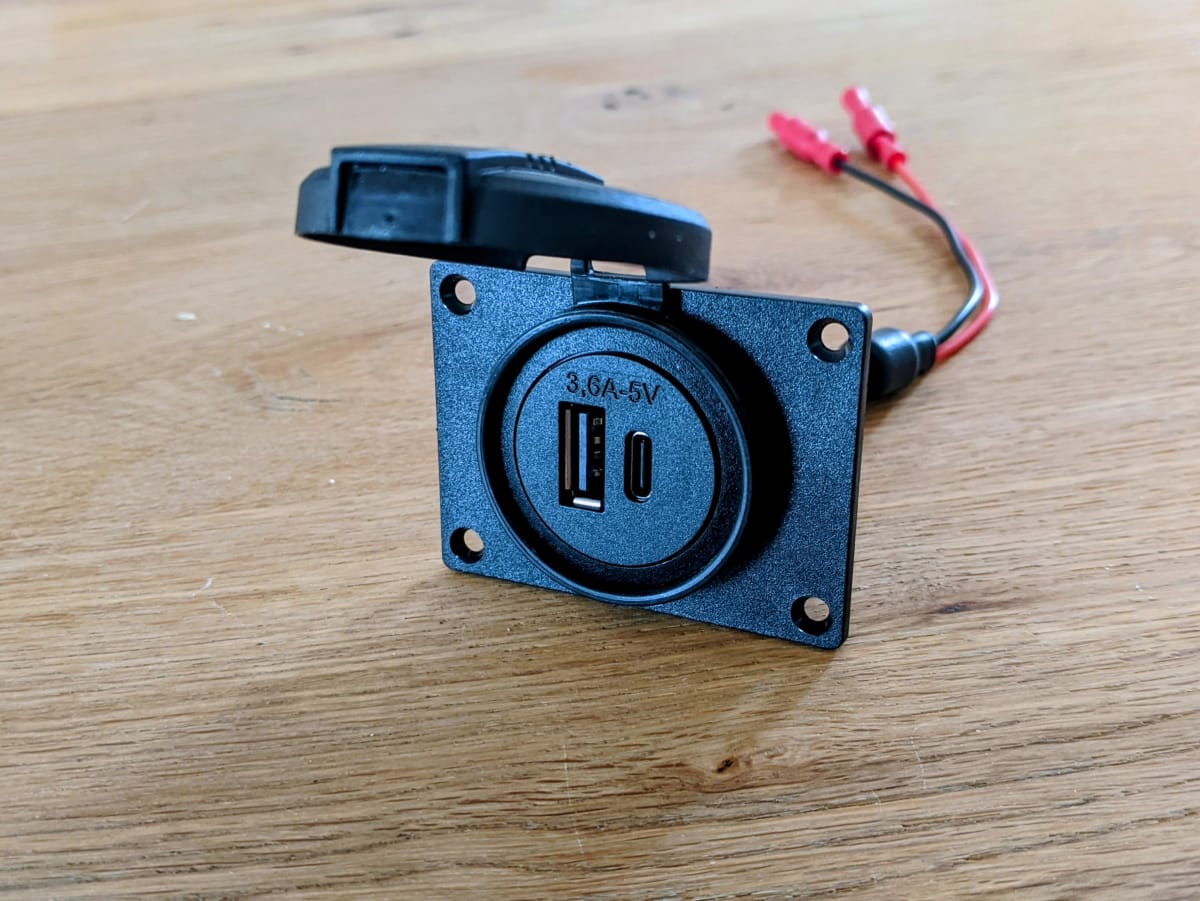
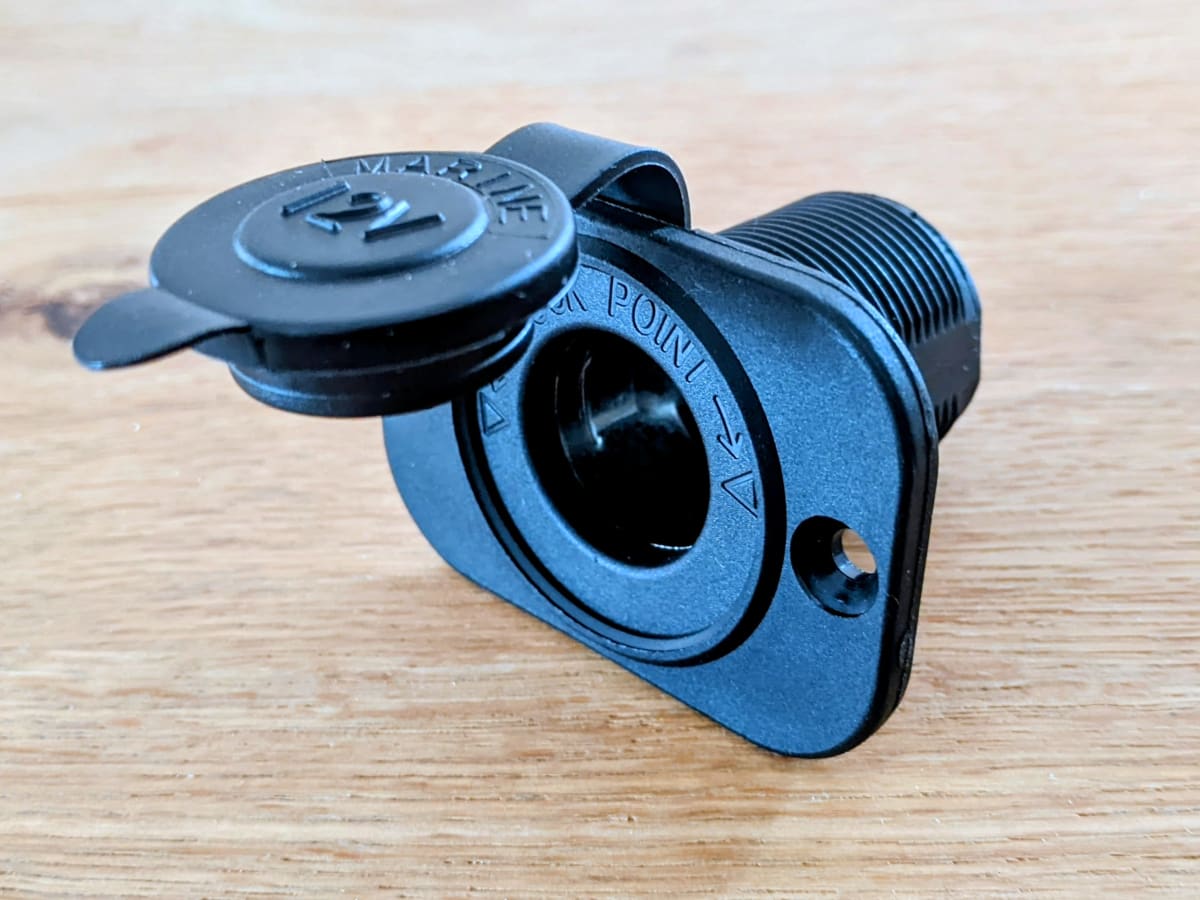
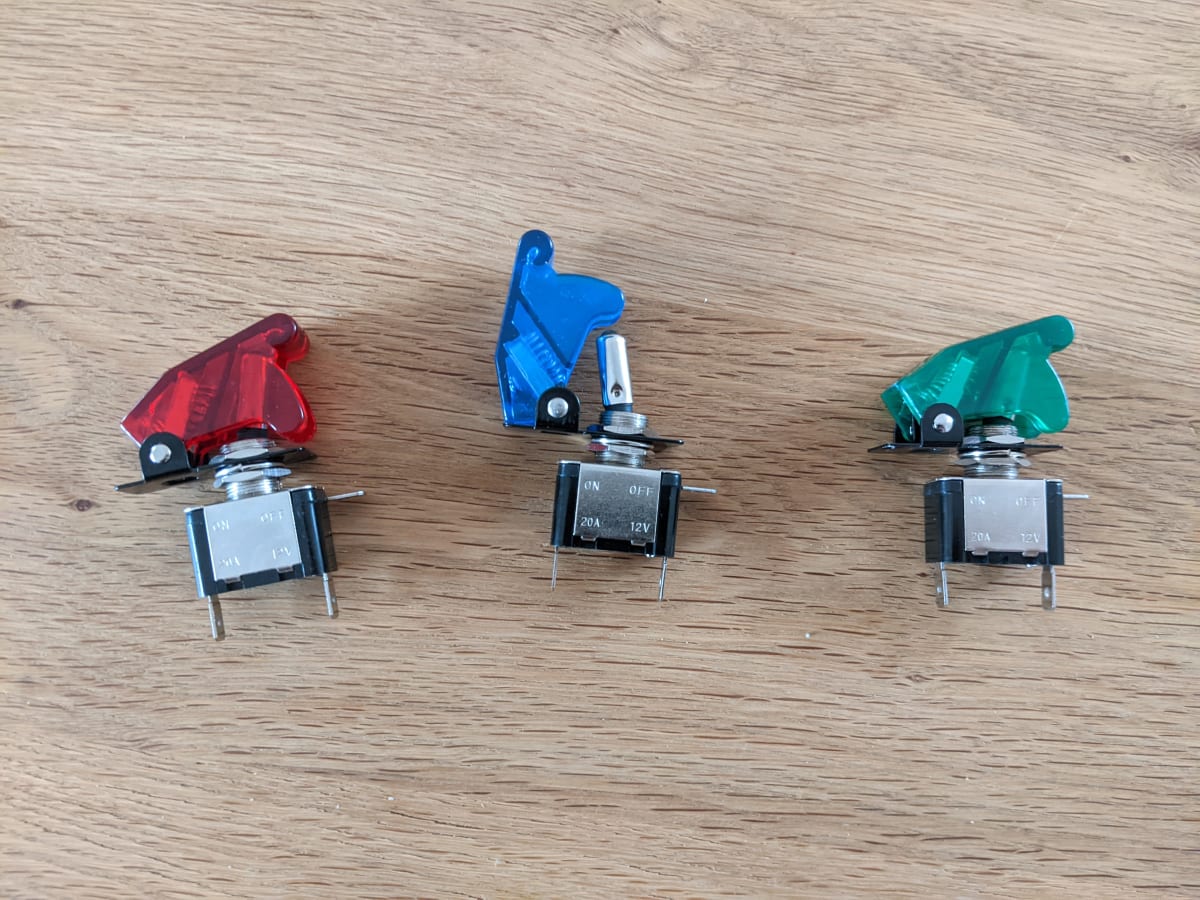
Then came the exciting part: fitting the base plate into the Eurobox and wiring everything up. I cut two round openings into the box with a jigsaw for ventilation – one at the front for the fan, one at the back as an exhaust. The smaller holes for the connectors were made with Forstner bits and regular drill bits. On the front panel I mounted an Anderson connector as the solar input, a 12-volt socket for the cooler, a USB socket with A and C ports for charging phones and other devices, plus three coloured toggle switches with illuminated caps: red for the battery, green for the solar input, and blue for the outputs. This way everything can be switched on and off individually.
Fitting into the Eurobox with wiring, fan and the first connectors installed.
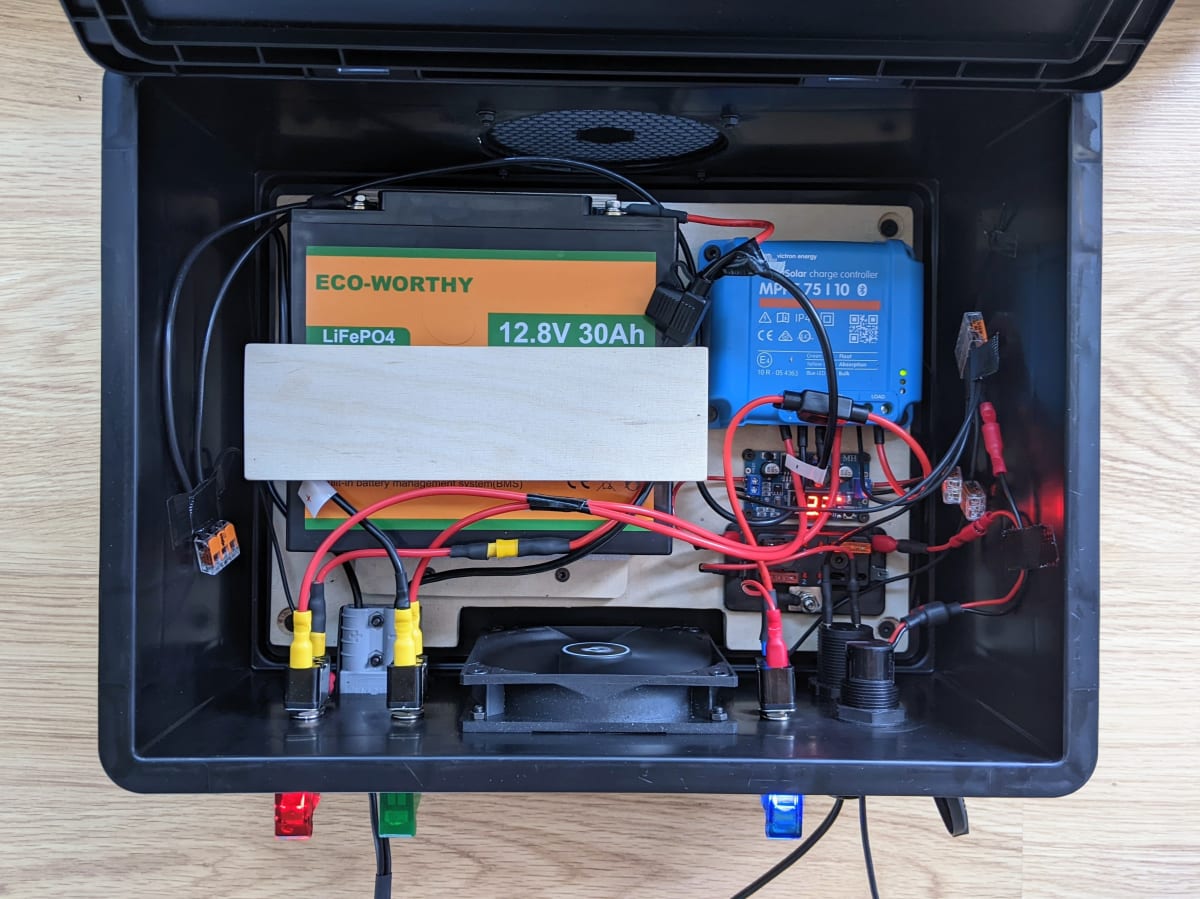
The wiring was one of the bigger challenges. There is enough space inside a Eurobox of this size, but when you start connecting everything it gets tight quickly. In a commercial product every millimetre is optimised, but with a DIY build you need considerably more room – if only because you might have to take something apart or adjust it later. But it just about fit. All consumers are individually fused, and the battery has an additional main fuse on the positive lead. I check regularly that everything is still tight and working properly.
All components installed and wired up, view from inside.
The fan openings got black fan grilles that match the Eurobox perfectly. The 12-volt socket and the USB socket have dust and splash caps. And the Eurobox lid locks shut, so nothing can open during transport.
Finished battery box from the outside with toggle switches, connectors and fan grilles.
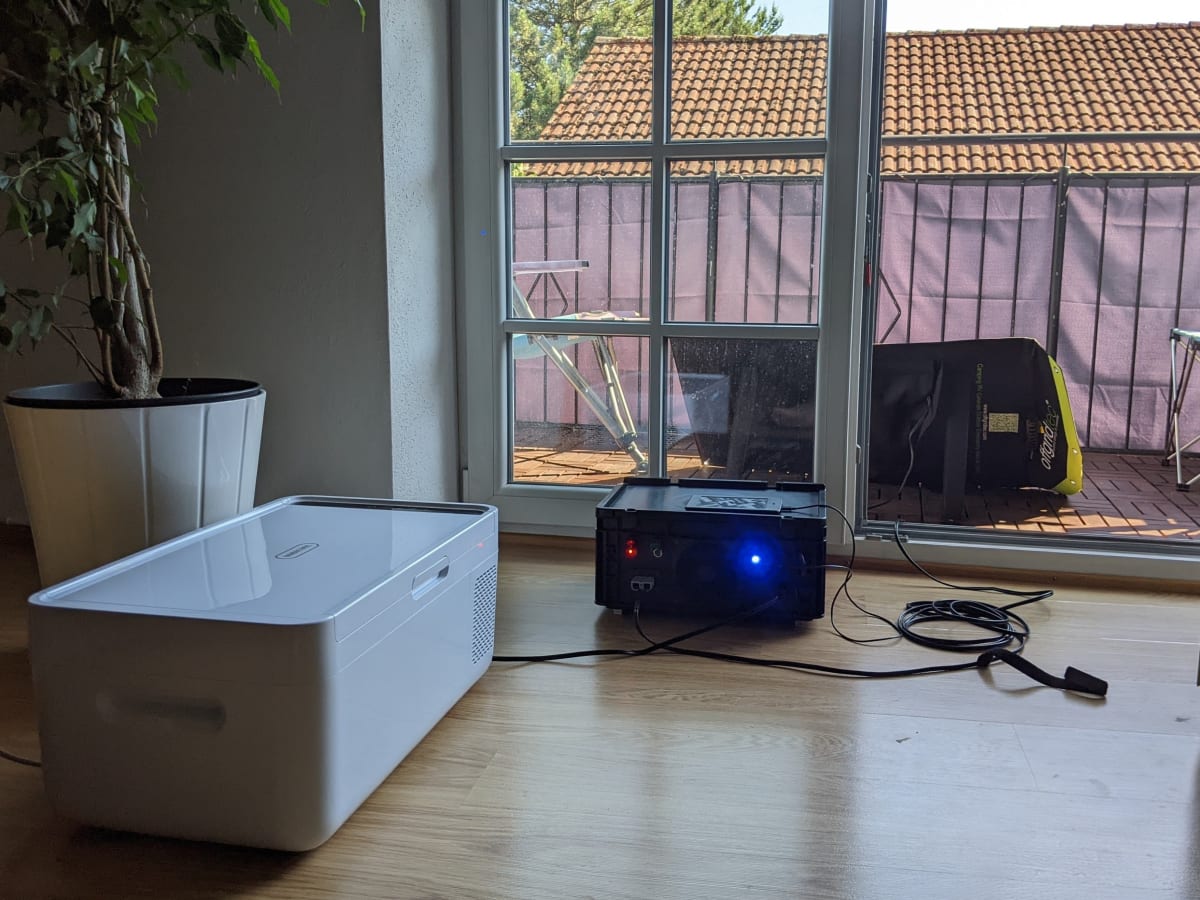
The last picture shows the box in action, here still at home during the first test. On the balcony sits the foldable 80-watt solar panel, which eventually gave up and was replaced by a 100-watt solar suitcase. Inside on the floor is the battery box with its glowing toggle switches, a Kindle charging on top, and the compressor cooler next to it.
The battery box in action: solar panel on the balcony, cooler and Kindle running on solar power.
The box has been in use for several years now and has held up remarkably well. Functionally there have been almost no issues. A few hours of sun per day are enough to keep the cooler running reliably. On the side we charge phones, occasionally run a small fan, a lamp, or our lanterns at the tent awning. It is obviously not enough for an electric kettle, but for everything else it is more than sufficient.
What really makes this box special for us is the independence. We often camped without a power hookup, just with the solar panel, and it always worked. You do have to make sure the box does not sit in the rain – it is not fully waterproof. But it has survived the occasional shower without any problems. And honestly, setting up and angling the solar panel is part of the camping fun for me: a bit of tinkering, a bit more freedom, even when you could have just booked the power hookup at the campsite.
Below is a gallery showing some of the components in more detail.
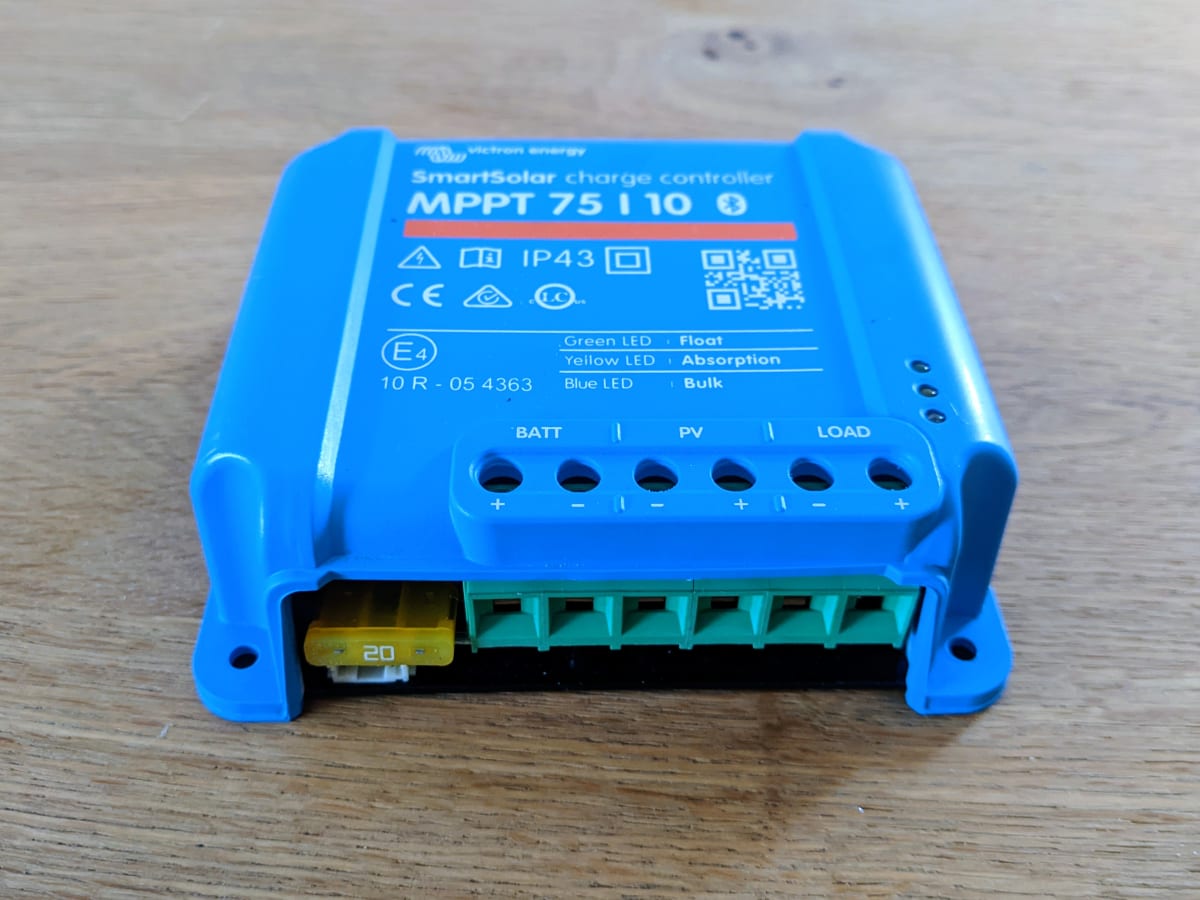
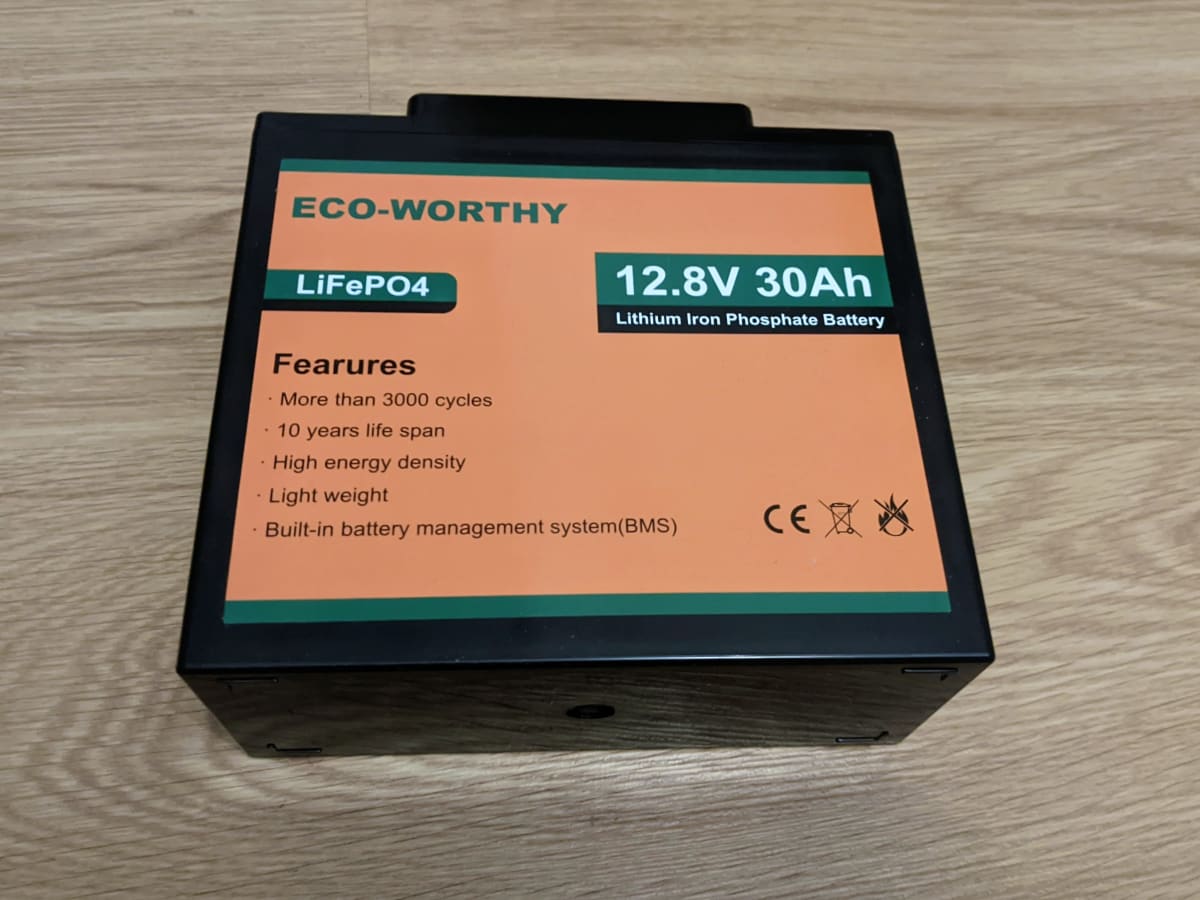
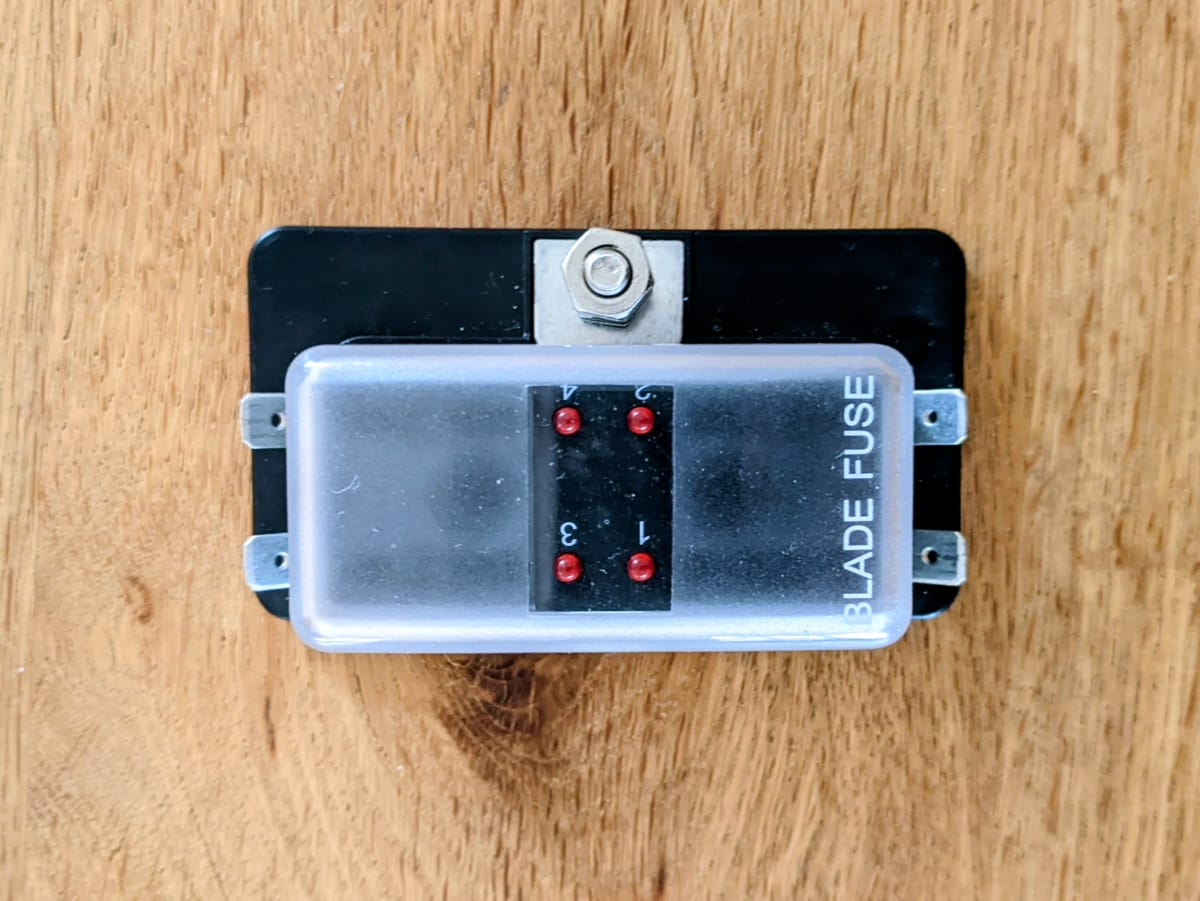
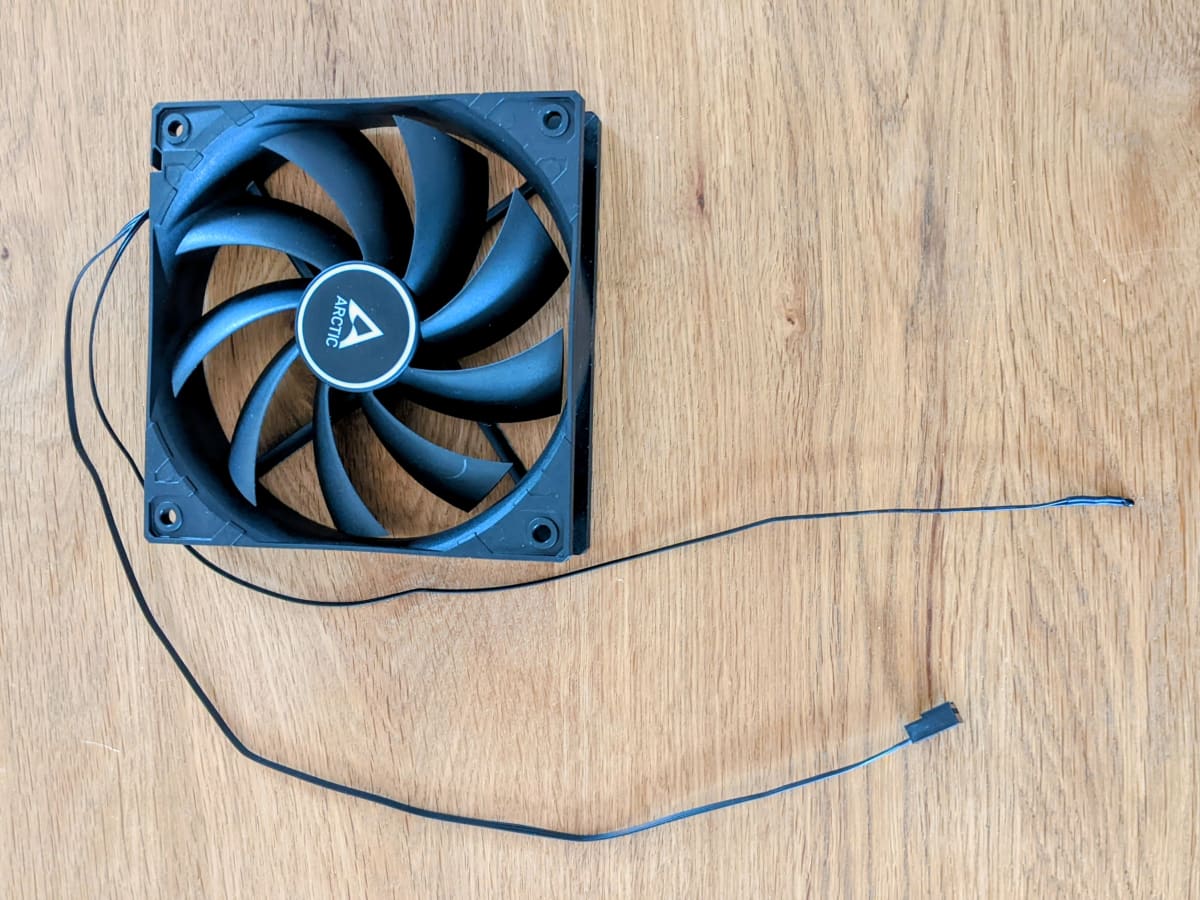
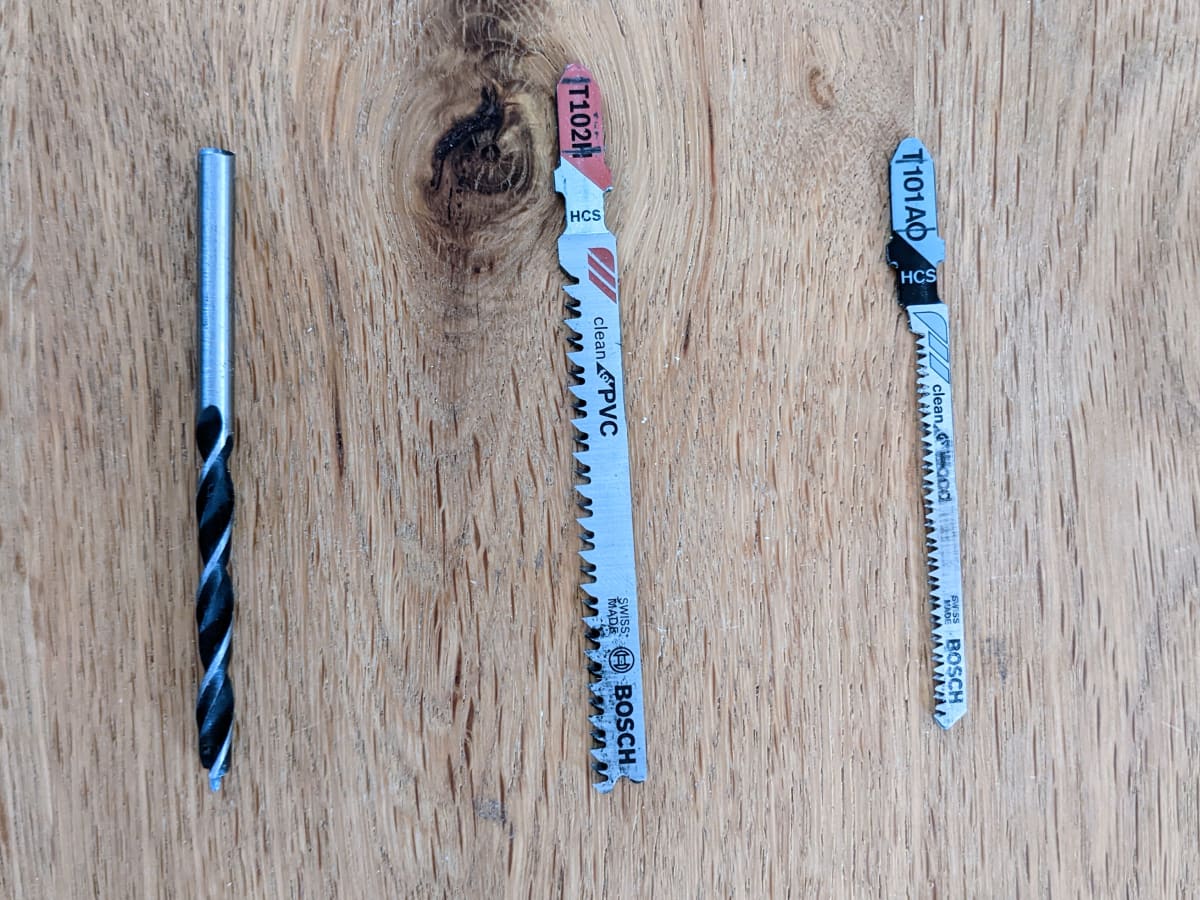
Victron MPPT solar charge controller 75/10.Eco Worthy LiFePO4 battery 12.8 V / 30 Ah.Fuse holder with 4 fuses for the 12 V outputs and the solar input.12 V fan for cooling the battery box during operation.Silverstone fan grilles as covers for the ventilation openings.Anderson connector for hooking up the solar panel.USB socket (A and C) for charging devices directly from the battery box.12 V socket for powering the cooler and other consumers.Illuminated toggle switches for controlling the individual circuits.Drill bits and saw blades used for the cutouts in the Eurobox.
And here is an overview of all the components and tools used:
Component
approx. price
LiFePO4 battery 30 Ah
~80 €
MPPT solar charge controller
~45 €
Eurobox 40 x 30 x 18.5 cm
~15 €
Fuse holder
~8 €
Buck converter
~5 €
120 mm fan with temperature sensor
~10 €
Fan grilles (2x)
~5 €
Anderson connector
~5 €
12 V panel-mount socket
~8 €
USB panel-mount socket (A + C)
~10 €
Illuminated toggle switches (3x)
~10 €
Fuses, cables, crimp terminals
~15 €
Craft plywood
~5 €
Screws, nuts, small parts
~5 €
Total (approx.)
~226 €
Tools
Jigsaw
Drill
Forstner bit set
Soldering iron
Wire stripper
Crimping tool
About
Welcome to Minimal Camper! We share our experiences, tips, and favorite spots for minimalist camping and outdoor adventures.
We believe in traveling light, being friendly, leaving no trace, and making the most of every journey.
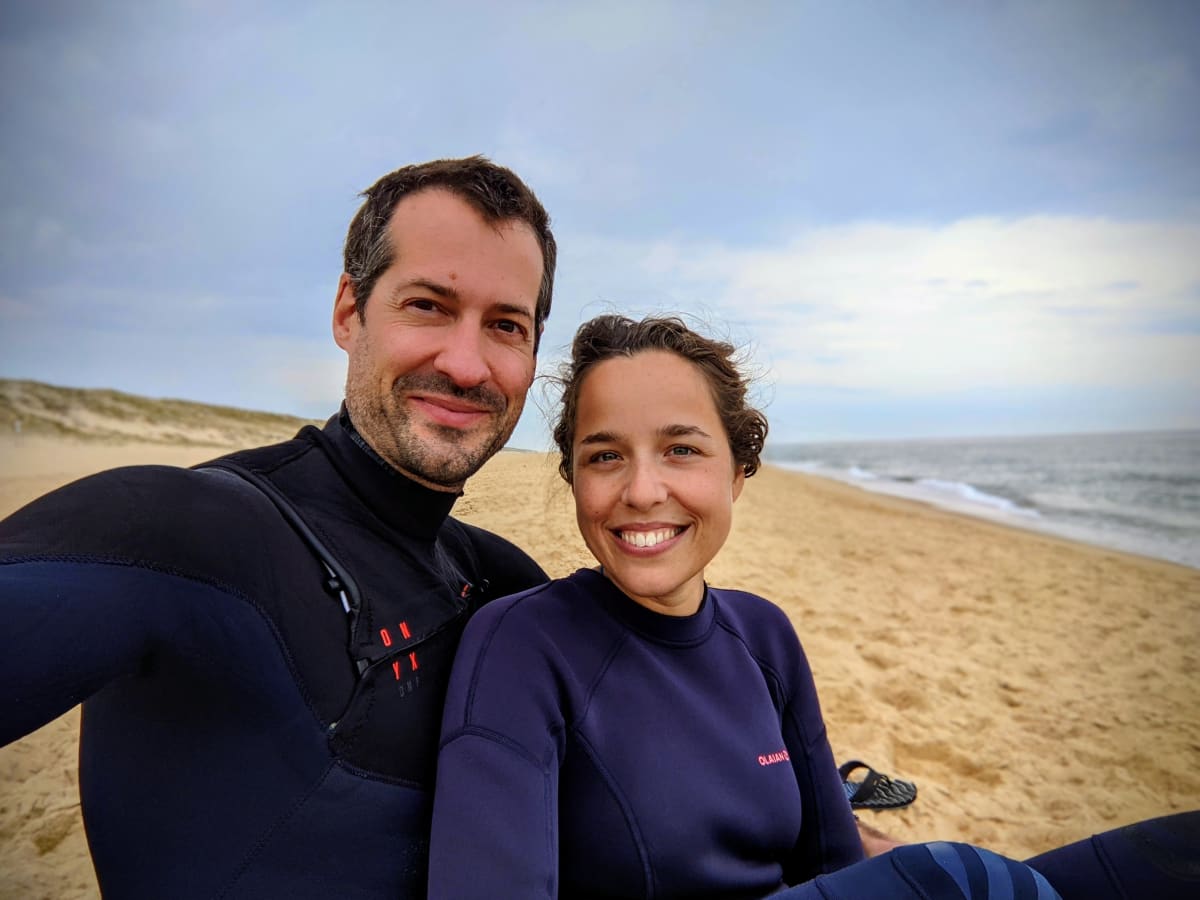
Susi, Fred and Noah.
This is us: Susi, Noah and Fred.
Contact
Have questions, suggestions, or want to get in touch?